Blog
/
Network
/
September 6, 2021

What Are the Early Signs of a Ransomware Attack?

Discover the early signs of ransomware and how to defend against it. Often attack is the best form of defense with cybersecurity. Learn more here!
Inside the SOC
Darktrace cyber analysts are world-class experts in threat intelligence, threat hunting and incident response, and provide 24/7 SOC support to thousands of Darktrace customers around the globe. Inside the SOC is exclusively authored by these experts, providing analysis of cyber incidents and threat trends, based on real-world experience in the field.
Written by
Brianna Leddy
Director of Analyst Operations
Default blog imageDefault blog imageDefault blog imageDefault blog imageDefault blog imageDefault blog image
06
Sep 2021

The deployment of ransomware is the endgame of a cyber-attack. A threat actor must have accomplished several previous steps – including lateral movement and privilege escalation – to reach this final position. The ability to detect and counter the early moves is therefore just as important as detecting the encryption itself.

Attackers are using diverse strategies – such as ‘Living off the Land’ and carefully crafting their command and control (C2) – to blend in with normal network traffic and evade traditional security defenses. The analysis below examines the Tactics, Techniques and Procedures (TTPs) used by many ransomware actors by unpacking a compromise which occurred at a defense contractor in Canada.

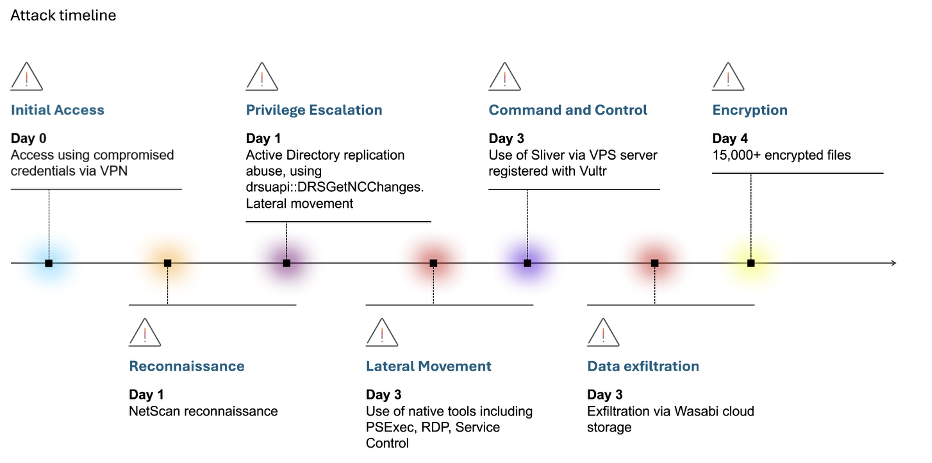
Phases of a ransomware attack

Figure 1: Timeline of the attack.

The opening: Initial access to privileged account

The first indicator of compromise was a login on a server with an unusual credential, followed by unusual admin activity. The attacker may have gained access to the username and password in a number of ways, from credential stuffing to buying them on the Dark Web. As the attacker had privileged access from the get-go, there was no need for privilege escalation.

Lateral movement

Two days later, the attacker began to spread from the initial server. The compromised server began to send out unusual Windows Management Instrumentation (WMI) commands.

It began remotely controlling four other devices – authenticating on them with a single admin credential. One of the destinations was a domain controller (DC), another was a backup server.

By using WMI – a common admin tool – for lateral movement, the attacker opted to ‘live off the land’ rather than introduce a new lateral movement tool, aiming to remain unnoticed by the company’s security stack. The unusual use of WMI was picked up by Darktrace and the timings of the unusual WMI connections were pieced together by Cyber AI Analyst.

Models:

  • New or Uncommon WMI Activity
  • AI Analyst / Extensive Chain of Administrative Connections

Establish C2

The four devices then connected to the IP 185.250.151[.]172. Three of them, including the DC and backup server, established SSL beacons to the IP using the dynamic DNS domain goog1e.ezua[.]com.

The C2 endpoints had very little open-source intelligence (OSINT) available, but it seems that a Cobalt Strike-style script had used the endpoint in the past. This suggests complex tooling, as the attacker used dynamic SSL and spoofed Google to mask their beaconing.

Interestingly, through the entirety of the attack, only these three devices used SSL connections for beaconing, while later C2 occurred over unencrypted protocols. It appears these three critical devices were treated differently to the other infected devices on the network.

Models:

  • Immediate breach of Anomalous External Activity from Critical Network Device, then several model breaches involving beaconing and SSL to dynamic DNS. (Domain Controller DynDNS SSL or HTTP was particularly specific to this activity.)

The middle game: Internal reconnaissance and further lateral movement

The attack chain took the form of two cycles of lateral movement, followed by establishing C2 at the newly controlled destinations.

Figure 2: Observed chain of lateral movement and C2.

So, after establishing C2, the DC made WMI requests to 20 further IPs over an extended period. It also scanned 234 IPs via ICMP pings, presumably in an attempt to find more hosts.

Many of these were eventually found with ransom notes, in particular when the targeted devices were hypervisors. The ransomware was likely deployed with remote commands via WMI.

Models:

  • AI Analyst / Suspicious Chain of Administrative Connections (from the initial server to the DC to the hypervisor)
  • AI Analyst / Extensive Suspicious WMI Activity (from the DC)
  • Device / ICMP Address Scan, Scanning of Multiple Devices AI Analyst incident (from the DC)

Further C2

As the second stage of lateral movement stopped, a second stage of unencrypted C2 was seen from five new devices. Each started with GET requests to the IP seen in the SSL C2 (185.250.151[.]172), which used the spoofed hostname google[.]com.

Activity started on each device with HTTP requests for a URI ending in .png, before a more consistent beaconing to the URI /books/. Eventually, the devices made POST requests to the URI /ebooks/?k= (a unique identifier for each device). All this appears to be a way of concealing a C2 beacon in what looks like plausible traffic to Google.

In this way, by encrypting some C2 connections with SSL to a Dynamic DNS domain, while crafting other unencrypted HTTP to look like traffic to google[.]com, the attacker managed to operate undetected by the company’s antivirus tools.

Darktrace identified this anomalous activity and generated a large number of external connectivity model breaches.

Models:

  • Eight breaches of Compromise / HTTP Beaconing to New Endpoint from the affected devices

Accomplish mission: Checkmate

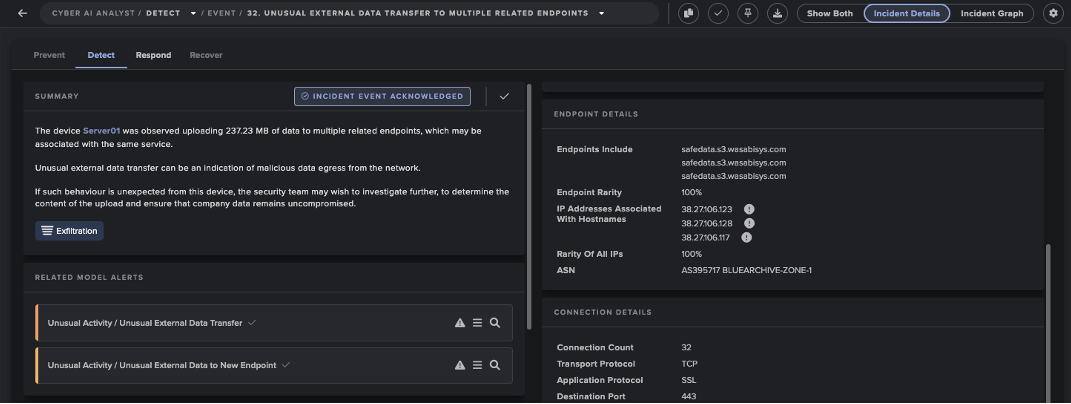
Finally, the attacker deployed ransomware. In the ransom note, they stated that sensitive information had been exfiltrated and would be leaked if the company did not pay.

However, this was a lie. Darktrace confirmed that no data had been exfiltrated, as the C2 communications had sent far too little data. Lying about data exfiltration in order to extort a ransom is a common tactic for attackers, and visibility is crucial to determine whether a threat actor is bluffing.

In addition, Antigena – Darktrace’s Autonomous Response technology – blocked an internal download from one of the servers compromised in the first round of lateral movement, because it was an unusual incoming data volume for the client device. This was most likely the attacker attempting to transfer data in preparation for the end goal, so the block may have prevented this data from being moved for exfiltration.

Figure 3: Antigena model breach.

Figure 4: Device is blocked from SMB communication with the compromised server three seconds later.

Models:

  • Unusual Incoming Data Volume
  • High Volume Server Data Transfer

Unfortunately, Antigena was not active on the majority of the devices involved in the incident. If in active mode, Antigena would have stopped the early stages of this activity, including the unusual administrative logins and beaconing. The customer is now working to fully configure Antigena, so they benefit from 24/7 Autonomous Response.

Cyber AI Analyst investigates

Darktrace’s AI spotted and reported on beaconing from several devices including the DC, which was the highest scoring device for unusual behavior at the time of the activity. It condensed this information into three incidents – ‘Possible SSL Command and Control’, ‘Extensive Suspicious Remote WMI Activity’, and ‘Scanning of Remote Devices’.

Crucially, Cyber AI Analyst not only summarized the admin activity from the DC but also linked it back to the first device through an unusual chain of administrative connections.

Figure 5: Cyber AI Analyst incident showing a suspicious chain of administrative connections linking the first device in the chain of connections to a hypervisor where a ransom note was found via the compromised DC, saving valuable time in the investigation. It also highlights the credential common to all of the lateral movement connections.

Finding lateral movement chains manually is a laborious process well suited to AI. In this case, it enabled the security team to quickly trace back to the device which was the likely source of the attack and find the common credential in the connections.

Play the game like a machine

To get the full picture of a ransomware attack, it is important to look beyond the final encryption to previous phases of the kill chain. In the attack above, the encryption itself did not generate network traffic, so detecting the intrusion at its early stages was vital.

Despite the attacker ‘Living off the Land’ and using WMI with a compromised admin credential, as well as spoofing the common hostname google[.]com for C2 and applying dynamic DNS for SSL connections, Darktrace was able to identify all the stages of the attack and immediately piece them together into a meaningful security narrative. This would have been almost impossible for a human analyst to achieve without labor-intensive checking of the timings of individual connections.

With ransomware infections becoming faster and more frequent, with the threat of offensive AI looming closer and the Dark Web marketplace thriving, with security teams drowning under false positives and no time left on the clock, AI is now an essential part of any security solution. The board is set, the time is ticking, the stakes are higher than ever. Your move.

Thanks to Darktrace analyst Daniel Gentle for his insights on the above threat find.

IoCs:

IoCComment185.250.151[.]172IP address used for both HTTP and SSL C2goog1e.ezua[.]comDynamic DNS Hostname used for SSL C2

Darktrace model detections:

  • AI Analyst models:
  • Extensive Suspicious WMI Activity
  • Suspicious Chain of Administrative Connections
  • Scanning of Multiple Devices
  • Possible SSL Command and Control
  • Meta model:
  • Device / Large Number of model breaches
  • External connectivity models:
  • Anonymous Server Activity / Domain Controller DynDNS SSL or HTTP
  • Compromise / Suspicious TLS Beaconing to Rare External
  • Compromise / Beaconing Activity To External Rare
  • Compromise / SSL to DynDNS
  • Anomalous Server Activity / External Activity from Critical Network Device
  • Compromise / Sustained SSL or HTTP Increase
  • Compromise / Suspicious Beaconing Behaviour
  • Compromise / HTTP Beaconing to New Endpoint
  • Internal activity models:
  • Device / New or Uncommon WMI Activity
  • User / New Admin Credentials on Client
  • Device / ICMP Address Scan
  • Anomalous Connection / Unusual Incoming Data Volume
  • Unusual Activity / High Volume Server Data Transfer

Inside the SOC
Darktrace cyber analysts are world-class experts in threat intelligence, threat hunting and incident response, and provide 24/7 SOC support to thousands of Darktrace customers around the globe. Inside the SOC is exclusively authored by these experts, providing analysis of cyber incidents and threat trends, based on real-world experience in the field.
Written by
Brianna Leddy
Director of Analyst Operations

More in this series

No items found.

Blog

/

Email

/

May 29, 2025

Why attack-centric approaches to email security can’t cope with modern threats

Default blog imageDefault blog image

What’s the problem with an attack-centric mindset?

For decades, traditional email security strategies have been built around an attack-centric mindset. Secure Email Gateways (SEGs) and other legacy solutions operate on the principle of identifying and blocking known threats. These systems rely heavily on predefined threat intelligence – blacklists, malware signatures, and reputation-based analysis – to filter out malicious content before it reaches the inbox.

While this approach was sufficient when email threats were relatively static and signature-based, it’s increasingly ineffective against the sophistication of modern attacks. Techniques like spear phishing, business email compromise (BEC), and supply chain attacks often bypass traditional SEG defenses because they lack obvious malicious indicators. Instead, they leverage social engineering, look-alike domains, and finely tuned spoofing tactics that are designed to evade detection.

The challenge extends beyond just legacy SEGs. Many modern email security providers have inherited the same attack-centric principles, even if they've reimagined the technology stack. While some vendors have shifted to API-based deployments and incorporated AI to automate pattern recognition, the underlying approach remains the same: hunting for threats based on known indicators. This methodology, though it’s undergone modernization using AI, still leaves gaps when it comes to novel, hyper-targeted threats that manipulate user behavior rather than deploy predictable malicious signatures. Attack-centric security will always remain one step behind the attacker.

By the way, native email security already covers the basics

One of the most overlooked realities in email security is that native solutions like Microsoft 365’s built-in security already handle much of the foundational work of attack-centric protection. Through advanced threat intelligence, anti-phishing measures, and malware detection, Microsoft 365 actively scans incoming emails for known threats, using global telemetry to identify patterns and block suspicious content before it even reaches the user’s inbox.

This means that for many organizations, a baseline level of protection against more obvious, signature-based attacks is already in place – but many are still disabling these protections in favour of another attack-centric solution. By layering another attack-centric solution on top, they are effectively duplicating efforts without enhancing their security posture. This overlap can lead to unnecessary complexity, higher costs, and a false sense of enhanced protection when in reality, it’s more of the same.

Rather than duplicating attack-centric protections, the real opportunity lies in addressing the gaps that remain: the threats that are specifically crafted to evade traditional detection methods. This is where a business-centric approach becomes indispensable, complementing the foundational security that’s already built into your infrastructure.

Introducing… the business-centric approach

To effectively defend against advanced threats, organizations need to adopt a business-centric approach to email security. Unlike attack-centric models that hunt for known threats, business-centric security focuses on understanding the typical behaviors, relationships, and communication patterns within your organization. Rather than solely reacting to threats as they are identified, this model continuously learns what “normal” looks like for each user and each inbox.

By establishing a baseline of expected behaviors, business-centric solutions can rapidly detect anomalies that suggest compromise, such as sudden changes in sending patterns, unusual login locations, or subtle shifts in communication tone. This proactive detection method is especially powerful against spear phishing, business email compromise (BEC), and supply chain attacks that are engineered to bypass static defenses. This approach also scales with your organization, learning and adapting as new users are onboarded, communication patterns evolve, and external partners are added.

In an era where AI-driven threats are becoming the norm, having email security that knows your users and inboxes better than the attacker does is a critical advantage.

Why native + business-centric email security is the winning formula

By pairing native security with a business-centric model, organizations can cover the full spectrum of threats – from signature-based malware to sophisticated, socially engineered attacks. Microsoft 365’s in-built security manages the foundational risks, while business-centric defense identifies subtle anomalies and targeted threats that legacy approaches miss.

Layering Darktrace on top of your native Microsoft security eliminates duplicate capabilities, costs and workflows without reducing functionality

Rather than layering redundant attack-centric solutions on top of existing protections, the future of email security lies in leveraging what’s already in place and building on it with smarter, behavior-based detection. The Swiss Cheese Model is a useful one to refer to here: by acknowledging that no single defense can offer complete protection, layering defenses that plug each other’s gaps – like slices of Swiss cheese – becomes critical.

This combination also allows security teams to focus their efforts more effectively. With native solutions catching broad-based, known threats, the business-centric layer can prioritize real anomalies, minimizing false positives and accelerating response times. Organizations benefit from reduced overlap, streamlined costs, and a stronger overall security posture.

Download the full guide to take the first step towards achieving your next-generation security stack.

[related-resource]

Continue reading
About the author
Carlos Gray
Senior Product Marketing Manager, Email

Blog

/

Network

/

May 30, 2025

PumaBot: Novel Botnet Targeting IoT Surveillance Devices

password login screen on computerDefault blog imageDefault blog image

Introduction: PumaBot attacking IoT devices

Darktrace researchers have identified a custom Go-based Linux botnet named “PumaBot” targeting embedded Linux Internet of Things (IoT) devices. Rather than scanning the Internet, the malware retrieves a list of targets from a command-and-control (C2) server and attempts to brute-force SSH credentials. Upon gaining access, it receives remote commands and establishes persistence using system service files. This blog post provides a breakdown of its key functionalities, and explores binaries related to the campaign.

Technical Analysis

Filename: jierui

md5: cab6f908f4dedcdaedcdd07fdc0a8e38

The Go-based botnet gains initial access through brute-forcing SSH credentials across a list of harvested IP addresses. Once it identifies a valid credential pair, it logs in, deploys itself, and begins its replication process.

Overview of Jierui functions
Figure 1: Overview of Jierui functions.

The domain associated with the C2 server did not resolve to an IP address at the time of analysis. The following details are a result of static analysis of the malware.

The malware begins by retrieving a list of IP addresses of likely devices with open SSH ports from the C2 server (ssh.ddos-cc[.]org) via the getIPs() function. It then performs brute-force login attempts on port 22 using credential pairs also obtained from the C2 through the readLinesFromURL(), brute(), and trySSHLogin() functions.

Within trySSHLogin(), the malware performs several environment fingerprinting checks. These are used to avoid honeypots and unsuitable execution environments, such as restricted shells. Notably, the malware checks for the presence of the string “Pumatronix”, a manufacturer of surveillance and traffic camera systems, suggesting potential IoT targeting or an effort to evade specific devices [1].

Fingerprinting of “Pumatronix”.
Figure 2: Fingerprinting of “Pumatronix”.

If the environment passes these checks, the malware executes uname -a to collect basic system information, including the OS name, kernel version, and architecture. This data, along with the victim's IP address, port, username, and password, is then reported back to the C2 in a JSON payload.

Of note, the bot uses X-API-KEY: jieruidashabi, within a custom header when it communicates with the C2 server over HTTP.

The malware writes itself to /lib/redis, attempting to disguise itself as a legitimate Redis system file. It then creates a persistent systemd service in /etc/systemd/system, named either redis.service or mysqI.service (note the spelling of mysql with a capital I) depending on what has been hardcoded into the malware. This allows the malware to persist across reboots while appearing benign.

[Unit]
Description=redis Server Service

[Service]
Type=simple
Restart=always
RestartSec=1
User=root
ExecStart=/lib/redis e

[Install]
WantedBy=multi-user.target

In addition to gaining persistence with a systemd service, the malware also adds its own SSH keys into the users’ authorized_keys file. This ensures that access can be maintained, even if the service is removed.

A function named cleankill() contains an infinite loop that repeatedly attempts to execute the commands “xmrig” and “networkxm”. These are launched without full paths, relying on the system's PATH variable suggesting that the binaries may be downloaded or unpacked elsewhere on the system. The use of “time.Sleep” between attempts indicates this loop is designed to ensure persistence and possibly restart mining components if they are killed or missing.

During analysis of the botnet, Darktrace discovered related binaries that appear to be part of a wider campaign targeting Linux systems.

Filename: ddaemon
Md5: 48ee40c40fa320d5d5f8fc0359aa96f3

Ddaemon is a Go-based backdoor. The malware begins by parsing command line arguments and if conditions are met, enters a loop where it periodically verifies the MD5 hash of the binary. If the check fails or an update is available, it downloads a new version from a C2 server (db.17kp[.]xyz/getDdaemonMd5), verifies it and replaces the existing binary with a file of the same name and similar functionality (8b37d3a479d1921580981f325f13780c).

The malware uses main_downloadNetwork() to retrieve the binary “networkxm” into /usr/src/bao/networkxm. Additionally, the bash script “installx.sh” is also retrieved from the C2 and executed. The binary ensures persistence by writing a custom systemd service unit that auto starts on boot and executes ddaemon.

Filename: networkxm
Md5: be83729e943d8d0a35665f55358bdf88

The networkxm binary functions as an SSH brute-force tool, similar to the botnet. First it checks its own integrity using MD5 hashes and contacts the C2 server (db.17kp[.]xyz) to compare its hash with the latest version. If an update is found, it downloads and replaces itself.

Part of networkxm checking MD5 hash.
Figure 3: Part of networkxm checking MD5 hash.
MD5 hash
Figure 4: MD5 hash

After verifying its validity, it enters an infinite loop where it fetches a password list from the C2 (/getPassword), then attempts SSH connections across a list of target IPs from the /getIP endpoint. As with the other observed binaries, a systemd service is created if it doesn’t already exist for persistence in /etc/systemd/system/networkxm.service.

Bash script installx.sh.
Figure 5: Bash script installx.sh.

Installx.sh is a simple bash script used to retrieve the script “jc.sh” from 1.lusyn[.]xyz, set permissions, execute and clear bash history.

Figure 6: Snippet of bash script jc.sh.

The script jc.sh starts by detecting the operating system type Debian-based or Red Hat-based and determines the location of the pam_unix.so file. Linux Pluggable Authentication Modules (PAM) is a framework that allows for flexible and centralized user authentication on Linux systems. PAM allows system administrators to configure how users are authenticated for services like login, SSH, or sudo by plugging in various authentication modules.

Jc.sh then attempts to fetch the current version of PAM installed on the system and formats that version to construct a URL. Using either curl or wget, the script downloads a replacement pam_unix.so file from a remote server and replaces the existing one, after disabling file immutability and backing up the original.

The script also downloads and executes an additional binary named “1” from the same remote server. Security settings are modified including enabling PAM in the SSH configuration and disabling SELinux enforcement, before restarting the SSH service. Finally, the script removes itself from the system.

Filename: Pam_unix.so_v131
md5: 1bd6bcd480463b6137179bc703f49545

Based on the PAM version that is retrieved from the bash query, the new malicious PAM replaces the existing PAM file. In this instance, pam_unix.so_v131 was retrieved from the server based on version 1.3.1. The purpose of this binary is to act as a rootkit that steals credentials by intercepting successful logins. Login data can include all accounts authenticated by PAM, local and remote (SSH). The malware retrieves the logged in user, the password and verifies that the password is valid. The details are stored in a file “con.txt” in /usr/bin/.

Function storing logins to con.txt
Figure 7: Function storing logins to con.txt

Filename: 1

md5: cb4011921894195bcffcdf4edce97135

In addition to the malicious PAM file, a binary named “1” is also retrieved from the server http://dasfsdfsdfsdfasfgbczxxc[.]lusyn[.]xyz/jc/1. The binary “1” is used as a watcher for the malicious PAM file using inotify to monitor for “con.txt” being written or moved to /usr/bin/.

Following the daemonize() function, the binary is run daemonized ensuring it runs silently in the background. The function read_and_send_files() is called which reads the contents of “/usr/bin/con.txt”, queries the system IP with ifconfig.me, queries SSH ports and sends the data to the remote C2 (http://dasfsdfsdfsdfasfgbczxxc[.]lusyn[.]xyz/api/).

Command querying SSH ports.
Figure 8: Command querying SSH ports.

For persistence, a systemd service (my_daemon.service) is created to autostart the binary and ensure it restarts if the service has been terminated. Finally, con.txt is deleted, presumably to remove traces of the malware.

Conclusion

The botnet represents a persistent Go-based SSH threat that leverages automation, credential brute-forcing, and native Linux tools to gain and maintain control over compromised systems. By mimicking legitimate binaries (e.g., Redis), abusing systemd for persistence, and embedding fingerprinting logic to avoid detection in honeypots or restricted environments, it demonstrates an intent to evade defenses.

While it does not appear to propagate automatically like a traditional worm, it does maintain worm-like behavior by brute-forcing targets, suggesting a semi-automated botnet campaign focused on device compromise and long-term access.

[related-resource]

Recommendations

  1. Monitor for anomalous SSH login activity, especially failed login attempts across a wide IP range, which may indicate brute-force attempts.
  2. Audit systemd services regularly. Look for suspicious entries in /etc/systemd/system/ (e.g., misspelled or duplicate services like mysqI.service) and binaries placed in non-standard locations such as /lib/redis.
  3. Inspect authorized_keys files across user accounts for unknown SSH keys that may enable unauthorized access.
  4. Filter or alert on outbound HTTP requests with non-standard headers, such as X-API-KEY: jieruidashabi, which may indicate botnet C2 communication.
  5. Apply strict firewall rules to limit SSH exposure rather than exposing port 22 to the internet.

Appendices

References

1.     https://pumatronix.com/

Indicators of Compromise (IoCs)

Hashes

cab6f908f4dedcdaedcdd07fdc0a8e38 - jierui

a9412371dc9247aa50ab3a9425b3e8ba - bao

0e455e06315b9184d2e64dd220491f7e - networkxm

cb4011921894195bcffcdf4edce97135 - 1
48ee40c40fa320d5d5f8fc0359aa96f3 - ddaemon
1bd6bcd480463b6137179bc703f49545 - pam_unix.so_v131

RSA Key

ssh-rsa AAAAB3NzaC1yc2EAAAADAQABAAABAQC0tH30Li6Gduh0Jq5A5dO5rkWTsQlFttoWzPFnGnuGmuF+fwIfYvQN1z+WymKQmX0ogZdy/CEkki3swrkq29K/xsyQQclNm8+xgI8BJdEgTVDHqcvDyJv5D97cU7Bg1OL5ZsGLBwPjTo9huPE8TAkxCwOGBvWIKUE3SLZW3ap4ciR9m4ueQc7EmijPHy5qds/Fls+XN8uZWuz1e7mzTs0Pv1x2CtjWMR/NF7lQhdi4ek4ZAzj9t/2aRvLuNFlH+BQx+1kw+xzf2q74oBlGEoWVZP55bBicQ8tbBKSN03CZ/QF+JU81Ifb9hy2irBxZOkyLN20oSmWaMJIpBIsh4Pe9 @root

Network

http://ssh[.]ddos-cc.org:55554

http://ssh[.]ddos-cc.org:55554/log_success

http://ssh[.]ddos-cc.org:55554/get_cmd

http://ssh[.]ddos-cc.org:55554/pwd.txt

https://dow[.]17kp.xyz/

https://input[.]17kp.xyz/

https://db[.]17kp[.]xyz/

http://1[.]lusyn[.]xyz

http://1[.]lusyn[.]xyz/jc/1

http://1[.]lusyn[.]xyz/jc/jc.sh

http://1[.]lusyn[.]xyz/jc/aa

http://1[.]lusyn[.]xyz/jc/cs

http://dasfsdfsdfsdfasfgbczxxc[.]lusyn[.]xyz/api

http://dasfsdfsdfsdfasfgbczxxc[.]lusyn[.]xyz/jc

Detection Rule

rule Linux_PumaBot

{

  meta:

      description = "Rule to match on PumaBot samples"

      author = "tgould@cadosecurity.com"

  strings:

      $xapikey = "X-API-KEY" ascii

      $get_ips = "?count=5000" ascii

      $exec_start = "ExecStart=/lib/redis" ascii

      $svc_name1 = "redis.service" ascii

      $svc_name2 = "mysqI.service" ascii

      $uname = "uname -a" ascii

      $pumatronix = "Pumatronix" ascii

  condition:

      uint32(0) == 0x464c457f and

      all of (

          $xapikey,

          $uname,

          $get_ips,

          $exec_start

      ) and any of (

          $svc_name1,

          $svc_name2

      ) and $pumatronix

}

Continue reading
About the author
Tara Gould
Threat Researcher
Your data. Our AI.
Elevate your network security with Darktrace AI