Darktrace cyber analysts are world-class experts in threat intelligence, threat hunting and incident response, and provide 24/7 SOC support to thousands of Darktrace customers around the globe. Inside the SOC is exclusively authored by these experts, providing analysis of cyber incidents and threat trends, based on real-world experience in the field.
Written by
Kendra Gonzalez Duran
Principal Analyst
Share
22
Feb 2024
What is VIP impersonation?
VIP impersonation involves a threat actor impersonating a trusted, prominent figure at an organization in an attempt to solicit sensitive information from an employee.
VIP impersonation is a high-priority issue for security teams, but it can be difficult to assess the exact risks, and whether those are more critical than other types of compromise. Looking across a range of Darktrace/Email™ customer deployments, this blog explores the patterns of individuals targeted for impersonation and evaluates if these target priorities correspond with security teams' focus on protecting attack pathways to critical assets.
How do security teams stop VIP Impersonation?
Protecting VIP entities within an organization has long been a traditional focus for security teams. The assumption is that VIPs, due to their prominence, possess the greatest access to critical assets, making them prime targets for cyber threats.
Email remains the predominant vector for attacks, with over 90% of breaches originating from malicious emails. However, the dynamics of email-based attacks are shifting, as the widespread use of generative AI is lowering the barrier to entry by allowing adversaries to create hyper-realistic emails with minimal errors.
Given these developments, it's worth asking the question – which entities (VIP/non-VIP) are most targeted by threat actors via email? And, more importantly – which entities (VIP/non-VIP) are more valuable if they are successfully compromised?
There are two types of VIPs:
1. When referring to emails and phishing, VIPs are the users in an organization who are well known publicly.
2. When referring to attack paths, VIPs are users in an organization that are known publicly and have access to highly privileged assets.
Not every prominent user has access to critical assets, and not every user that has access to critical assets is prominent.
Darktrace analysis of VIP impersonation
We analyzed patterns of attack pathways and phishing attempts across 20 customer deployments from a large, randomized pool encompassing a diverse range of organizations.
Understanding Attack Pathways
Our observations revealed that 57% of low-difficulty attack paths originated from VIP entities, while 43% of observed low-difficulty attack paths towards critical assets or entities began through non-VIP users. This means that targeting VIPs is not the only way attackers can reach critical assets, and that non-VIP users must be considered as well.
While the sample size prevents us from establishing statistical significance across all customers, the randomized selection lends credence to the generalizability of these findings to other environments.
Phishing Attempts
On average, 1.35% of total emails sent to these customers exhibited significantly malicious properties associated with phishing or some form of impersonation. Strikingly, nearly half of these malicious emails (49.6%) were directed towards VIPs, while the rest were sent to non-VIPs. This near-equal split is worth noting, as attack paths show that non-VIPs also serve as potential entry points for targeting critical assets.
Figure 1: A phishing email actioned by Darktrace, sent to multiple VIP and non-VIP entities
For example, a recent phishing campaign targeted multiple customers across deployments, with five out of 13 emails specifically aimed at VIP users. Darktrace/Email actioned the malicious emails by double locking the links, holding the messages, and stripping the attachments.
Given that non-VIP users receive nearly half of the phishing or impersonation emails, it underscores the critical importance for security teams to recognize their blind spots in protecting critical assets. Overlooking the potential threat originating from non-VIP entities could lead to severe consequences. For instance, if a non-VIP user falls victim to a phishing attack or gets compromised, their credentials could be exploited to move laterally within the organization, potentially reaching critical assets.
This highlights the necessity for a sophisticated security tool that can identify targeted users, without the need for extensive customization and regardless of VIP status. By deploying a solution capable of promptly responding to email threats – including solicitation, phishing attempts, and impersonation – regardless of the status of the targeted user, security teams can significantly enhance their defense postures.
Darktrace vs Traditional Email Detection Methods
Traditional rules and signatures-based detection mechanisms fall short in identifying the evolving threats we’ve observed, due to their reliance on knowledge of past attacks to categorize emails.
Secure Email Gateway (SEG) or Integrated Cloud Email Security (ICES) tools categorize emails based on previous or known attacks, operating on a known-good or known-bad model. Even if tools use AI to automate this process, the approach is still fundamentally looking to the past and therefore vulnerable to unknown and zero-day threats.
Darktrace uses AI to understand each unique organization and how its email environment interoperates with each user and device on the network. Consequently, it is able to identify the subtle deviations from normal behavior that qualify as suspicious. This approach goes beyond simplistic categorizations, considering factors such as the sender’s history and recipient’s exposure score.
This nuanced analysis enables Darktrace to differentiate between genuine communications and malicious impersonation attempts. It automatically understands who is a VIP, without the need for manual input, and will action more strongly on incoming malicious emails based on a user’s status.
Email does determine who is a VIP, without a need of manual input, and will action more strongly on incoming malicious emails.
Darktrace/Email also feeds into Darktrace’s preventative security tools, giving the interconnected AI engines further context for assessing the high-value targets and pathways to vital internal systems and assets that start via the inbox.
Leveraging AI for Enhanced Protection Across the Enterprise
The efficacy of AI-driven security solutions lies in their ability to make informed decisions and recommendations based on real-time business data. By leveraging this data, AI driven solutions can identify exploitable attack pathways and an organizations most critical assets. Darktrace uniquely uses several forms of AI to equip security teams with the insights needed to make informed decisions about which pathways to secure, reducing human bias around the importance of protecting VIPs.
With the emergence of tools like AutoGPT, identifying potential targets for phishing attacks has become increasingly simplified. However, the real challenge lies in gaining a comprehensive understanding of all possible and low-difficulty attack paths leading to critical assets and identities within the organization.
At the same time, organizations need email tools that can leverage the understanding of users to prevent email threats from succeeding in the first instance. For every email and user, Darktrace/Email takes into consideration changes in behavior from the sender, recipient, content, and language, and many other factors.
Integrating Darktrace/Email with Darktrace’s attack path modeling capabilities enables comprehensive threat contextualization and facilitates a deeper understanding of attack pathways. This holistic approach ensures that all potential vulnerabilities, irrespective of the user's status, are addressed, strengthening the overall security posture.
Conclusion
Contrary to conventional wisdom, our analysis suggests that the distinction between VIPs and non-VIPs in terms of susceptibility to impersonation and low-difficulty attack paths is not as pronounced as presumed. Therefore, security teams must adopt a proactive stance in safeguarding all pathways, rather than solely focusing on VIPs.
Attack path modeling enhances Darktrace/Email's capabilities by providing crucial metrics on potential impact, damage, exposure, and weakness, enabling more targeted and effective threat mitigation strategies. For example, stronger email actions can be enforced for users who are known to have a high potential impact in case of compromise.
In an era where cyber threats continue to evolve in complexity, an adaptive and non-siloed approach to securing inboxes, high-priority individuals, and critical assets is indispensable.
Darktrace cyber analysts are world-class experts in threat intelligence, threat hunting and incident response, and provide 24/7 SOC support to thousands of Darktrace customers around the globe. Inside the SOC is exclusively authored by these experts, providing analysis of cyber incidents and threat trends, based on real-world experience in the field.
From VPS to Phishing: How Darktrace Uncovered SaaS Hijacks through Virtual Infrastructure Abuse
Darktrace identified coordinated SaaS account compromises across multiple customer environments. The incidents involved suspicious logins from VPS-linked infrastructure followed by unauthorized inbox rule creation and deletion of phishing-related emails. These consistent behaviors across devices point to a targeted phishing campaign leveraging virtual infrastructure for access and concealment. Discover how Darktrace uncovered this activity and what it means for the future of SaaS security.
Defending the Cloud: Stopping Cyber Threats in Azure and AWS with Darktrace
This blog examines three real-world cloud-based attacks in Azure and AWS environments, including credential compromise, data exfiltration, and ransomware detonation. Learn how Darktrace’s AI-driven threat detection and Autonomous Response capabilities help organizations defend against evolving threats in complex cloud environments.
Top Eight Threats to SaaS Security and How to Combat Them
SaaS security requires new methods to keep up with evolving threats and business infrastructure. In this blog, learn the top eight threats to identity security and how AI-based solutions can help.
Hiding in Plain Sight: Uncovering a Multi-Stage Ransomware Attack Through Behavioral Detection
Why ransomware has changed
Ransomware attacks have continued to increase globally, with 698 incidents reported in May 2026, representing a 48% rise compared to 472 incidents in May 2025 [1]. At the same time, the ransomware landscape is evolving. Several major ransomware groups, including LockBit [2], have been disrupted by successful joint law enforcement operations, resulting in a shift away from a small number of dominant actors towards a more fragmented and distributed ecosystem. This is increasingly composed of smaller groups who play a specialized role in the attack, such as initial access brokers, affiliates or developers.
As a result, ransomware tactics, techniques, and procedures (TTPs) are becoming more diverse and less predictable. On top of this, adversaries are leveraging native tools and legitimate penetration testing frameworks to evade detection. Anomaly-based detection is therefore critical to identify pre-ransomware activity, rather than relying on signatures associated with a handful of well-known ransomware groups.
As these attacks often unfold over several days, there is a critical window for defenders to act. In this context, behavioral-based detection plays a vital role in identifying suspicious pre-ransomware activity, and enabling early intervention before encryption or exfiltration occurs.
Inside a modern ransomware intrusion
In early 2026, Darktrace detected activity within a customer’s environment related to a multi-stage ransomware intrusion from the initial compromise. This activity does not appear to be attributable to a specific ransomware group, and no known ransomware payload was observed until the final stage.
The attack aligns with a broader industry trend in which compromised virtual private network (VPN) credentials are used as an entry point, followed by rapid internal reconnaissance and lateral movement using legitimate administrative tools. This growing preference for native tools and legitimate frameworks in cyber-attacks illustrates that it is increasingly unreliable to depend solely on traditional indicators of compromise such as known malware signatures or exploit detection.
The intrusion also involved the use of Sliver, an open-source adversary emulation framework, which is increasingly observed in real-world attacks. Originally designed for penetration testing and red teaming, Sliver has gained traction among threat actors as a stealthier alternative to more heavily signatured frameworks such as Cobalt Strike. As a legitimate framework, its use further complicates detection for security tools that rely on known malicious signatures.
Darktrace’s detection of a ransomware event in a customer’s environment
The initial compromise appears to have occurred via compromised credentials used over the VPN shortly before, or at the onset of the first indicators of suspicious activity. While it remains unclear as to how or when the threat actors gained access to these credentials, the use of initial access brokers (IABs) is a common feature of modern ransomware operations. This suggests that access to the environment may have been established several days or weeks beforehand.
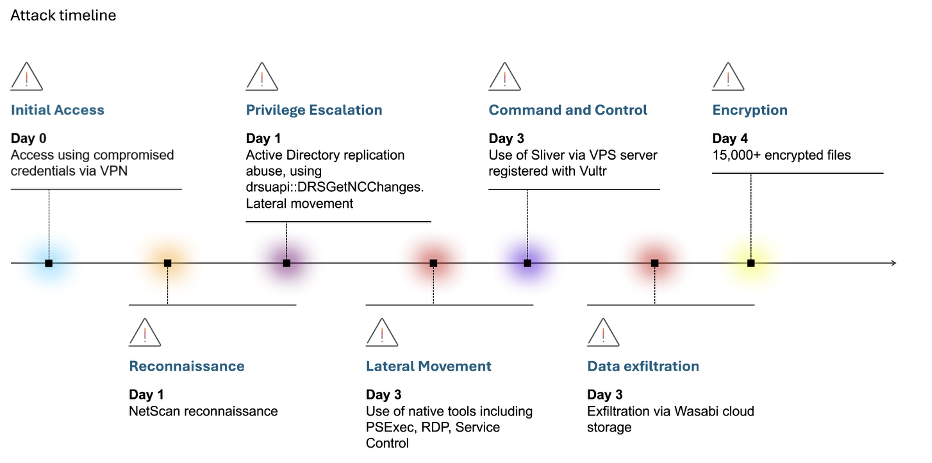
The intrusion unfolded over three days, presenting multiple opportunities for early detection and intervention before ransomware deployment. The attack progressed through a compressed but structured sequence: initial access and reconnaissance were completed within hours, followed by privilege escalation and lateral movement the next day, and culminating in data exfiltration and encryption shortly thereafter. Throughout each stage, distinct behavioral anomalies emerged across the network providing clear indicators of malicious activity well before the ransomware was deployed.
While Darktrace’s Autonomous Response capability was enabled within the customer’s environment, it was not fully configured across the impacted devices, allowing the attack to progress to ransomware deployment. Had Autonomous Response been fully deployed across the affected systems, it could have taken targeted action against the earliest stages of malicious activity, potentially disrupting the intrusion before it escalated.
Figure 1: Timeline of the attack progression.
Day 1: Reconnaissance and privilege escalation
The threat actor gained access via compromised VPN credentials and initiated internal reconnaissance. Darktrace detected anomalous scanning behavior, including unusual port scanning activity and widespread network enumeration.
Specifically, Darktrace detected a high volume of east-west scanning activity across a broad range of ports, with TCP connections targeting ports 21, 80, 445, 4899 and 8080. Associated URIs suggested the use of Nmap, a widely used penetration testing tool. This highlights how attackers often leverage legitimate penetration testing tools for malicious reconnaissance, enabling them to blend into normal network activity and evade traditional signature-based detection methods.
Figure 2: Darktrace's detection of a sharp increase in anomalous internal connections, triggering multiple high-severity model alerts associated with reconnaissance activity.
Several devices were observed using administrative credentials to carry out privileged actions in a manner that was highly anomalous for the environment. This activity was accompanied by behavior consistent with SMB authentication scanning, suggesting efforts to identify and access additional systems. As the activity intensified, an increasing number of devices became involved, signalling lateral movement and further spread across the network.
Darktrace also identified privilege escalation through active directory (AD) replication abuse, specifically via the drsuapi::DRSGetNCChanges function. This technique allows an attacker with sufficient privileges to request directory replication data from a domain controller (DC), enabling them to extract credentials, including password hashes, without directly interacting with user accounts. Commonly associated with ‘DCSync’ attacks, this technique is frequently used to obtain highly privileged credentials and enable further escalation within an environment.
Figure 3: Darktrace’s detection of anomalous AD replication activity indicative of privilege escalation.
This activity was seen alongside the use of the now obsolete SMBv1, repeated NTLM authentication attempts using multiple variations of ‘Administrator’ credentials, reverse DNS scanning, and large-scale network scanning. Darktrace observed widespread use of SMBv1 across the customer’s environment, exposing a significant security weakness. As a legacy protocol with well-documented weaknesses, SMBv1 can be exploited to facilitate lateral movement, allowing the attackers to expand their access following initial compromise.
Day 3: Lateral Movement, Command & Control, and Exfiltration
Two days later, the attacker escalated privileges and expanded their foothold using living-off-the-land (LOTL) techniques such as PSExec, WMI, and RDP. Concurrently, Darktrace identified command-and-control (C2)-style communications consistent with the Sliver framework, alongside rare outbound connections to cloud infrastructure indicating potential data exfiltration. The volume and severity of observed activity increased as attack behavior intensified.
The device was observed conducting extensive lateral movement, leveraging LOTL techniques to evade detection. Activity included WMI execution (e.g. ExecQuery), DCE-RPC activity, SMB sessions and file writes, most of which were successful, as well as the deployment of PSEXESVC.exe via ADMIN$ shares and prolonged RDP sessions. Darktrace identified this behavior as highly anomalous for the environment. Such activity is commonly associated with the transfer of attacker tooling, remote command execution, and the establishment of persistent access across compromised systems.
Figure 4: Darktrace’s detection of a spike in RPC binding events indicative of potential lateral movement.
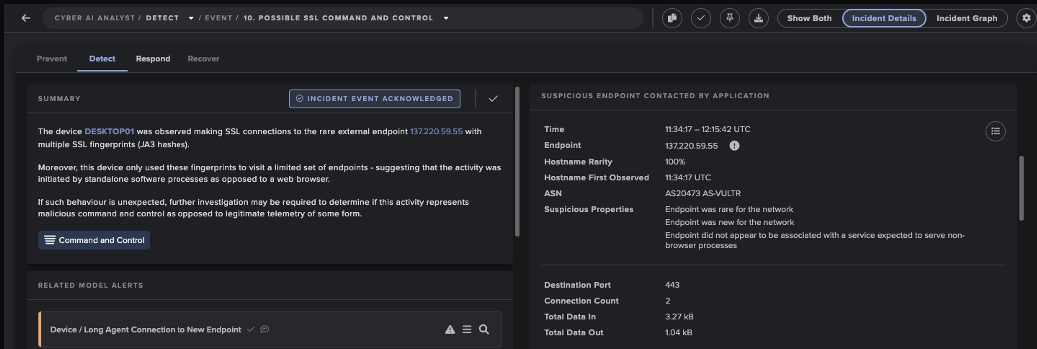
On the same day, Darktrace detected C2-style SSL communications originating from multiple internal devices to rare external endpoints. These connections exhibited anomalous characteristics, including invalid SSL certificates and repeated connection patterns resembling beaconing. Analysis of the observed JA3 fingerprint further linked the activity to Sliver, the adversary simulation framework referenced earlier, as the hash has previously been associated with Sliver-related infrastructure [3]. The use of this framework reflects a broader trend of attackers repurposing legitimate offensive security tools for stealthy C2 communications. Connections to 137[.]220[.]59[.]55 (ASN AS20473 AS-VULTR) indicated that the communications were likely routed via a virtual private server (VPS) hosted by Vultr. Attackers often utilize VPS infrastructure from legitimate cloud providers like Vultr to obscure their true origin, blend into benign traffic, and evade IP-based detection mechanisms [4].
Figure 5: Darktrace’s Cyber AI Analyst detection of two linked unusual connections to Vultr infrastructure.
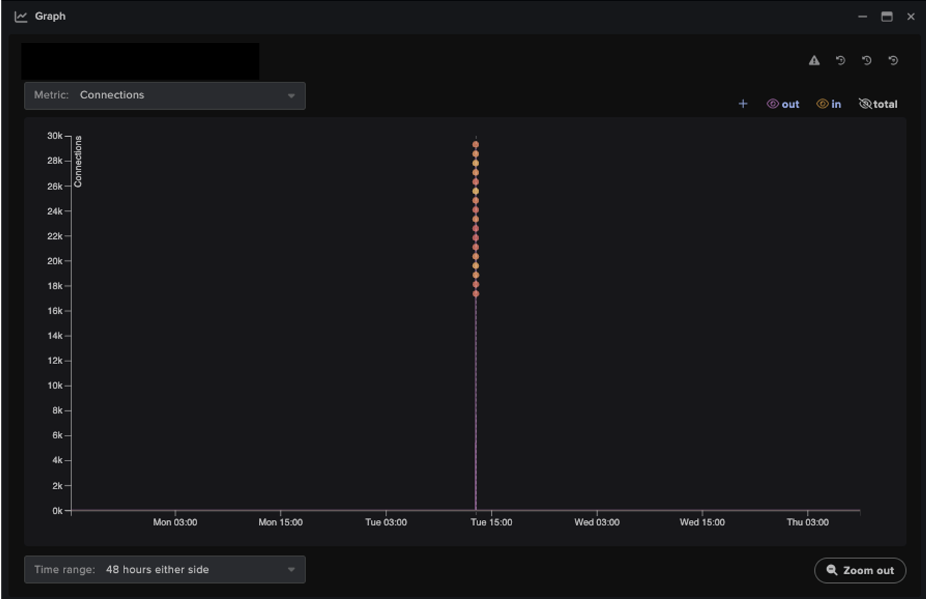
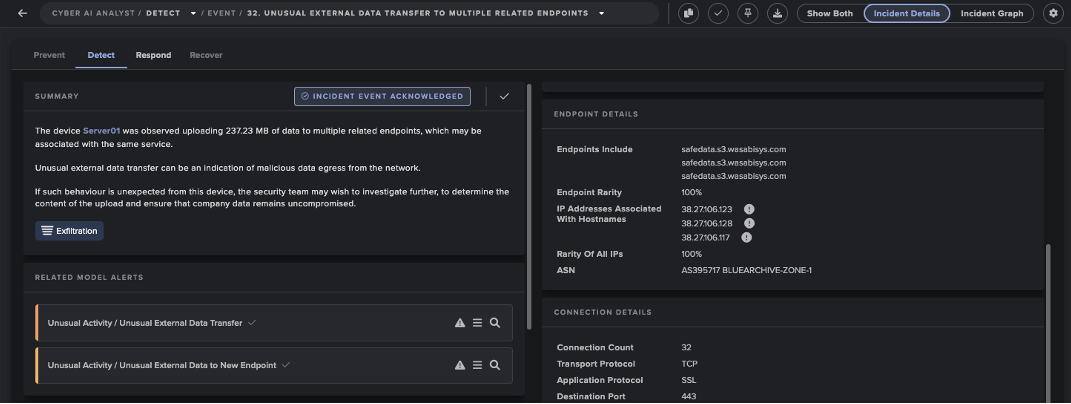
Darktrace also observed a device initiating SSL connections to safedata.s3[.]wasabisys[.]com, an endpoint associated with Wasabi cloud storage. Darktrace recognized that neither the destination nor the associated IP address had previously been observed within the environment. More than 200 MB of data was subsequently uploaded externally to endpoints sharing the same JA3 client hash, indicating a sustained transfer session and potential data exfiltration to third-party storage. The apparent exfiltration prior to encryption is consistent with a double-extortion ransomware strategy.
Figure 6: Darktrace’s Cyber AI Analyst detection of more than 30 rare outbound connections to a Wasabi cloud storage endpoint, indicative of potential data exfiltration
Day 4: Encryption
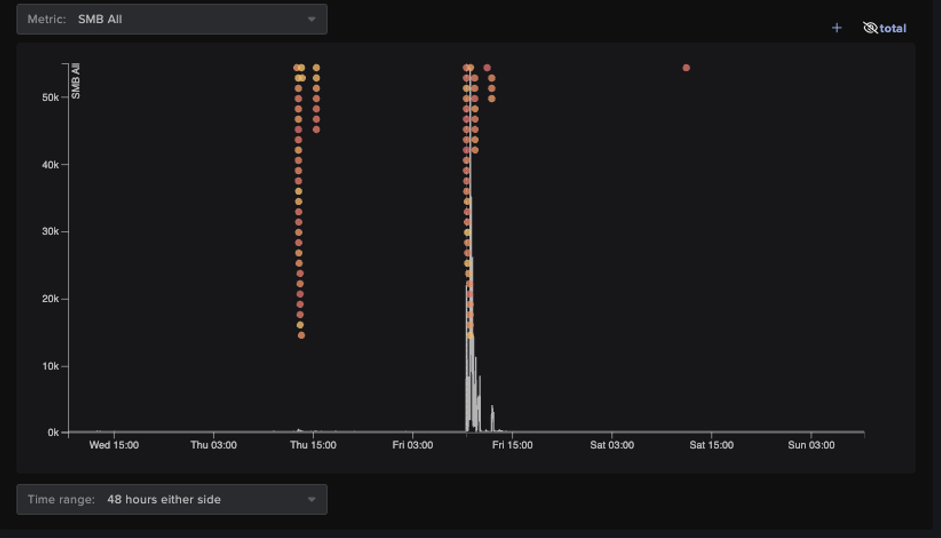
The attack culminated in ransomware deployment, marking the transition from suspicious network activity to a business-impacting incident. Using SMB-based propagation, the threat actor encrypted thousands of files across the network, affecting multiple systems and disrupting normal operations. Throughout the encryption event, the legacy SMBv1 protocol was used extensively across multiple internal systems, resulting in a significant increase in newly encrypted files.
Figure 7: Darktrace’s detection of abnormal spikes in SMB activity and associated model alerts, indicative of ransomware encryption and propagation.
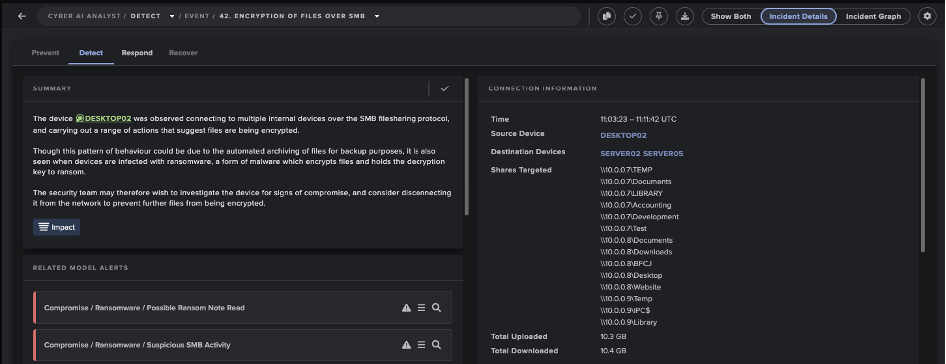
Darktrace’s Cyber AI Analyst automatically investigated and correlated the encryption activity and related events into a single incident narrative, providing the customer with real-time visibility into the attack while significantly reducing investigation time.
Figure 8: Darktrace’s Cyber AI Analyst’s investigation into the encryption activity. AI Analyst incident detailing example encryption activity in real time. Related events are automatically correlated and summarized into a clear narrative, reducing investigation time.
Defender action recommendations
What Could Have Stopped the Attack Earlier?
Although the attack ultimately resulted in ransomware deployment, there were multiple opportunities to detect, contain, and disrupt the intrusion before encryption occurred. The following actions could have significantly reduced the overall impact:
Detect and investigate indicators of reconnaissance and lateral movement
Unusual scanning
Active Directory replication anomalies consistent with DCSync activity
Anomalous use of native tools and processes indicative of LOTL attacks
Unusual use of common reconnaissance tools such as Nmap and NetScan
Contain compromised credentials and affected devices
Disable and reset compromised VPN credentials
Isolate devices performing anomalous scanning and lateral movement activity
Block suspicious external communications and data exfiltration
Use anomaly-based detection to detect and block repeated outbound connections to rare external infrastructure
Prevent data exfiltration to unauthorized cloud storage services such as Wasabi
Conclusion
The incident highlights the importance of anomaly-based detection, particularly against attacks that primarily use native or legitimate tools to evade traditional security measures. Darktrace identified suspicious activity from the first day of the compromise, providing multiple opportunities to disrupt the intrusion before it progressed to lateral movement and data exfiltration.
In this instance, detection was not the limiting factor; response time was. Prompt investigation and containment of devices exhibiting anomalous behavior could have prevented lateral movement, data exfiltration, and ultimately ransomware deployment.
As adversaries increasingly prioritize stealth over custom malware, relying instead on legitimate tools, valid credentials, and trusted infrastructure, traditional signature-based detection becomes less effective. Identifying subtle behavioral deviations early remains critical to disrupting attacks before they escalate into full-scale ransomware incidents.
Credit to Alexandra Evzona (Cyber Analyst), Priya Thapa (Senior Cyber Analyst) Edited by Ryan Traill (Content Manager)
Darktrace / EMAIL Expands Behavioral Defense Across Email and Collaboration Workflows
Email and collaboration tools do more than carry messages. They are where organizations approve payments, share sensitive data, reset credentials, and make thousands of everyday decisions. Increasingly, they are interfaces through which humans direct AI agents in their daily activity. Email, Slack and Teams are high volume, rich with sensitive data, and an easy place to hide malicious activity.
The opportunity isn’t lost on bad actors. Darktrace / EMAIL detected more than 32 million high-confidence phishing emails globally in 2025, and 70% of those messages passed DMARC authentication. Phishing is increasingly difficult to detect and familiar trust signals alone are not enough. People and security teams need to understand how a message fits the normal behavior of the sender, recipient, and organization. They also need to correlate activity across platforms to spot threats that span multiple channels.
To effectively secure against today’s evolved threats, security teams need to act at two levels: they need to help each employee make a safer decision ‘in the moment’, and they need to understand the wider patterns that may expose the business to risk.
Darktrace is introducing four new capabilities in Darktrace / EMAIL to address both challenges. The new features explain suspicious content more clearly to end users, strengthen the capabilities of Darktrace / Adaptive Human Defense with richer guidance, let organizations define their own patterns for detecting sensitive data in messages, and give security teams a process-level view of risk across email and collaboration workflows.
Darktrace / EMAIL Inbox Analysis highlights risky content within your emails
A warning is more useful when it explains what the user should look at. To help do that, we’ve expanded Darktrace / EMAIL’s Inbox Analysis Add-In to highlight potentially dangerous content within the body of emails that Darktrace / EMAIL flags as potentially suspicious or high risk.
The add-in can highlight language designed to create urgency, financial references, requests for payment, suspicious links, and content that is unusual for the sender. Each highlighted element includes a pop up that explains why it may be suspicious. Instead of asking an employee to accept a verdict without context, the analysis helps them examine the message and make a more informed decision.
Enhanced Just-In-Time Training Banners in Darktrace / Adaptive Human Defense
Enhanced Just-In-Time Training Banners build on the same principle. The banners now include a contextual header, actionable advice, and specific detection context. This gives employees more useful guidance at the point of risk without adding unnecessary information or cognitive load.
Together, the capabilities help turn a warning into a short learning moment. Employees can see what looks unusual, understand what action to take, and build their judgment.
Custom Sensitive Data Detection in Darktrace / EMAIL - Data Loss Prevention
Sensitive data is different for every business. Standard categories such as payment card details or government identifiers matter, but organizations also have their own customer codes, project names, research formats, account structures, and internal identifiers.
Custom Sensitive Data Detection in Darktrace / EMAIL - Data Loss Prevention allows administrators to write custom expressions for the data their organization needs to protect. Matched content can trigger existing model actions and data loss prevention (DLP) workflows, extending Darktrace's DLP capabilities.
This extends data loss detection beyond a fixed library of common data types. Security teams can apply controls to information that is sensitive in the context of their own organization and adapt those controls as the business changes.
Introducing Email and Collaboration Workflow Risk Posture Dashboards
Some of the most important risks are not isolated events. They are repeated ways of working that create an opening for error, misuse, or attack. For example, a payment request may be one suspicious message, but a recurring approval workflow that relies on weak verification is a business process risk.
The new Email and Collaboration Workflow Risk Posture Dashboard analyzes email and collaboration data across Email, Microsoft Teams, Slack and Zoom to provide a process-level view of risk in the organization. These may include financial authorization workflows, sensitive data sharing patterns, and activity that could expose credentials.
The dashboard brings these patterns into a view and provides actionable recommendations. This helps security teams determine where to investigate or strengthen controls, where ownership needs to be clarified, and where the business may need to change a risky process. It gives CISOs a clearer view of how human and communication risk is embedded in everyday operations, not only where individual alerts occur.
Behavior connects the individual decision to the wider risk
These capabilities build on Darktrace’s unique behavioral approach to security. We use Adaptive AI to learn how people and AI normally behave within an organization, creating the context needed to recognize when activity changes.
Within the Darktrace Behavioral Defense Platform, Darktrace / EMAIL helps protect people against phishing, account takeover, data exfiltration, and human risk across email and collaboration tools. The new capabilities extend that protection in both directions. They give employees clearer context for the decision in front of them, while giving security leaders a broader view of the workflows and behavior that create risk across the organization.
The result is not simply more alerts. It is a better understanding of why something is risky, what action to take, and where the organization can reduce risk before a familiar process becomes an easy route for an attacker.


.jpg)