


We are delighted to announce the general availability of Microsoft Azure support for Darktrace / CLOUD, enabling real-time cloud detection and response across dynamic multi-cloud environments. Built on Self-Learning AI, Darktrace / CLOUD leverages Microsoft’s new virtual network flow logs (VNet flow) to offer an agentless-first approach that dramatically simplifies detection and response within Azure, unifying cloud-native security with Darktrace’s innovative ActiveAI Security Platform.
As organizations increasingly adopt multi-cloud architectures, the need for advanced, real-time threat detection and response is critical to keep pace with evolving cloud threats. Security teams face significant challenges, including increased complexity, limited visibility, and siloed tools. The dynamic nature of multi-cloud environments introduces ever-changing blind spots, while traditional security tools struggle to provide real-time insights, often offering static snapshots of risk. Additionally, cloud security teams frequently operate in isolation from SOC teams, leading to fragmented visibility and delayed responses. This lack of coordination, especially in hybrid environments, hinders effective threat detection and response. Compounding these challenges, current security solutions are split between agent-based and agentless approaches, with agentless solutions often lacking real-time awareness and agent-based options adding complexity and scalability concerns. Darktrace / CLOUD helps to solve these challenges with real-time detection and response designed specifically for dynamic cloud environments like Azure and AWS.
Pioneering AI-led real-time cloud detection & response
Darktrace has been at the forefront of real-time detection and response for over a decade, continually pushing the boundaries of AI-driven cybersecurity. Our Self-Learning AI uniquely positions Darktrace with the ability to automatically understand and instantly adapt to changing cloud environments. This is critical in today’s landscape, where cloud infrastructures are highly dynamic and ever-changing.
Built on years of market-leading network visibility, Darktrace / CLOUD understands ‘normal’ for your unique business across clouds and networks to instantly reveal known, unknown, and novel cloud threats with confidence. Darktrace Self-Learning AI continuously monitors activity across cloud assets, containers, and users, and correlates it with detailed identity and network context to rapidly detect malicious activity. Platform-native identity and network monitoring capabilities allow Darktrace / CLOUD to deeply understand normal patterns of life for every user and device, enabling instant, precise and proportionate response to abnormal behavior - without business disruption.
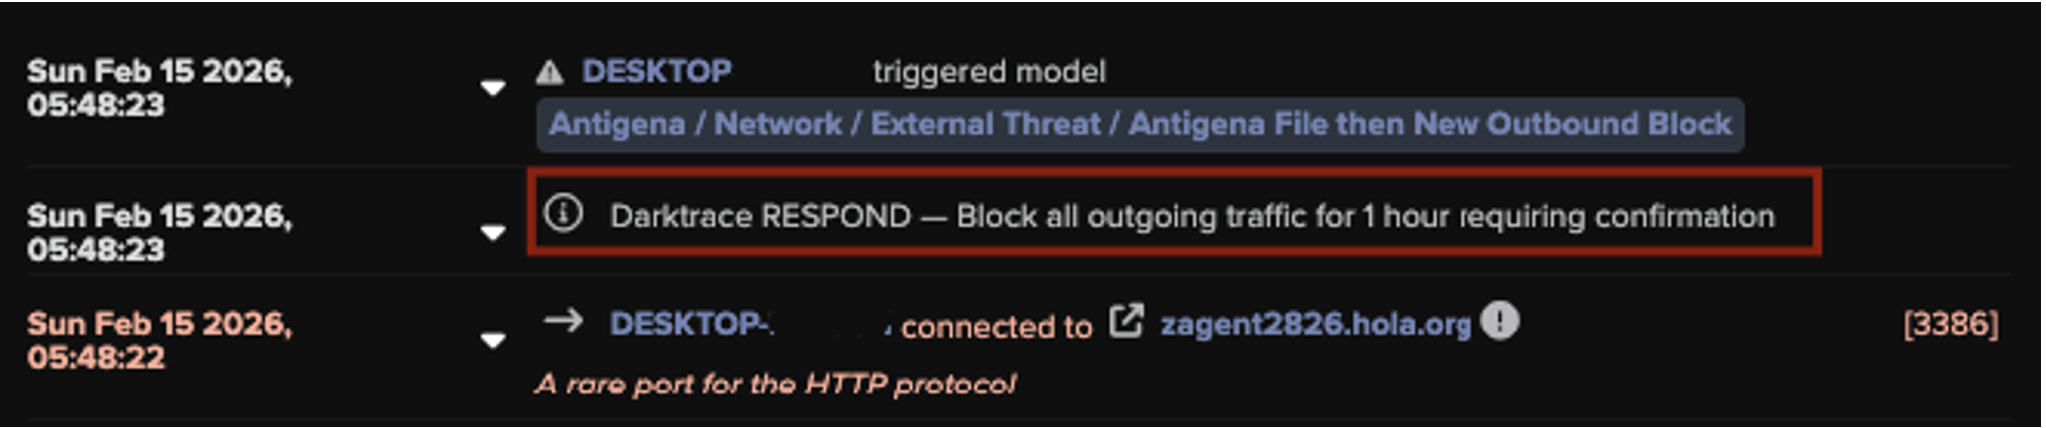
Leveraging platform-native Autonomous Response, AI-driven behavioral containment neutralizes malicious activity with surgical accuracy while preventing disruption to cloud infrastructure or services. As malicious behavior escalates, Darktrace correlates thousands of data points to identify and instantly respond to unusual activity by blocking specific connections and enforcing normal behavior.

Unparalleled agentless visibility into Azure
As a long-term trusted partner of Microsoft, Darktrace leverages Azure VNet flow logs to provide agentless, high-fidelity visibility into cloud environments, ensuring comprehensive monitoring without disrupting workflows. By integrating seamlessly with Azure, Darktrace / CLOUD continues to push the envelope of innovation in cloud security. Our Self-learning AI not only improves the detection of traditional and novel threats, but also enhances real-time response capabilities and demonstrates our commitment to delivering cutting-edge, AI-powered multi-cloud security solutions.
- Integration with Microsoft Virtual network flow logs for enhanced visibility
Darktrace / CLOUD integrates seamlessly with Azure to provide agentless, high-fidelity visibility into cloud environments. VNet flow logs capture critical network traffic data, allowing Darktrace to monitor Azure workloads in real time without disrupting existing workflows. This integration significantly reduces deployment time by 95%1 and cloud security operational costs by up to 80%2 compared to traditional agent-based solutions. Organizations benefit from enhanced visibility across dynamic cloud infrastructures, scaling security measures effortlessly while minimizing blind spots, particularly in ephemeral resources or serverless functions.
- High-fidelity agentless deployment
Agentless deployment allows security teams to monitor and secure cloud environments without installing software agents on individual workloads. By using cloud-native APIs like AWS VPC flow logs or Azure VNet flow logs, security teams can quickly deploy and scale security measures across dynamic, multi-cloud environments without the complexity and performance overhead of agents. This approach delivers real-time insights, improving incident detection and response while reducing disruptions. For organizations, agentless visibility simplifies cloud security management, lowers operational costs, and minimizes blind spots, especially in ephemeral resources or serverless functions.
- Real-time visibility into cloud assets and architectures
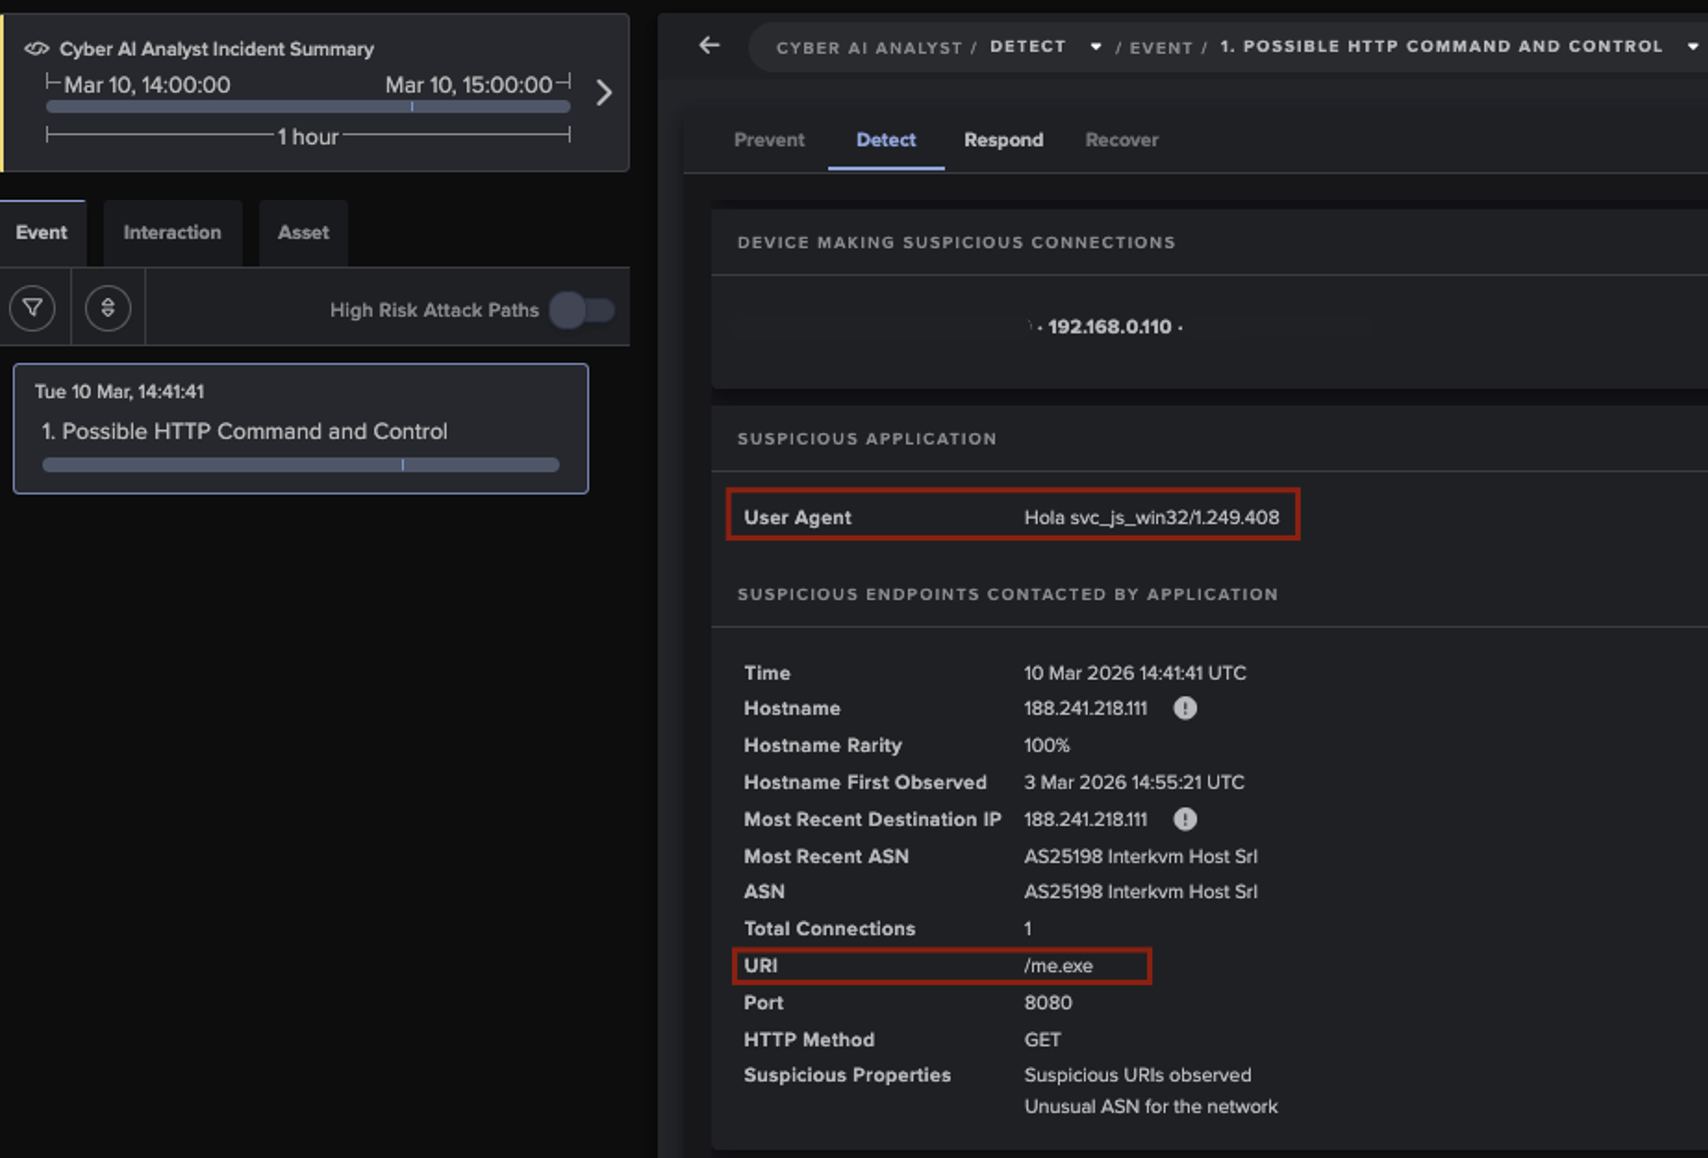
With real-time Cloud Asset Enumeration and Dynamic Architecture Modeling, Darktrace / CLOUD generates up-to-date architecture diagrams, giving SecOps and DevOps teams a unified view of cloud infrastructures. This shared context enhances collaboration and accelerates threat detection and response, especially in complex environments like Kubernetes. Additionally, Cyber AI Analyst automates the investigation process, correlating data across networks, identities, and cloud assets to save security teams valuable time, ensuring continuous protection and efficient cloud migrations.

Unified multi-cloud security at scale
As organizations increasingly adopt multi-cloud strategies, the complexity of managing security across different cloud providers introduces gaps in visibility. Darktrace / CLOUD simplifies this by offering agentless, real-time monitoring across multi-cloud environments. Building on our innovative approach to securing AWS environments, our customers can now take full advantage of robust real-time detection and response capabilities for Azure. Darktrace is one of the first vendors to leverage Microsoft’s virtual network flow logs to provide agentless deployment in Azure, enabling unparalleled visibility without the need for installing agents. In addition, Darktrace / CLOUD offers automated Cloud Security Posture Management (CSPM) that continuously assesses cloud configurations against industry standards. Security teams can identify and prioritize misconfigurations, vulnerabilities, and policy violations in real-time. These capabilities give security teams a complete, live understanding of their cloud environments and help them focus their limited time and resources where they are needed most.
This approach offers seamless integration into existing workflows, reducing configuration efforts and enabling fast, flexible deployment across cloud environments. By extending its capabilities across multiple clouds, Darktrace / CLOUD ensures that no blind spots are left uncovered, providing holistic, multi-cloud security that scales effortlessly with your cloud infrastructure. diagrams, visualizes cloud assets, and prioritizes risks across cloud environments.

The future of cloud security: Real-time defense in an unpredictable world
Darktrace / CLOUD’s support for Microsoft Azure, powered by Self-Learning AI and agentless deployment, sets a new standard in multi-cloud security. With real-time detection and autonomous response, organizations can confidently secure their Azure environments, leveraging innovation to stay ahead of the constantly evolving threat landscape. By combining Azure VNet flow logs with Darktrace’s AI-driven platform, we can provide customers with a unified, intelligent solution that transforms how security is managed across the cloud.
Unlock advanced cloud protection

Download the Darktrace / CLOUD solution brief to discover how autonomous, AI-driven defense can secure your environment in real-time.
Learn More:
References
1. Based on internal research and customer data
2. Based on internal research


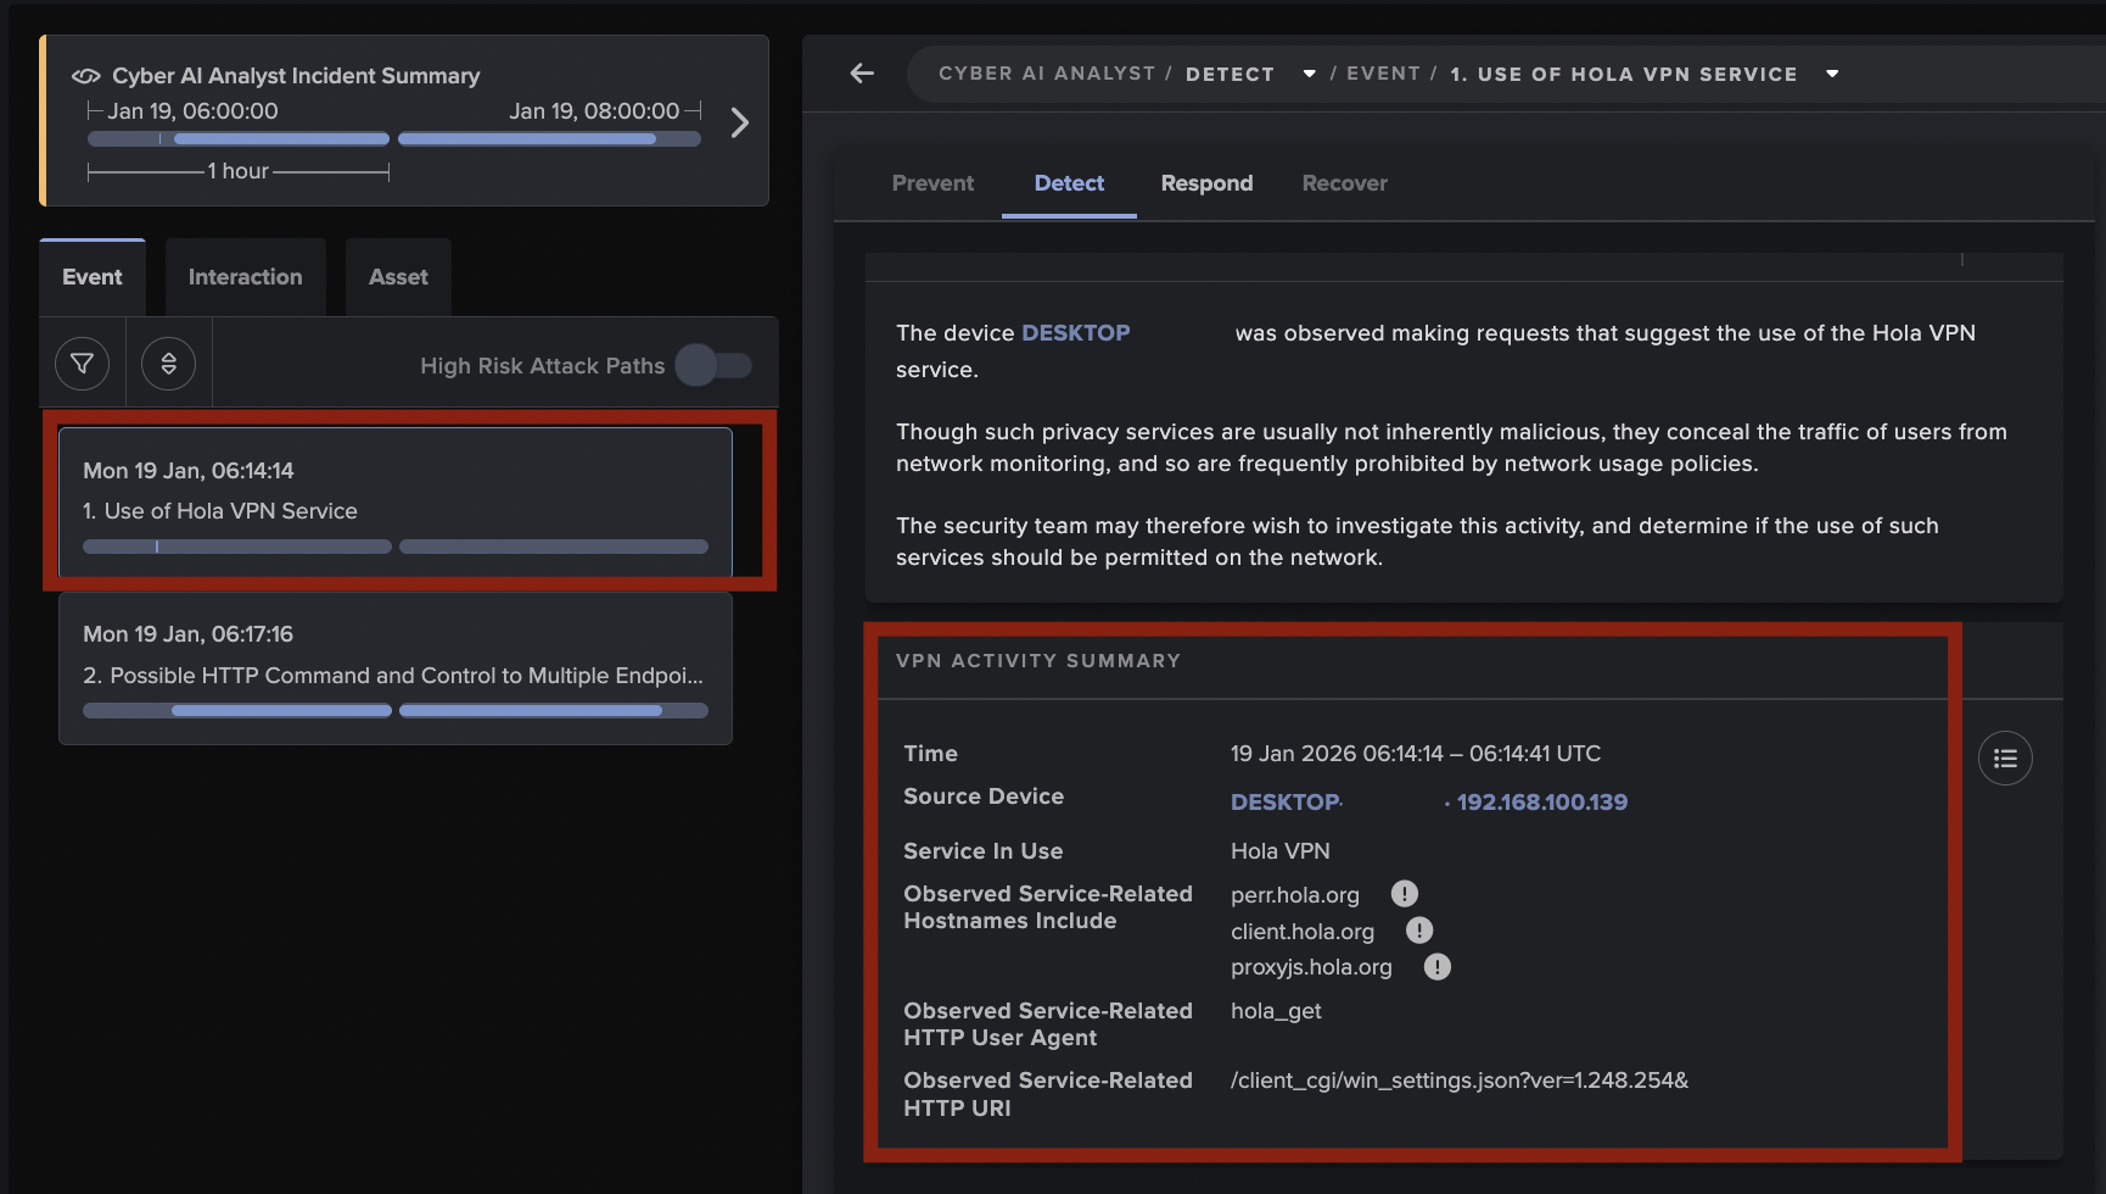
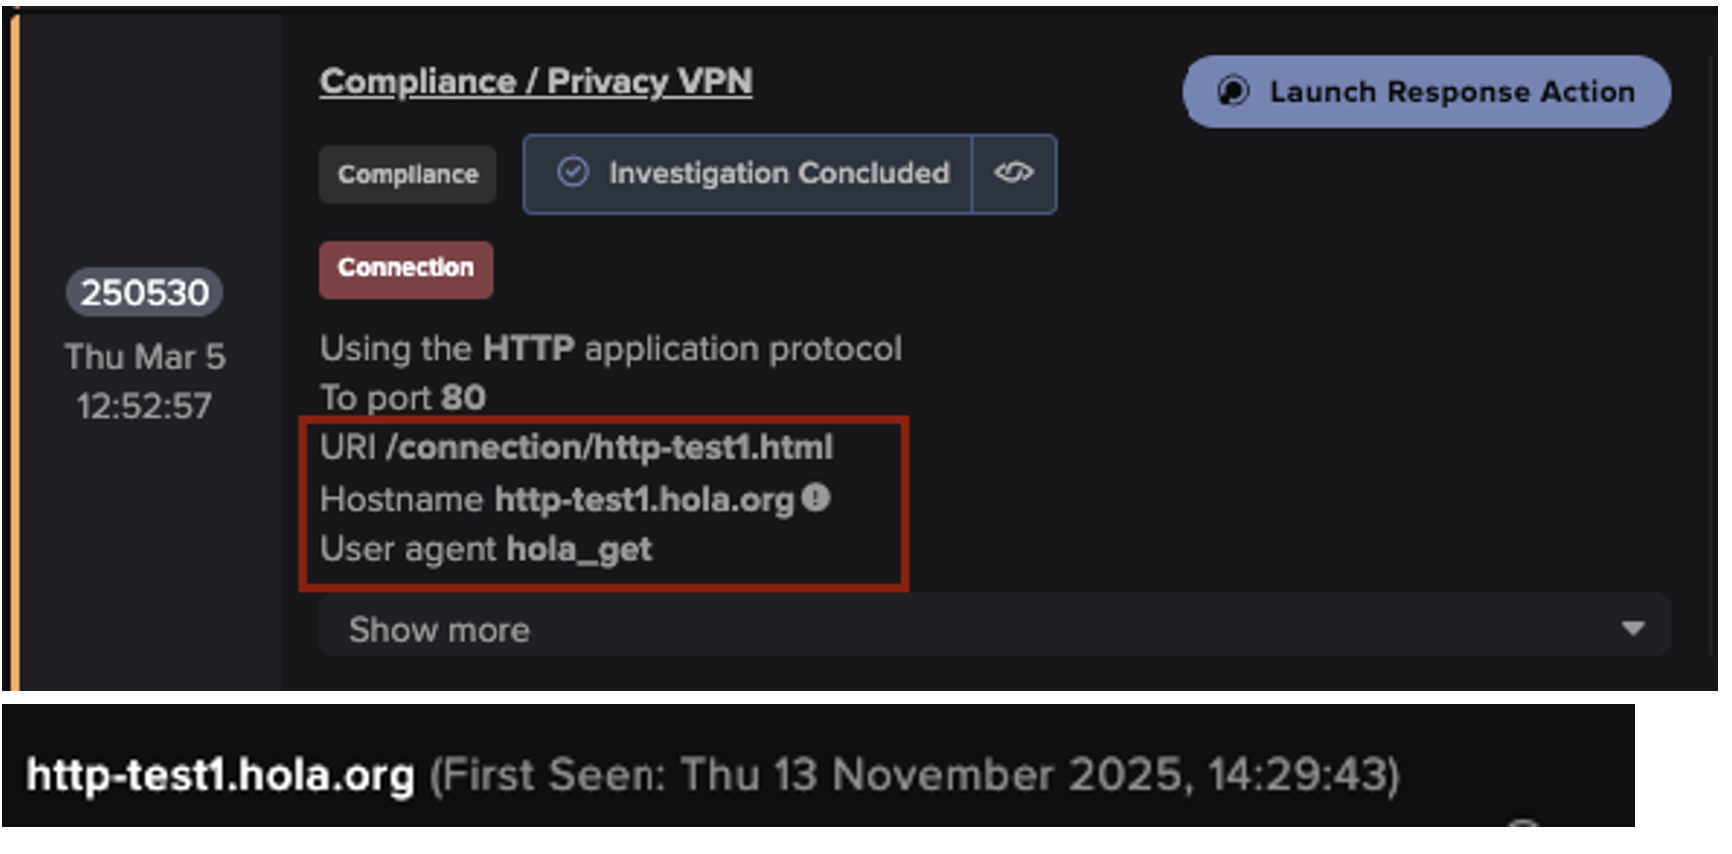
![Variation in URLs over time within the same hola[.]org domain, indicating the use of dynamically changing endpoints.](https://cdn.prod.website-files.com/626ff4d25aca2edf4325ff97/6a304bdeff111215c0436931_Screenshot%202026-06-15%20at%2012.00.43%E2%80%AFPM.png)
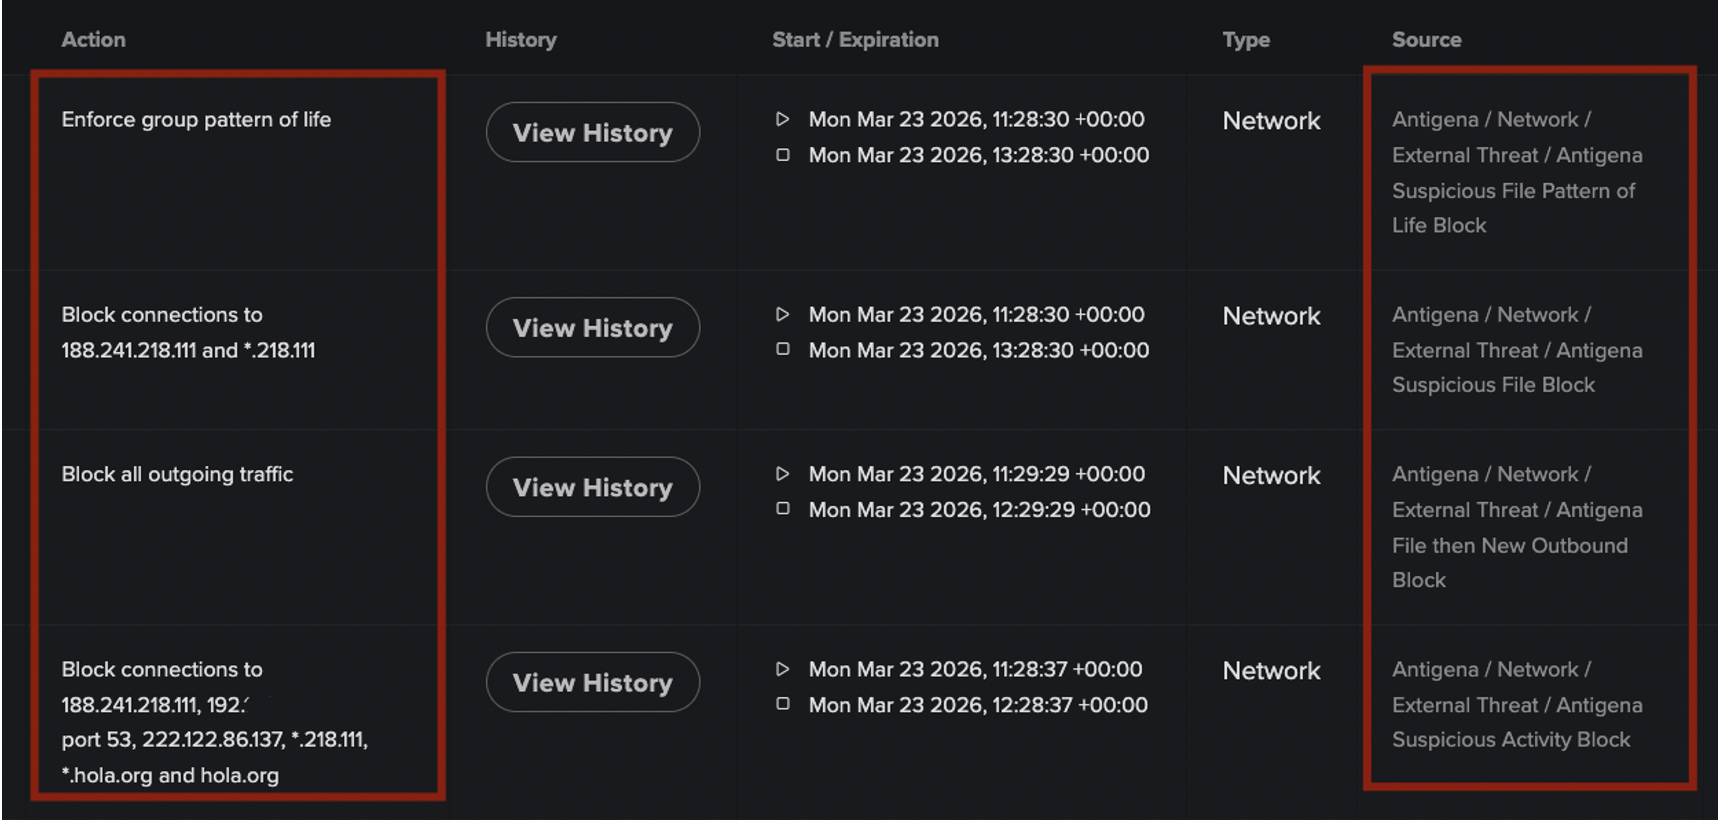
![File transfer event showing the download of an executable from the rare external endpoint 188.241.219[.]55.](https://cdn.prod.website-files.com/626ff4d25aca2edf4325ff97/6a304c2468d20aeff16a2721_Screenshot%202026-06-15%20at%2012.01.53%E2%80%AFPM.png)